2023.03.20
OpenAI API(ChatGPT)+Kotlinで作るIntelliJ IDEAプラグイン入門編
次世代システム研究室のT.Sです。私は高校時代にプログラミングに出会ったのですが、その時に「PCという箱の中であればなんでもできる呪文がある!!」と感動し、それ以降どっぷりその世界に浸かってきました。そんな中、昨今出てきたDiffusion ModelだったりGPT3.X/4.0はその呪文が高度に進化したものだなあと感動しています。当時はメラだった呪文が、メラガイアーやメドローアまで進化したと…
もともとそういった”魔法”に感銘を受けてこの業界に身を投じた者としては、この究極魔法であるChatGPTを活用する方法について乗ってみたいと思い、入門編ではありますが今回のBlogを書きました。世界中の魔法使いのどなたかの役に立てば幸いです。
ただし今回はあくまで動作を把握する入門編であり、UI/UXや運用など一切考慮していない動作を確認するだけのコードですのでそこはご容赦ください
実現したいこと
さて題名に[ChatGPT+Kotlinで作るIntelliJ IDEAプラグイン入門編]とあるように、ChatGPTをKotlinで取り扱ってみようという内容になります。で、どんなものを取り上げようかなと思ったのですが、今回は
「PullRequest時にもらったFBコメントを踏襲したリファクタリングアドバイスをするプラグイン」を軽く作ってみたいと思います。
通常開発する際にはlintなどの静的解析ツールを使ってコードチェックなどを行うことが多いかと思います。あとはIDEAのAuto Formatterなどで外形を整えたりと。私もAndroidアプリを開発することが多いのですが、上記のような解析ツールでBasicな部分は修正・分析しています。
しかし開発をしていく中でこれらの解析ツールではなかなか抑えられないことも出てきます。簡単な例だと以下のように条件分岐があるパターンとかでしょうか. argument-list-wrappingのように改行/インデントして…というのはありますが、このようなプロジェクト特有の可読性ルールがlintでは抑えきれないものも出でくることも多いのかなと思います。
こういった従来のツールではなかなか捕まえられない項目をChatGPTで指摘してくれないかな… というのが今回のモチベーションになります
ゴールイメージとしては該当コードをIntelliJ IDEAで選択して、メニューを選択するとリファクタリングアドバイスが返ってくるというプラグインを開発することになります。↓のようなイメージですね
プロジェクト作成: Kotlin OpenAI SDK
さてモチベーションについて述べたので、ここから具体的な実装に入りましょう。OpenAI APIにはソースコードに適したCodexというAPIもあるのですが、汎用的なChatにも使えるよう今回はChat completionというAPIを使います。API自体は単なるREST APIなのでKotlinであればretrofitなどを使えば簡単に利用することができます。ただ今回はもっと簡単に扱うことができるようKotlin用のOpenAI SDKを使ったコードを解説しましょう。
OpenAIの公式サイトにはCommunity Librarlyが紹介されているのですが、ここに記載されているopenai-kotlinを使ってみようと思います。
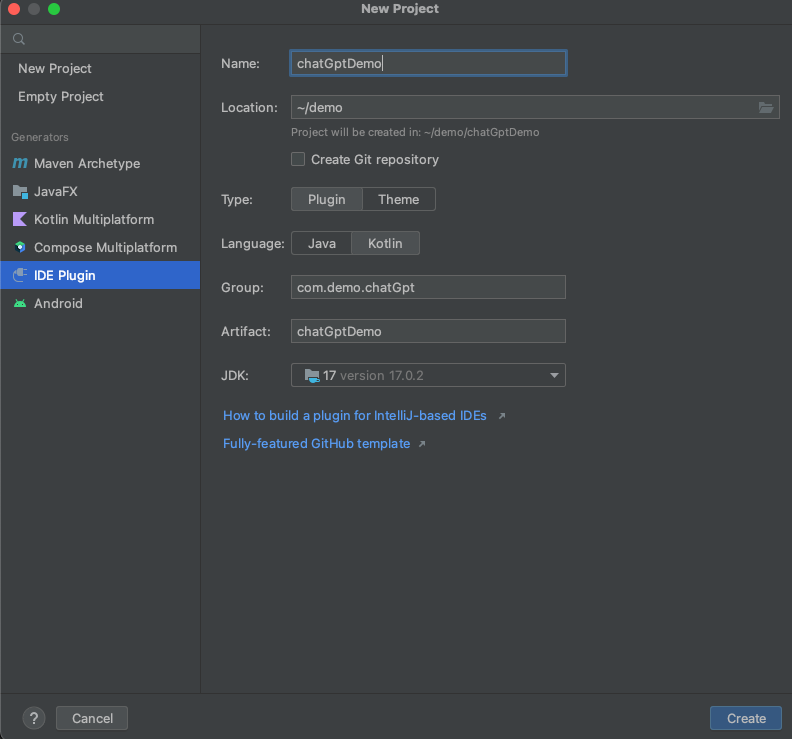
SDKを使う前に、IntelliJ IDEA上でプラグイン開発用のプロジェクトを作ってみましょう。起動後の画面から[New Project]を選択し、Generatorsとして[IDE Plugin]を選択->必須項目を入力してCreateボタンを押下します。
これでProjectを作成できたのでopenai-kotlinの使えるようにしましょう。build.gradle.ktsのdependenciesに該当ライブラリを追加すればいいのですが、なぜかbomを使うと依存関係がresolveできないという状況に悩まされました。。。というわけで一先ず個別にdependenciesを設定しております。皆様の環境でbomが使えれば、それが最適ですのでそちらをお使いください
// build.gradle.kts
dependencies {
    implementation("com.aallam.openai:openai-client:3.1.1")
    implementation("io.ktor:ktor-client-okhttp:2.1.3")
    // implementation("com.aallam.openai:openai-client-bom:3.1.1")
}
あとはopenai-kotlinの環境を踏まえ、念の為KotlinとgradleのVersionも上げております。
// build.gradle.kts
plugins {
    ...
    id("org.jetbrains.kotlin.jvm") version "1.8.10"
    ...
}
# gradle/wrapper/gradle-wrapper.properties
...
distributionUrl=https\://services.gradle.org/distributions/gradle-7.6.1-bin.zip
...
OpenAI APIの利用
これで環境はできましたので、次はChat Completion APIを呼んでみましょう。openai-kotlinのサンプルを見るとChat Completionのサンプルコードとしては以下のように記載されています. chatCompletionはsuspend関数でAPIのCallを取得し終わった後に表示するものですが、chatCompletionsはFlow返してくれておりStream的に処理することができます。今回は画面描画まで考えませんがFlowが帰ってくるというのであればStateFlowに変換してAndroidアプリで簡単に扱えそうですし、非常に良いですね。
今回はあまりFlow周りの処理も解説すると主題が薄れるので、単純にsuspend関数のchatCompletionを使っていこうかと思います。
println("\n> Create chat completions...")
val chatCompletionRequest = ChatCompletionRequest(
    model = ModelId("gpt-3.5-turbo"),
    messages = listOf(
        ChatMessage(
            role = ChatRole.System,
            content = "You are a helpful assistant that translates English to French."
        ),
        ChatMessage(
            role = ChatRole.User,
            content = "Translate the following English text to French: “OpenAI is awesome!”"
        )
    )
)
openAI.chatCompletion(chatCompletionRequest).choices.forEach(::println)

println("\n>️ Creating chat completions stream...")
openAI.chatCompletions(chatCompletionRequest)
    .onEach { print(it.choices.first().delta?.content.orEmpty()) }
    .onCompletion { println() }
    .launchIn(this)
    .join()
(https://github.com/aallam/openai-kotlin/blob/main/sample/native/src/nativeMain/kotlin/main.kt より抜粋)
さて、上のコードを見るとChatCompletionにはChatMeesageというクラスを与えていることがわかります。この引数についてみるとroleというあまり見慣れないものがありますね。
ChatMessage(
    // roleという見慣れない項目....
    role = ChatRole.System,
    // Input or Outputされたメッセージ
    content = "You are a helpful assistant that translates English to French."
),
こちらの役割については Chat Completionsのマニュアル欄に記載しております
The system message helps set the behavior of the assistant. In the example above, the assistant was instructed with "You are a helpful assistant."
The user messages help instruct the assistant. They can be generated by the end users of an application, or set by a developer as an instruction.
The assistant messages help store prior responses. They can also be written by a developer to help give examples of desired behavior.
( https://platform.openai.com/docs/guides/chat/introduction より抜粋)
こちらを踏まえ私は以下のように解釈して利用しています。
- system
- このChatの役割などの前提条件を記載
- また事前に学習してほしいデータもここに記載する
- user
- userの質問内容
- assistant
- chatが返してきた内容
- 連続した会話をする場合はuser/assistantに過去の質問を含める
これを踏まえると今回はChatの役割と、プロジェクト特有のコーディングルールをsystemに投入した上で、userで質問を投げかけるという流れになりそうですね
ではまずChatの役割を与えてみましょう。jsonで記載するとこんな感じになります.
[
  {"role": "system", "content": "This is a chat that tells you where to refactor when developing Andorid with Kotlin."},
  {"role": "system", "content": "The advice will be given in consideration of the feedback comments to date. The comments are as follows."}
]
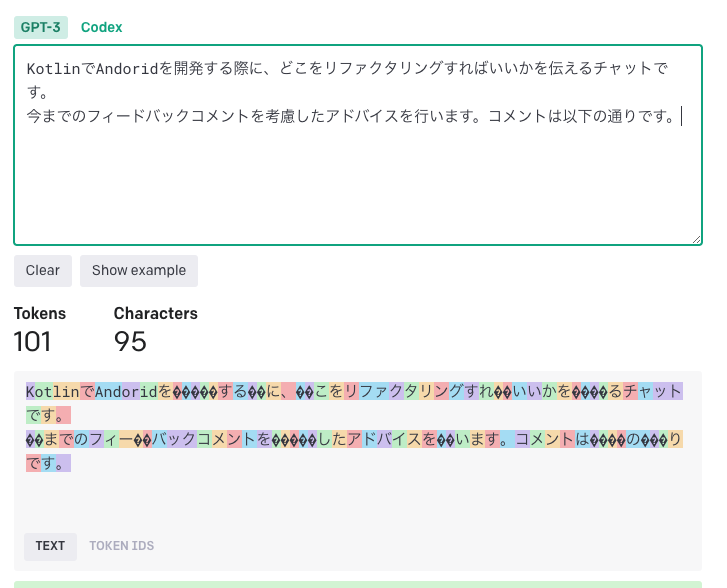
内容としてAndorid・Kotlin前提であることやリファクタリングのアドバイスをしてほしいこと、またこの後にコーディングルールが続くことが記載されています。ちなみにcontentを英語で記載していますが、これはChatGPTが英語のほうが精度が高いという理由の他に、Tokenを削減するという2つの理由でそうしています。特に今回のやり方だとTokenサイズの上限がかなりシビアになるため少しでも削減したく英語にしていいます。ちなみにTokenサイズはこちらで実際にしらべることができます。実際に計算してみると明らかに英語のほうが短くなっていることがわかるかと思います
(英語の場合)

(日本語の場合)
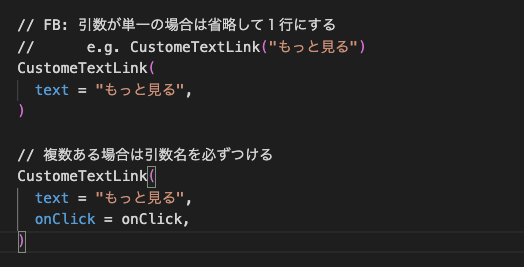
さて次にプロジェクト特有のコーディングルールを与えましょう。こういった例を与える場合はフォーマットを揃えるのが大事というお話があるため、今回は以下のフォーマットに揃えようかと思います
the code before refactor: [修正前コード]

refactor commant: [修正コメント]

the code after refactor: [修正後コード]
[
  ...
  {"role": "system", "content": "the code before refactor: CustomLinkText(text = \"more\")
                                 refactor commant: I want to omit it if it is a single argument and can be omitted
                                 the code after refactor: CustomLinkText(\"more\")"
  }
]
さてこれで投入するJSONのイメージはできました。ただ今回はSDKを利用するので生JSONをそのまま使うのではなくてSDKを利用します。というわけでこれらの情報を格納できるdata classを作ります
data class ChatGptMarkupLanguage(
    val role: ChatRole,
    val message: String,
    val codeBeforeRefactor: String? = null,
    val codeAfterRefactor: String? = null,
)
ここで与えたmessageを与えたいフォーマットに整形します. codeBefore/Afterのときだけ整形したいので、こんな感じのfunを追加します
data class ChatGptMarkupLanguage(
...
) {
    private fun getFormatMessageContent(): String {
        val codeBeforeRefactorHeader = "the code before refactor: %s \n"
        val commentHeader = "refactor comment: %s \n"
        val codeAfterRefactorHeader = "the code after refactor: %s \n"

        val commentMessage = if(codeBeforeRefactor == null && codeAfterRefactor == null){
            message
        } else {
            commentHeader.format(message)
        }

        val codeBeforeRefactorMessage = codeBeforeRefactor
            ?.let {
                codeBeforeRefactorHeader.format(it)
            } ?: ""

        val codeAfterRefactorMessage = codeAfterRefactor
            ?.let {
                codeAfterRefactorHeader.format(it)
            } ?: ""

        return codeBeforeRefactorMessage +
                commentMessage +
                codeAfterRefactorMessage
    }
}
これでformatした与えたい文字列は得れるので、これをSDKが扱えるChatMeesage型に変えるfunを用意しましょう.OptInが加わっていることに注意してください
@OptIn(BetaOpenAI::class)
data class ChatGptMarkupLanguage(
    ...
) {
    fun toChatMessage(): ChatMessage =
        ChatMessage(
            role = this.role,
            content = getFormatMessageContent(),
        )
}
さあこれで機能は揃ったので、最後に与えるメッセージを定数として持ってみましょう。本来であればresourceにxmlなど用意したり、外部から設定するようにするべきですが今回の範囲外ということで簡単に定数として持つことにします。全体としては以下のようになります.追加でデータを加えたい場合は適宜加えてみてください。
@OptIn(BetaOpenAI::class)
data class ChatGptMarkupLanguage(
    val role: ChatRole,
    val message: String,
    val codeBeforeRefactor: String? = null,
    val codeAfterRefactor: String? = null,
) {
    fun toChatMessage(): ChatMessage =
        ChatMessage(
            role = this.role,
            content = getFormatMessageContent(),
        )

    private fun getFormatMessageContent(): String {
        val codeBeforeRefactorHeader = "the code before refactor: %s \n"
        val commentHeader = "refactor comment: %s \n"
        val codeAfterRefactorHeader = "the code after refactor: %s \n"

        val commentMessage = if(codeBeforeRefactor == null && codeAfterRefactor == null){
            message
        } else {
            commentHeader.format(message)
        }

        val codeBeforeRefactorMessage = codeBeforeRefactor
            ?.let {
                codeBeforeRefactorHeader.format(it)
            } ?: ""

        val codeAfterRefactorMessage = codeAfterRefactor
            ?.let {
                codeAfterRefactorHeader.format(it)
            } ?: ""

        return codeBeforeRefactorMessage +
                commentMessage +
                codeAfterRefactorMessage
    }

    companion object {
        val SETUP_CHAT_SYSTEM_MESSAGES = listOf(
            ChatGptMarkupLanguage(
                role = ChatRole.System,
                message = "This is a chat that tells you where to refactor when developing Andorid with Kotlin.",
            ),

            ChatGptMarkupLanguage(
                role = ChatRole.System,
                message = "The advice will be given in consideration of the feedback comments to date. The comments are as follows.",
            ),

            ChatGptMarkupLanguage(
                role = ChatRole.System,
                message = "I want to omit it if it is a single argument and can be omitted",
                codeBeforeRefactor = "CustomLinkText(text = \"more\")",
                codeAfterRefactor = "CustomLinkText(\"more\")",
            ),
        )
    }
}
Pluginとして組み込み
さあこれで実際にPostするdataを用意するところまでの準備が終わったので、あとはPluginとして動くようにしましょう!今回は単純にAPI Callして、結果を待ち、それをDialogに表示するだけの超簡易なものにします。そのためPluginのActionを処理するClassを作成します. com.intellij.openapi.actionSystem.AnActionクラスを継承するのをお忘れなく
@OptIn(BetaOpenAI::class)
class ChatGptAdviceAction : AnAction() {
  ...
}
さてここでOpenAI APIにコールする関数を作成しましょう。内容としては先述したsampleとdata classを見ていただけると想像がつくかと思います
@OptIn(BetaOpenAI::class)
class ChatGptAdviceAction : AnAction() {
    // messageはrefactorしてほしいソースコードが入る
    private suspend fun requestChat(message: String): ChatCompletion {
        val openAI = OpenAI(apiKey) // apiKeyは別途用意してください

        // 先程作ったdata classを利用してrole.systemの送信内容を作成する
        val systemMessage = ChatGptMarkupLanguage
            .SETUP_CHAT_SYSTEM_MESSAGES
            .map { it.toChatMessage() }

     // 問い合わせのためにrole.userでrefactorを指示するMessageを作成する
        val refacotoringMessage = ChatGptMarkupLanguage(
            role = ChatRole.User,
            message = "Please refactor this code\n%s".format(message)
        ).toChatMessage()

        // GPT-3.5を利用して問い合わせ
        val chatCompletionRequest = ChatCompletionRequest(
            model = ModelId("gpt-3.5-turbo"),
            messages = systemMessage + refacotoringMessage,
        )

     // APIが返るまで待つため待ち時間あり
        // 本番ではFlowを利用して、逐次UIを更新するよう実装すべき
        return openAI.chatCompletion(chatCompletionRequest)
    }
}
これでAPIをCallして結果を取得することができるようになりました。あとはIntelliJ IDEAのプラグイン部分を実装します。プラグインの挙動はactionPerformed関数をオーバーライドして実装します
@OptIn(BetaOpenAI::class)
class ChatGptAdviceAction : AnAction() {
    ...
    override fun actionPerformed(e: AnActionEvent) {

    }
}
次にリファクタリングしたいソースコードを取得します。今回はエディタ上で選択したものが対象となるため、こんな感じで取得します
    override fun actionPerformed(e: AnActionEvent) {
        val editor = e.getRequiredData(PlatformDataKeys.EDITOR)
        val selectedText = editor.selectionModel.selectedText
    }
ここで選択した文字列が取得できればあとは先に作ったrequestChatを使って値を取得します。今回は横着をしてrunBlockingで取得していますが、UI/UX的にかなり良くないので、ここは前述したように皆が使うものを作る際はFlowで処理することを検討してくださいね
    override fun actionPerformed(e: AnActionEvent) {
        ...
        selectedText?.let {
            val text = runBlocking {
                requestChat(selectedText)
            }.choices
                .map { it.message?.content }
                .filterNotNull()
                .joinToString(",")
    }
最後は取得した値を簡易的にDialogに表示してしまいましょう。こちらも実際は別のUIを考慮ください
    override fun actionPerformed(e: AnActionEvent) {
        ...
        selectedText?.let {
         val result = Messages.showDialog(
                text,
                "chatGPT Advice",
                OPTIONS.values.toTypedArray(),
                0,
                null,
            )
    }
最後にソースコード全体を全掲します。ある程度簡単にアクセスするだけなら2つのClassファイルで済むので割と簡単に実現できることがわかっていただければ幸いです。
val OPTIONS = mapOf(
    0 to "OK",
)

@OptIn(BetaOpenAI::class)
class ChatGptAdviceAction : AnAction() {

    private suspend fun requestChat(message: String): ChatCompletion {
        val openAI = OpenAI(apiKey)
        val systemMessage = ChatGptMarkupLanguage
            .SETUP_CHAT_SYSTEM_MESSAGES
            .map { it.toChatMessage() }

        val refacotoringMessage =
            ChatGptMarkupLanguage(
                role = ChatRole.User,
                message = "Please refactor this code\n%s".format(message)
            ).toChatMessage()

       val chatCompletionRequest =
            ChatCompletionRequest(
                model = ModelId("gpt-3.5-turbo"),
                messages = systemMessage + refacotoringMessage,
            )

        return openAI.chatCompletion(chatCompletionRequest)
    }

    override fun actionPerformed(e: AnActionEvent) {
        val editor = e.getRequiredData(PlatformDataKeys.EDITOR)
        val selectedText = editor.selectionModel.selectedText

        selectedText?.let {
            val text = runBlocking {
                requestChat(selectedText)
            }.choices
                .map { it.message?.content }
                .filterNotNull()
                .joinToString(",")

         val result = Messages.showDialog(
                text,
                "chatGPT Advice",
                OPTIONS.values.toTypedArray(),
                0,
                null,
            )

            // clipboardへのコピー
            CopyPasteManager.getInstance().setContents(StringSelection(text))
        }
    }
}
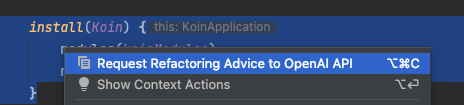
あとはこのClassをplugin.xmlに登録すれば完了です!
<!-- src/resources/META-INF/plugin.xml -->
<idea-plugin>
    <actions>
        <action id="xxxxx.ChatGptAdviceAction"
                class="xxxx.ChatGptAdviceAction"
                text="Request Refactoring Advice to OpenAI API"
                description="Request Refactoring Advice to OpenAI API"
                icon="AllIcons.Actions.Copy"
        >
結果
最後に実際に独自のルールを考慮したアドバイスをしてくれるか見てみましょう。以下のコードを投入してみたいとおもいます
    Column(
        modifier = Modifier.fillMaxWidth(),
        verticalArrangement = Arrangement.spacedBy(8.dp),
    ){
        CustomTextFieled(text = "題名")
    }
結果は以下になります。ちゃんとできていますね!(しかもCustomTextFieledのTypoも同時に直してくれていますね)
Here's one possible refactor:

    Column(
        modifier = Modifier.fillMaxWidth(),
        verticalArrangement = Arrangement.spacedBy(8.dp)
    ){
        CustomTextField("題名")
    }

Changes made:
  - Removed the `text` argument in `CustomTextField` since it's redundant
ただしこのCustomTextFiledを2つに増やすとと結果下記のようなコードが帰ってきてしまい、全く想定しないものになっています。。ここらへんは与える例の数や、もっと数大きなデータでFine Tuningするなどで回避できるか追加で試してみようかと思います
Column(
    modifier = Modifier.fillMaxWidth().spacedBy(8.dp)
) {
    CustomTextField(text = "題名")

    CustomTextField(
          text = "題名",
          onClick = onClick
    )
}
以上いかがでしたでしょうか?ChatGPTが与えるインパクトは非常に大きいだけにSDKの開発も非常に活発で簡単に組み込みできることがわかっていただけたかと思います。まずはエンジニアとして色々遊ぶきっかけになっていただければ幸いです
次世代システム研究室では、プログラミングが大好きなMLエンジニアも募集しています。興味を持って頂ける方がいらっしゃいましたら、ぜひ 募集職種一覧からご応募をお願いします。
一緒に勉強しながら楽しく働きたい方のご応募をお待ちしております。
グループ研究開発本部の最新情報をTwitterで配信中です。ぜひフォローください。
Follow @GMO_RD