2022.01.12
DeepWordMatchモデルを用いてテキストフィーチャのみでCTR予測
こんにちは。次世代システム研究室のA.Z.です。
前回のブログでは、広告とドキュメントのキーワードエンティティを利用して、シンプルなモデルでctrの予測を簡単に試しました。精度的にもの足りない結果でしたので、今回は更にモデルのアーキテクチャを研究し、ctr予測における、キーワード x 広告テキストのモデルを紹介したいと思います。
はじめ
前回のブログはメディア記事キーワードエンティティと広告のキーワードエンティティのみを利用し、ctrを予測を行いましたが、検証した結果、AUCのscoreは約0.56になります。実運用のモデルの精度から考えると、スコアーが低いですが、他のフィーチャと組み合わせ、またはモデルの最適化を行えば、精度が改善される可能性があると思います。しかし、前回はかなりシンプルなモデルを利用しましたので、今回もテキストのフィーチャのみだけを利用し、モデルのアーキテクチャの変更を行い、再チャレンジしたいと思います。
前回利用しているデータセットはhash化されたエンティティIDしかなく、実際に何のエンティティの情報がなく、今回は新しいデータセットで実験してみました。
エンティティの抽出自体はそれなりに学習したコーパスに依存し、学習済のNERモデルは新しいデータセットに適用していたときに、エンティティの数があまり抽出できませんでした。学習済モデルを利用し、移転学習(Transfer Learning)を行えば、抽出数や精度が改善できると思いますが、今回はそれを対象外にし、単語単位のみを利用し、新しいモデルアーキテクチャで試してみたいと思います。
DeepWordMatch
今回利用したアーキテクチャ(DeepWordMatch)は以下の論文で発表されました。
Deep Character-Level Click-Through Rate Prediction for Sponsored Search
https://arxiv.org/pdf/1707.02158.pdf
こちら論文を今回参考にした理由は実際にやりたいことと近いです。こちらの論文の特徴はユーザーや他の特徴などを利用せずに、テキスト情報のみ(クエリと広告)を利用して、ctr予測を行います。論文でリシュティング広告に応用し、クエリ x 広告をマッチングを行いますが、実際に、ディスプレイ広告やネーティブ広告に応用すると、クエリ=メディア記事、広告=広告クリエイティブや広告LP記事になり、特徴と性質的にに近いと思います。また、この手法はCNNベースなので、他のアプローチ(RNN、LSTM、 Transformer)に比べて、試しやすいだと思います。また、精度的にも良く、学習ための計算コストもそこまでかからないため、手軽に実験できます。
実際に、DeepWordMatchのアーキテクチャは以下です。
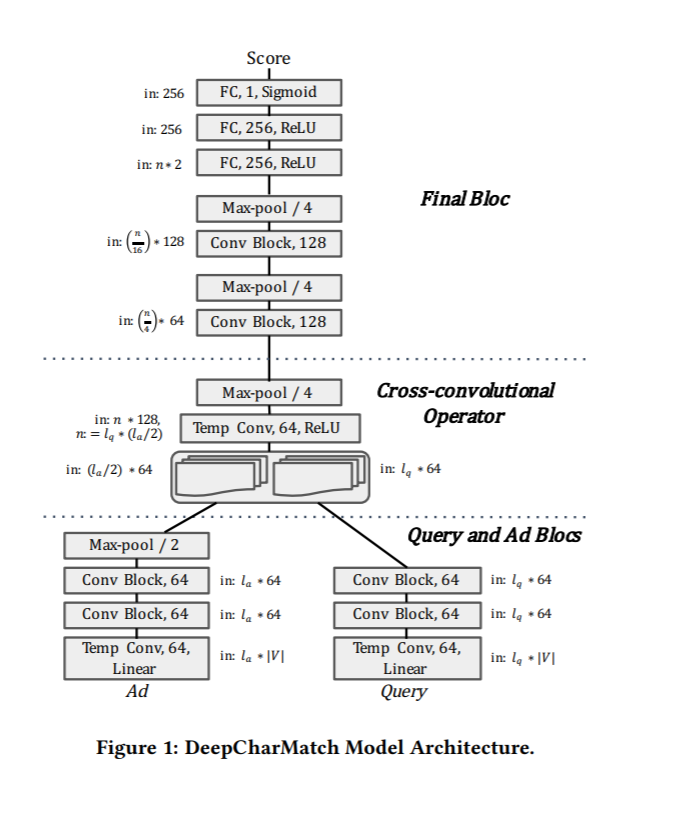
構成の詳細は次に話します。
Temporal Convolution Layer
上記の図では 「Temp Conv, X,Y」で記載される部分です。こちらの部分ばConv1Dというlayerで表現されます。画像は空間的な関連性がほとんど2次元のConvolution Layerを利用しますが、テキストは空間的な概念がなく、基本的に1次元のポジションの近い単語で関連性あるので、1次元のConvolution layerで表現されます。
詳細のソースコードは以下です。
class TemporalConvLayers(Layer):
    def __init__(self, num_filters, kernel_size, strides=1, padding='SAME', activation='linear'):
        super().__init__()
        self.layer = Conv1D(num_filters, kernel_size, strides=strides, padding=padding, activation=activation)

    def call(self, inputs, **kwargs):
        x = self.layer(inputs)
        return x
Temporal Convolution Block
上記の図では 「Conv Block, X」で記載される部分です。こちらは基本的に複数のTemporal Convolution Layer, Batch Normalization LayerとReLU Activation Layerの組み合わせ。詳細のブロックの内容は:

詳細のソースコードは以下です。
class ConvBlock(Layer):
    def __init__(self, num_filters, kernel_size, strides=1, padding='SAME'):
        super().__init__()
        self.conv_1 = Conv1D(num_filters, kernel_size, strides=strides, padding=padding)
        self.batch_norm_1 = BatchNormalization()
        self.relu_1 = ReLU()

        self.conv_2 = Conv1D(num_filters, kernel_size, strides=strides, padding=padding)
        self.batch_norm_2 = BatchNormalization()
        self.relu_2 = ReLU()

    def call(self, inputs, **kwargs):
        x = self.conv_1(inputs)
        x = self.batch_norm_1(x)
        x = self.relu_1(x)
        x = self.conv_2(x)
        x = self.batch_norm_2(x)
        x = self.relu_2(x)
        return x
Cross-Convolutional Operator部分
Cross-Convolutional Operatorでは基本的にクエリと広告の特徴をマージし、マージしたデータから、convolutionの処理で、クエリ x 広告の関連性を表現します。
全体のモデル
tensorflowで、全体のモデルをコードは以下になります。
class DeepWordMatchModel(Model):

    def __init__(self, batch_size: int, vocab_size: int, embedding_mat, params: dict):
        super().__init__(self)
        self.params = params
        self.vocab_size = vocab_size
        self.batch_size = batch_size
        self.embedding_matrix = embedding_mat
        self.conv_word_size = self.params.get("conv_word_size", 64)
        self.n = int(self.params.get("max_query_len", 30) * (self.params.get('max_doc_len', 30) / 2))

    def build(self, input_shape):
        self.embedding = Embedding(self.vocab_size, self.params.get("embedding_size", 50),
                                   embeddings_initializer=keras.initializers.Constant(self.embedding_matrix),
                                   trainable=False)
        self.doc_temp_conv = TemporalConvLayers(self.conv_word_size, 3)
        self.doc_conv_block = ConvBlock(self.conv_word_size, 3)
        self.doc_max_pool = MaxPool1D(2, 2, 'SAME')

        self.query_temp_conv = TemporalConvLayers(self.conv_word_size, 3)
        self.query_conv_block = ConvBlock(self.conv_word_size, 3)

        self.cross_temp_conv = TemporalConvLayers(self.conv_word_size, 3, activation='relu')
        self.cross_max_pool = MaxPool1D(4, 4, 'SAME')

        self.final1_conv_block = ConvBlock(self.conv_word_size * 2, 3)
        self.final1_max_pool = MaxPool1D(4, 4, 'SAME')

        self.final2_conv_block = ConvBlock(self.conv_word_size * 2, 3)
        self.final2_max_pool = MaxPool1D(4, 4, 'SAME')

        self.final3_fc1 = Dense(self.params.get('fc_output_size', 256), activation='relu')
        self.final3_fc2 = Dense(self.params.get('fc_output_size', 256), activation='relu')
        self.final3_fc3 = Dense(1, activation='sigmoid')

    def _cross_conv_op(self, query_out, doc_out):
        query_size = int(query_out.get_shape()[1])
        doc_size = int(doc_out.get_shape()[1])
        extended_query_conv_outputs = tf.concat([query_out] * doc_size, axis=1)
        extended_ad_conv_outputs = tf.concat([doc_out] * query_size, axis=1)
        cross_conv_outputs = tf.concat([extended_query_conv_outputs,
                                        extended_ad_conv_outputs], axis=-1)
        return cross_conv_outputs

    def call(self, inputs, training=None, mask=None):
        query = inputs['query']
        doc = inputs['doc']
        real_batch_size = query.get_shape()[0] if query.get_shape()[0] is not None else self.batch_size
        q = self.embedding(query)
        d = self.embedding(doc)

        q = self.query_temp_conv(q)
        q = self.query_conv_block(q)

        d = self.doc_temp_conv(d)
        d = self.doc_conv_block(d)
        d = self.doc_max_pool(d)

        # cross convolutional op
        x = self._cross_conv_op(q, d)
        x = self.cross_temp_conv(x)
        x = self.cross_max_pool(x)

        # final block1
        x = self.final1_conv_block(x)
        x = self.final1_max_pool(x)

        # final block2
        x = self.final2_conv_block(x)
        x = self.final2_max_pool(x)

        # final block3
        flat_dim = [real_batch_size, self.n * 2]
        x = tf.reshape(x, flat_dim)
        x = self.final3_fc1(x)
        x = self.final3_fc2(x)
        x = self.final3_fc3(x)
        return x
本論文では2つのモデル(DeepCharMatchとDeepWordMatch)が紹介されますが、今回の実験はDeepWordMatch(単語ベースモデル)のみを試しました。インプットの形式以外、ネットワークのアーキテクチャが同じなので、インプットの部分が少しい変更すれば、文字列ベースのモデルにも利用できると思います。
実験
今回の実験環境は以下になります。
- python 3.9
- tensorflow 2.7
データセットについて
今回利用しているデータは情報検索の分野にディープラーニングを応用するためのデータセットMS MARCO(https://microsoft.github.io/msmarco/)のデータを利用しています。具体的に、以下にgithubのプロジェクト(beir)から処理済のデータ(dataset-id: msmarco-v2)
https://github.com/UKPLab/beir
上記のデータから、以下の処理で、clickとnon-clickデータを作成します。
- 関連する(score=1.0)query_idとdoc_idをマージし、clickデータとして利用
- queryとdocをランダムでjoinし、関連しない(score=NULL)をscore=0としてアサインし、non-clickデータとしてを利用する。
clickしたデータの割合は約7%です。
関連する(click)データの例:
{
    "doc_id":11232928957,
    "query_id":881814,
    "query":"what neuron is found in the peripheral nervous system",
    "doc_text":"The Peripheral\r\nNervous System(PNS)contains only nerves\r\nand connects the brain and spinal cord (CNS) to the rest of the body. The axons and dendrites are surrounded by a white myelin sheath. Cell\r\nbodies are in the central nervous system (CNS) or ganglia. Ganglia are collections of nerve cell bodies.",
    "doc_title":"",
    "score":1,
    "query_proc":"neuron found peripheral nervous system",
    "doc_proc":"peripheral nervous system pns contains nerves connects brain spinal cord cns rest body axons dendrites surrounded white myelin sheath cell bodies central nervous system cns ganglia ganglia collections nerve cell bodies"
}
関連がない(non-click)データの例:
{
    "doc_id":34855740757,
    "query_id":918658,
    "query":"what was kennedy's new frontier definition",
    "doc_text":"In this case, the maximum value in the observation time is called as MTVV and is defined as the maximum instantaneous vibration magnitude. Vibration transmitted to the human body should be measured at a point between the body and the vibrating surface.",
    "doc_title":"Human body and Whole-body Vibration, Hand-arm vibration | Dewesoft",
    "score":0,
    "query_proc":"kennedy new frontier definition",
    "doc_proc":"case maximum value observation time called mtvv defined maximum instantaneous vibration magnitude vibration transmitted human body measured point body vibrating surface"
}
query_procとdoc_procはqueryのテキストとdoc_textのテキストのpre-processingしたもの。こちらの例を見ると、queryとdocがかなり関連性が強いです。
ディスプレイ広告やネーティブ広告の場合は、同様なものは以下になると思います。
- queryは表示先の記事のキーワードやタイトルなどで表す
- docは広告関連テキスト(LP記事やクリエイティブ文言など)で表す
テキストの前処理について
今回のテキストの前処理は以下で簡単な方法で行います。
def clean_text(s, stop_words):
    # remove link or url
    s = s.lower()
    s = re.sub(r"(http|https|ftp|file)://\S+", "", s)
    s = re.sub(r"www\.\S+", "", s)
    # remove html tags
    s = re.sub(r"<.*?>", " ", s)
    # change \n \t to space
    s = re.sub(r"[\n\t\r]", ' ', s)
    # change punctuation to space. here we don't completely remove punctuation to preserve sentence structure
    s = re.sub(r"[{}]".format(re.escape(string.punctuation)), ' ', s)
    # remove multiple white space
    s = re.sub(r"\s+", ' ', s)
    # remove stopwords
    s = ' '.join([w for w in nltk.tokenize.word_tokenize(s) if w not in stop_words])
    return s
Word Vectorization and Embedding
単語ベースモデルだと、単語をベクターに変換する必要があり、今回は学習済のGloveの単語ベクターを利用しました。
Gloveに関する情報の詳細:
https://nlp.stanford.edu/projects/glove/
実際に単語から、embeddingベクターを作成するには以下のコードのように実施しました。
text_data = np.vstack((train_df['query_proc'].to_numpy().reshape((-1, 1)),
                        train_df['doc_proc'].to_numpy().reshape((-1, 1))))

text_ds = tf.data.Dataset.from_tensor_slices(text_data).batch(128)
vectorizer = layers.experimental.preprocessing.TextVectorization(max_tokens=MAX_VOCAB,
                                                                    output_sequence_length=SEQ_LEN)
vectorizer.adapt(text_ds)
voc = vectorizer.get_vocabulary()
num_tokens = len(voc) + 2
hits = 0
misses = 0
word_embedding = load_glove_data()
word_index = dict(zip(voc, range(len(voc))))
embedding_matrix = np.zeros((num_tokens, EMBEDDING_DIM))
for word, i in word_index.items():
    embedding_vector = word_embedding.get(word, None)
    if embedding_vector is not None:
        # Words not found in embedding index will be all-zeros.
        # This includes the representation for "padding" and "OOV"
        embedding_matrix[i] = embedding_vector
        hits += 1
    else:
        misses += 1
結果と考察
今回実験したデータセットに対して、かなり良い精度が得られました。aurocが0.96がかなり高い数字です。
auroc score:0.96898254047362
実際に、clickとnon-clickの予測分布は以下の図です。

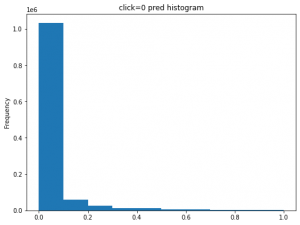
今回は疑似データで、記事とクエリの関連性はclick=1のときに強いだが、click=0ときだと全く関連性がないのものも多いです。結果的に、上記のclick=0の予測ctrがうまく行きました。click=1のデータで予測ctrは多少ずれている部分があり、悪くないと思います。実際に実運用するときに、click=0なのに、高くpctrが予測されるケースのほうが広告効果に悪い影響与えるので、今回、click=0のときに、ちゃんと低い予測ctrになっているので、精度的にに良いと思います。
もとの論文中で、リアルのデータに適用したときにもauroc=0.85以上も得られて、実運用では良い精度が期待できると思います。
まとめ
- 今回、キーワード x 広告のテキストのみのCTR予測モデルのアーキテクチャを紹介しました。
- 疑似データではありますが、モデル精度的に良いとは言えると思います。更に、他の自然言語処理の技術や他のフィーチャと組み合わせで、精度が更に向上できると思います。
次世代システム研究室では、ビッグデータ解析プラットホームの設計・開発を行うアーキテクトとデータサイエンティストを募集しています。次世代システム研究室にご興味を持って頂ける方がいらっしゃいましたら、ぜひ 募集職種一覧 からご応募をお願いします。
グループ研究開発本部の最新情報をTwitterで配信中です。ぜひフォローください。
Follow @GMO_RD