2017.01.10
Combining Ansible and Jenkins using Ansible’s Dynamic Inventory
こんにちは。次世代システム研究室のN.M. です。
How to use Ansible’s Dynamic Inventory functionality and Jenkins jobs to add and configure servers.
This article assumes a familiarity with Ansible, Jenkins and node.js.
Ansible’s Dynamic Inventory functionality allows for scripts to act as Inventory stores in place of the usual inventory file.
In this way it is possible to have inventories backed by a data-store, here we will be using mysql.
Dynamic Inventory scripts can be written in any language that is executable and able to output the data in a predefined JSON format. It should support 2 options:
Extending a template Ansible Dynamic Inventory script with mysql
We will use the dynamic inventory script inventory.py as a base to start from.
Change the example_inventory function to get the inventory information from a mysql table called inventory with columns ‘host_name’, ‘host_var1’ and ‘host_var2’.
    def example_inventory(self):
        cnx = mysql.connector.connect(user='MYSQL_USER', password='MYSQL_PASSWORD',
                              host='MYSQL_IP',
                              database='MYSQL_DB')

        cursor = cnx.cursor()
        query = ("SELECT host_name, host_var1, host_var2 FROM inventory ")
        cursor.execute(query)
        hosts = []
        hostVars = {}
        for (host_name, host_var1, host_var2) in cursor:
            hosts.append(host_name)
            hostVars[host_name] = {'host_var1': host_var1, 'host_var2': host_var2}

        cnx.close()
        return {
            'geth_provider': {
                'hosts': hosts,
                'vars': {
                }
            },
            '_meta': {
                'hostvars': hostVars
            }
        }
Note that because we provide the _meta section containing the host variables, we do not need to implement the –host option. Save inventory.py in your ansible playbook directory.
Retry with node.js and Bluebird
Creating a new server and then configuring that server will probably require retry logic. This is because it takes time for the server to be created and start accepting ssh connections.
Although we could just handle inserting into mysql and invoking ansible in a jenkins shell, it would be awkward to implement the retry logic. Also we have database inserts and we want to properly escape the data which is also difficult in a shell script.
For such retry functionality I used node.js with the bluebird-retry library and also bluebird promises.
Below is a sample script create-server.js
#!/usr/bin/node
const config = require('../config/' + process.env.NODE_ENV + '.json'),
    Promise = require('bluebird'),
    retry = require('bluebird-retry'),
    mysql = require('mysql2/promise'),
    exec = require('child_process').exec;

var con;
var deployNodeIp, instanceName;

// Create the mysql connection, using the bluebird promise library
mysql.createConnection({
    host            : config.mysql.host,
    user            : config.mysql.user,
    password        : config.mysql.password,
    database        : config.mysql.database,
    Promise: Promise
})
.then(function(_con) {
    // Set the global mysql connection variable
    con = _con;
    return new Promise(function(resolve, reject) {
        // Create a new server on openstack
        exec(`openstack server create -f json --image vmi-ubuntu-16.04-amd64-20gb --flavor g-512mb --security-group default --security-group g1 --security-group g2 --property instance_name_tag=${process.env.HOST_NAME} --key-name ci-server dummyservername`,
            function(error, stdout, stderr) {
                if (error) return reject(error);
                if (stderr && stderr.length > 0) return reject(new Error(stderr));
                console.log(stdout);
                instanceName = JSON.parse(stdout).name;
                deployNodeIp = instanceName.replace(/-/g, '.');
                console.log(`ip:${deployNodeIp}`);
                resolve(stdout);
        });
    })
})
.then(function() {
    // Insert data about our new server.
    // We are just using dummy data here.
    return con.query(`INSERT INTO inventory (
        host_var1,
        host_var2,
        created_at,
        updated_at
        )
        VALUES(
            ?,
            ?,
            NOW(),
            NOW()
    )`, [
        process.env.HOST_VAR1,
        process.env.HOST_VAR2
        ])
})
.then(function() {
    function ansibleCommon() {
        return new Promise(function(resolve, reject) {
            exec(`ansible-playbook -i inventory.py common.yml -l ${process.env.HOST_NAME}`,
                // Specify the ansible playbook directory as the current working directory.
                // I found it necessary to override the defaults for the ssh control path to avoid errors related to the
                // control path filename being too long.
                {cwd: config.ansible.pwd, env: {ANSIBLE_SSH_CONTROL_PATH: '%(directory)s/%%h-%%r'}},
                function(error, stdout, stderr) {
                    console.log('stdout: ', stdout);
                    if (error) {
                        return reject(error);
                    }
                    resolve(stdout);
            });
        })
    }
    return retry(ansibleCommon, {interval: config.jenkins.openStackInterval, timeout: config.jenkins.openStackTimeout});
})
.then(function() {
    return retry(reboot, {interval: config.jenkins.openStackInterval, timeout: config.jenkins.openStackTimeout})
})
.then(function() {
    function ansibleGeth() {
        return new Promise(function(resolve, reject) {
            exec(`ansible-playbook -i dynamic_inventory/deploy_nodes_inventory.py geth_provider.yml -l ${process.env.HOST_NAME}`,
                {cwd: config.ansible.pwd, env: {ANSIBLE_CONFIG: config.ansible.config, ANSIBLE_SSH_CONTROL_PATH: '%(directory)s/%%h-%%r'}},
                function(error, stdout, stderr) {
                    console.log('stdout: ', stdout);
                    if (error) {
                        return reject(error);
                    }
                    resolve(stdout);
            });
        })
    }
    return retry(ansibleGeth, {interval: config.jenkins.openStackInterval, timeout: config.jenkins.openStackTimeout});
})
.then(function() {
    return retry(reboot, {interval: config.jenkins.openStackInterval, timeout: config.jenkins.openStackTimeout})
})
.catch(function(error) {
    console.error(error);
    process.exitCode = 1;
})
.finally(function() {
    if (con) con.end();
})

function reboot() {
    return new Promise(function(resolve, reject) {
        exec(`openstack server reboot ${instanceName}`,
            function(error, stdout, stderr) {
                if (error) return reject(error);
                if (stderr && stderr.length > 0) return reject(new Error(stderr));
                resolve(stdout);
        });
    })
}
Creating the Jenkins Parameterized Build
By using a Jenkins Parameterized Build to run create-server.js we can trigger execution of create-server.js by accessing the Jenkins job URL. Also we are able to post parameters to our script which Jenkins will set into environment variables as defined in the Parameterized Build settings.
An example URL called with curl could be:
curl -u admin:<admin's USER TOKEN> -FSubmit=Build 'http://<JENKINS SERVER DOMAIN>/jenkins/job/new-server-sample/buildWithParameters?HOST_VAR1=hello&HOST_VAR2=world'
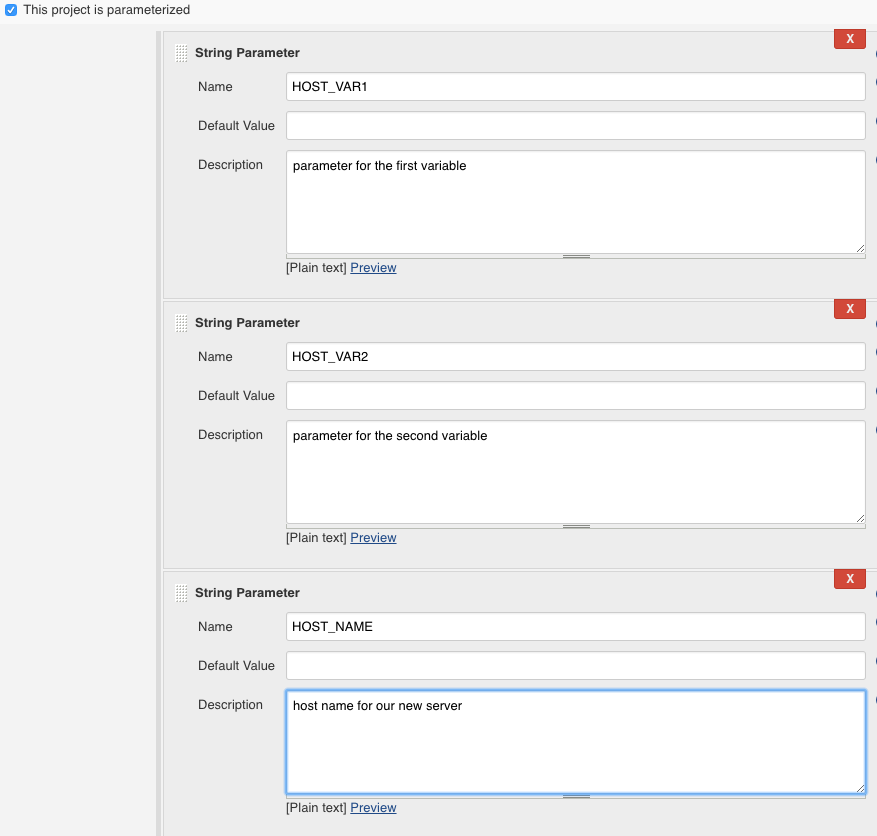
The image below shows how we configured the parameters (HOST_VAR1, HOST_VAR2) for our build
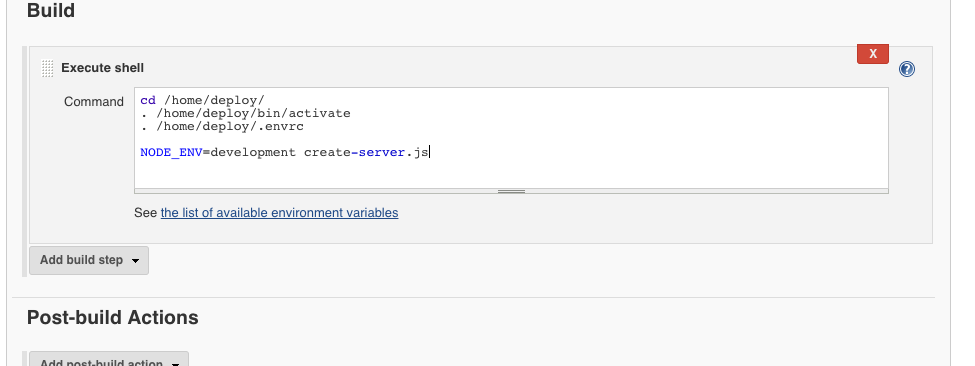
The image below shows how we call our create-server.js script. And also runs a couple of scripts to configure the user environment before invoking create-server.js.
Summary
The combination of Jenkins Parameterized Builds, ansible Dynamic Inventory with the power of full-featured node.js bluebird promises is powerful and flexible enough to easily implement the above 3 steps. Furthermore if required since the Jenkins build is callable via it’s URL this whole process can be incorporated into a system console or admin UI.
次世代システム研究室では、グループ全体のインテグレーションを支援してくれるアーキテクトを募集しています。インフラ設計、構築経験者の方、次世代システム研究室にご興味を持って頂ける方がいらっしゃいましたら、ぜひ 募集職種一覧 からご応募をお願いします。
皆さんのご応募をお待ちしています。
グループ研究開発本部の最新情報をTwitterで配信中です。ぜひフォローください。
Follow @GMO_RD