2024.01.11
EKSにKarpenterを導入してみる
こんにちは、次世代システム研究室のT.I.です。最近プロジェクトでEKSの構築を行いました。今回はその時に行ったKarpenterの導入についてお話しします。
Karpenterとは
karpenterとはawsが開発しているオープンソースのkubernetes用Autoscalerです。具体的にはNodeをオートスケーリングします。今回はEKS上にこちらを導入する話をします。
EKSではManagedNodeGroupというAutoscalerがデフォルトで使用できますが、Karpenterはこれと比較して以下の点が優れています。
- EKSのManagedNodeGroupを介さずに直接EC2インスタンスを起動してClusterに追加するため、Nodeの起動が速い
- インスタンスタイプとNodeの数を固定する必要がない(候補を設定すればKarpenterが自動で適したインスタンスタイプを指定して必要な数だけ起動してくれる)
- Nodeの使用状況から、自動でPodの移動、別インスタンスタイプのNodeの起動などをしてNodeの使用状況を最適化してくれる
- Clusterのバージョンをupgradeする際、自動でNodeのアップグレードをしてくれる(
ManagedNodeGroupは自動でしてくれないので、本来なら1オペで終わるのに足を引っ張られます)
ちなみに、KarpenterとManagedNodeGroupを比較して性能面でManagedNodeGroupが優れているところはないのでkarpenterは完全上位互換です。
Karpenterの仕組みとしては以下のようになっています。
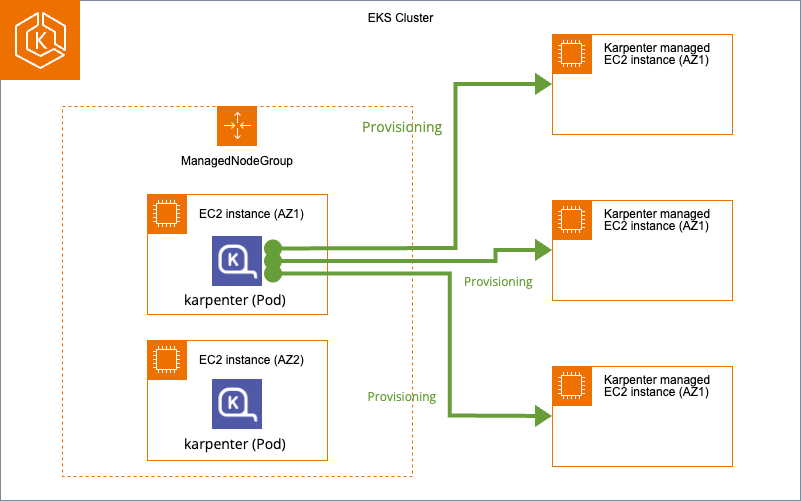
前提としてEKS Clusterでは最低1つのManagedNodeGroupが必要です。(こいつのせいで1オペでClusterのアップグレードが不可能になります)また、Karpenter本体はKubernetesのDeploymentsです。基本的にはこのManagedNodeGroup管理のNodeにKarpenterをデプロイします。
デプロイ後、Karpeneterの設定を行うとPodがPendingになった時に新規でNodeを用意してくれます。先述した通り、Karpenterが用意するNodeは完全にKarpenter管理でManagedNodeGroupとは関係がありません。また、不要になったNodeは自動で削除されます。
また、Karpenterの基本的なアプリケーション内の概念としては以下のようになっています。
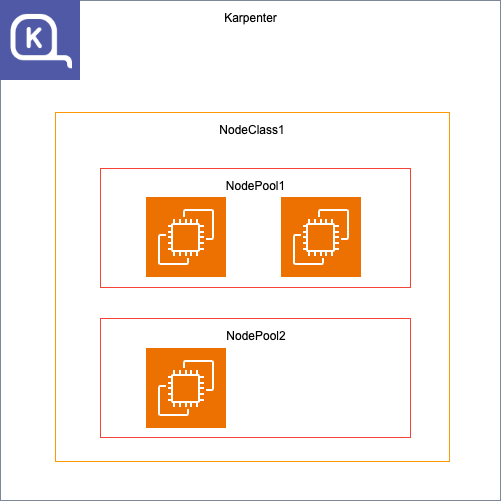
Karpenterには、NodeClass、NodePoolという概念があります。役割については以下の通りです。
- NodeClass:インスタンスの基本設定を行います。
- NodePool:NodeClassの設定に従ってNodeのスケーリングを行います。
インストール
karpenterがNodeを作成する際、OIDCProviderでAWSのServiceAccountを使用してEC2インスタンスを作成します。自分でインストールする場合はこれらを全て手作業で作成しなくてはいけないためかなり面倒くさいです。
そのため、今回はeksctlを使用します。理由としてはKarpenterが公式でサポートされており、EKS Clusterを作成する際にこれらの依存関係も全て用意してくれます。
以下リファレンスに記載されているymlです。
apiVersion: eksctl.io/v1alpha5
kind: ClusterConfig

metadata:
  name: cluster-with-karpenter
  region: us-west-2
  version: '1.25'
  tags:
    karpenter.sh/discovery: cluster-with-karpenter # here, it is set to the cluster name
iam:
  withOIDC: true # required

karpenter:
  version: 'v0.20.0' # Exact version must be specified

managedNodeGroups:
  - name: managed-ng-1
    minSize: 1
    maxSize: 2
    desiredCapacity: 1
このymlはEKS Cluster全てのインストールが含まれていますが、Karpenterインストールで必要な部分は以下のみです。
iam:
  withOIDC: true # required

karpenter:
  version: 'v0.20.0' # Exact version must be specified
ymlをeksctlで反映してEKS Clusterを作成することでKarpenterのデプロイまで完了します。
実際にeksctlでclusterを作成し、karpenterのnamespaceのpodを見てみると、以下のようにkarpenterのpodがデプロイされているのがわかります。
$kubectl get pods -n karpenter
NAME                        READY   STATUS    RESTARTS       AGE
karpenter-*********-*****   1/1     Running   0              1m
karpenter-*********-*****   1/1     Running   0              1m
ここまでで一旦karpenterのデプロイまで終わりましたが、追加でやる作業があります。eksctlが用意してくれたKarpenterのRoleだと権限が足りないため、以下の権限を追加します。
"iam:GetInstanceProfile",
"iam:CreateInstanceProfile",
"iam:TagInstanceProfile",
"iam:AddRoleToInstanceProfile",
"iam:RemoveRoleFromInstanceProfile",
"iam:DeleteInstanceProfile"
追加対象は「eksctl-KarpenterControllerPolicy-{CLUSTER_NAME}」というPolicyです。
設定
KarpenterでNodeのオートスケーリングを行うためにはNodeClass、NodePoolの設定を行う必要があります。
まずはNodeClassの設定を行います。以下が設定です。
apiVersion: karpenter.k8s.aws/v1beta1
kind: EC2NodeClass
metadata:
  name: default
spec:
  # Required, resolves a default ami and userdata
  amiFamily: AL2

  # Required, discovers subnets to attach to instances
  # Each term in the array of subnetSelectorTerms is ORed together
  # Within a single term, all conditions are ANDed
  subnetSelectorTerms:
    # Select on any subnet that has the "karpenter.sh/discovery: ${CLUSTER_NAME}"
    # AND the "environment: test" tag OR any subnet with ID "subnet-09fa4a0a8f233a921"
    - tags:
        karpenter.sh/discovery: "cluster-with-karpenter"

  # Required, discovers security groups to attach to instances
  # Each term in the array of securityGroupSelectorTerms is ORed together
  # Within a single term, all conditions are ANDed
  securityGroupSelectorTerms:
    # Select on any security group that has both the "karpenter.sh/discovery: ${CLUSTER_NAME}" tag
    # AND the "environment: test" tag OR any security group with the "my-security-group" name
    # OR any security group with ID "sg-063d7acfb4b06c82c"
    - tags:
        karpenter.sh/discovery: "cluster-with-karpenter"

  # Optional, IAM role to use for the node identity.
  # The "role" field is immutable after EC2NodeClass creation. This may change in the
  # future, but this restriction is currently in place today to ensure that Karpenter
  # avoids leaking managed instance profiles in your account.
  # Must specify one of "role" or "instanceProfile" for Karpenter to launch nodes
  role: "KarpenterNodeRole-${CLUSTER_NAME}"

  # Optional, configures storage devices for the instance
  blockDeviceMappings:
    - deviceName: /dev/xvda
      ebs:
        volumeSize: 100Gi
        volumeType: gp3
        iops: 10000
        deleteOnTermination: true

status:
  # Resolved subnets
  subnets:
    - id: subnet-******
      zone: us-east-2b

  # Resolved security groups
  securityGroups:
    - id: sg-******
      name: ClusterSharedNodeSecurityGroup
上記だと以下の項目の設定をしています。
- Nodeとして使用するEC2インスタンスのAMI
- Subnetの検出条件(※1)
- SecurityGroupの検出条件(※1)
- Nodeとして使用するEC2インスタンスにアタッチするRole
- Nodeとして使用するEC2インスタンスにアタッチするEBS
- Nodeとして使用するEC2インスタンスをデプロイするSubnetとAZ
- Nodeとして使用するEC2インスタンスにアタッチするSecurityGroup
ここで、アタッチするSubnetとSecurityGroupは別で、それぞれ検出条件(※1)というものを設定しています。KarpenterはSubnetとSecurityGroupをアタッチする際、最初にアタッチ可能なSubnetとSecurityGroupを検出しその中で、ymlに記載されているSubnetとSecurityGroupをアタッチします。つまり、今回の設定だとアタッチ対象のSubnetとSecurityGroupに「karpenter.sh/discovery: “cluster-with-karpenter”」のタグが付けられている必要があります。これはeksctlとは別で手動でつける必要があります。
また、kindが「EC2NodeClass」となっていますが、これはkarpenterインストール時に作成されるKubernetesのCustomResourceです。今回はこれを使用して、kubectl applyすることでNodeClassが作成されます。
次に、NodePoolの設定を行います。ymlは以下のようになっています。
apiVersion: karpenter.sh/v1beta1
kind: NodePool
metadata:
  name: default
spec:
  # Template section that describes how to template out NodeClaim resources that Karpenter will provision
  # Karpenter will consider this template to be the minimum requirements needed to provision a Node using this NodePool
  # It will overlay this NodePool with Pods that need to schedule to further constrain the NodeClaims
  # Karpenter will provision to launch new Nodes for the cluster
  template:
    spec:
      # References the Cloud Provider's NodeClass resource, see your cloud provider specific documentation
      nodeClassRef:
        apiVersion: karpenter.k8s.aws/v1beta1
        kind: EC2NodeClass
        name: default

      # Requirements that constrain the parameters of provisioned nodes.
      # These requirements are combined with pod.spec.topologySpreadConstraints, pod.spec.affinity.nodeAffinity, pod.spec.affinity.podAffinity, and pod.spec.nodeSelector rules.
      # Operators { In, NotIn, Exists, DoesNotExist, Gt, and Lt } are supported.
      # https://kubernetes.io/docs/concepts/scheduling-eviction/assign-pod-node/#operators
      requirements:
        - key: "karpenter.k8s.aws/instance-category"
          operator: In
          values: ["c", "m", "r"]
        - key: "karpenter.k8s.aws/instance-cpu"
          operator: In
          values: ["4", "8", "16", "32"]
        - key: "karpenter.k8s.aws/instance-hypervisor"
          operator: In
          values: ["nitro"]
        - key: "karpenter.k8s.aws/instance-generation"
          operator: Gt
          values: ["2"]
        - key: "kubernetes.io/arch"
          operator: In
          values: ["amd64"]
        - key: "karpenter.sh/capacity-type"
          operator: In
          values: ["on-demand"]

  # Disruption section which describes the ways in which Karpenter can disrupt and replace Nodes
  # Configuration in this section constrains how aggressive Karpenter can be with performing operations
  # like rolling Nodes due to them hitting their maximum lifetime (expiry) or scaling down nodes to reduce cluster cost
  disruption:
    # Describes which types of Nodes Karpenter should consider for consolidation
    # If using 'WhenUnderutilized', Karpenter will consider all nodes for consolidation and attempt to remove or replace Nodes when it discovers that the Node is underutilized and could be changed to reduce cost
    # If using `WhenEmpty`, Karpenter will only consider nodes for consolidation that contain no workload pods
    consolidationPolicy: WhenUnderutilized

    # The amount of time Karpenter should wait after discovering a consolidation decision
    # This value can currently only be set when the consolidationPolicy is 'WhenEmpty'
    # You can choose to disable consolidation entirely by setting the string value 'Never' here
    # consolidateAfter: 30s

    # The amount of time a Node can live on the cluster before being removed
    # Avoiding long-running Nodes helps to reduce security vulnerabilities as well as to reduce the chance of issues that can plague Nodes with long uptimes such as file fragmentation or memory leaks from system processes
    # You can choose to disable expiration entirely by setting the string value 'Never' here
    expireAfter: 720h

  # Resource limits constrain the total size of the cluster.
  # Limits prevent Karpenter from creating new instances once the limit is exceeded.
  limits:
    cpu: "1000"
    memory: 1000Gi

  # Priority given to the NodePool when the scheduler considers which NodePool
  # to select. Higher weights indicate higher priority when comparing NodePools.
  # Specifying no weight is equivalent to specifying a weight of 0.
  weight: 10
ここでは以下の項目を設定しています。
- 使用するNodeClass(※あらかじめ作成されている必要があります。)
- 作成するEC2インスタンスタイプの制約
- Nodeを整理する際のポリシー(※2)
- Nodeの連続起動時間の制限
- 管理するリソースの制限
- 他のNodePoolとNodeの起動条件が重なった際のウェイト(大きい方は優先される)
KarpenterはNodeの使用状況が最適化されていない場合は別Nodeを起動してPodを移し替えたりしてくれますが、それを行う場合は(※2)の設定を「WhenUnderutilized」にしておく必要があります。「WhenEmpty」にすると、Node内のPodが空になるまでNodeは削除されず、Podの移し替えも行われません。デプロイするPodのタイプに応じて使い分けることができます。
これらをデプロイして、karpenterのpodにエラーが出ていなければOKです。
オートスケーリング
ここまででKarpenterの設定が終わったので、実際にNodeのオートスケーリングを行ってみます。
まずはPendingにするPodを用意します。以下がDeploymentsのymlです。
apiVersion: apps/v1
kind: Deployment
metadata:
  name: inflate
spec:
  replicas: 1
  selector:
    matchLabels:
      app: inflate
  template:
    metadata:
      labels:
        app: inflate
    spec:
      terminationGracePeriodSeconds: 0
      nodeSelector:
        karpenter.sh/nodepool: default
      containers:
        - name: inflate
          image: public.ecr.aws/eks-distro/kubernetes/pause:3.7
          resources:
            requests:
              cpu: 1
以下のように、NodeSelectorなどでKarpenterのNodePoolのNodeを指定すると、今回の場合は対象のNodeが存在しないため、KarpenterによりNodeがスケールアウトされます。
nodeSelector:
  karpenter.sh/nodepool: default
実際にこのDeploymentsをデプロイしてみます。すると、デプロイ可能なNodeがないのでPodがPendingになります。
$kubectl get pods
NAME                        READY   STATUS    RESTARTS       AGE
inflate-*********-*****     0/1     Pending   0              10s
1分ほど待つと、Nodeが作成されます。(一番したのNodeです)
kubectl get nodes
NAME                                               STATUS   ROLES    AGE     VERSION
ip-***-**-**-**.us-west-2.compute.internal         Ready    <none>   1h      v1.25.15-eks-e71965b
ip-***-**-**-**.us-west-2.compute.internal         Ready    <none>   1h      v1.25.15-eks-e71965b
ip-***-**-**-**.us-west-2.compute.internal         Ready    <none>   23s     v1.25.15-eks-e71965b
podも正常にデプロイされているのがわかります。
$kubectl get pods
NAME                        READY   STATUS    RESTARTS       AGE
inflate-*********-*****     1/1     Running   0              1m
次に、スケールインを試してみます。先ほど追加したDeploymentsを削除して1分ほど待ちます。
kubectl get nodes
NAME                                               STATUS   ROLES    AGE     VERSION
ip-***-**-**-**.us-west-2.compute.internal         Ready    <none>   1h      v1.25.15-eks-e71965b
ip-***-**-**-**.us-west-2.compute.internal         Ready    <none>   1h      v1.25.15-eks-e71965b
先ほど追加されたNodeが削除されているのがわかります。
さいごに
次世代システム研究室では、グループ全体のインテグレーションを支援してくれるアーキテクトを募集しています。インフラ設計、構築経験者の方、次世代システム研究室にご興味を持って頂ける方がいらっしゃいましたら、ぜひ募集職種一覧からご応募をお願いします。 皆さんのご応募をお待ちしています
グループ研究開発本部の最新情報をTwitterで配信中です。ぜひフォローください。
Follow @GMO_RD