2022.10.11
nvim-orgmode: Org mode for Neovim
こんにちは、次世代システム研究室のN.M.です。
Lately, I’ve been trying hard to make my day-to-day workflow more efficient.
Part of this search for efficiency has been the elimination of wasted movements. Vim has long been known for its efficiency of movement and this is why I chose Neovim as my main development editor.
Neovim is a modern take on Vim. It attempts to be backward compatible while being more open to customization and plugin development. Although still allowing configuration with Vimscript, Neovim also allows for configuration with Lua. This means new users are not required to learn a proprietary language to customize it.
At the other end of efficiency is the planning of tasks and organization of knowledge and hence the need for organization tools. I have tried using other tools in the past such as Notion. I found Notion useful for documentation although the switch to a GUI-centric editor from the terminal world of Neovim is a bit of a wrench, physically and mentally. Remember these switches are micro-tasks that we as developers do many times a day, and after a while, the little things add up.
Org mode for Emacs is one of the most famous note-taking/task-management tools in the Unix world. Many users of Emacs claim to have switched to Emacs, just so that they could use org-mode. Emacs org-mode can do a lot.
I tried using Emacs org-mode, and I did find it useful, but it has always been a hassle to switch from my development editor (Neovim) to my org-mode editor (Doom Emacs). I wanted something more seamless and simpler.
So I tried out nvim-orgmode which is an org-mode clone for use in Neovim. Emacs org-mode has been in development since 2003, the initial commit to nvim-orgmode was in 2021 May. So I don’t expect a fully functional clone, but to be honest, I just want enough functionality to take notes and manage my tasks and Emacs org-mode can do a lot more than that.
Using nvim-orgmode
Let’s jump right in and cover some basic scenarios.
Capturing notes and tasks quickly
Sometimes it’s important to capture the text content of a task or note quickly so that it doesn’t get lost amidst the noise of a busy day’s activities.
org mode calls this functionality capturing. To capture in nvim-orgmode type the keys: <leader>oc
Let’s break down this command.
<leader>refers to your Vim leader key. The Vim leader key is similar to the<prefix>key in tmux, it is used as a prefix key for commands and can be set in one place and all other key-command mappings that refer to<leader>will be automatically updated if the leader is changed.- My leader key is set to the
spacekey for easy use. - Having a leader key allows us to do something like
<leader>oin normal mode and not go into insert mode on a new line, which is the default Vim behavior when typingoin normal mode.
- My leader key is set to the
ocThis means Orgmode Capture.
Having entered the capture command we see a menu from which we can choose a capture template.

To choose a template simply enter the shortcut key (t for Task).
Then we will see a new capture buffer below our current buffer something like below.
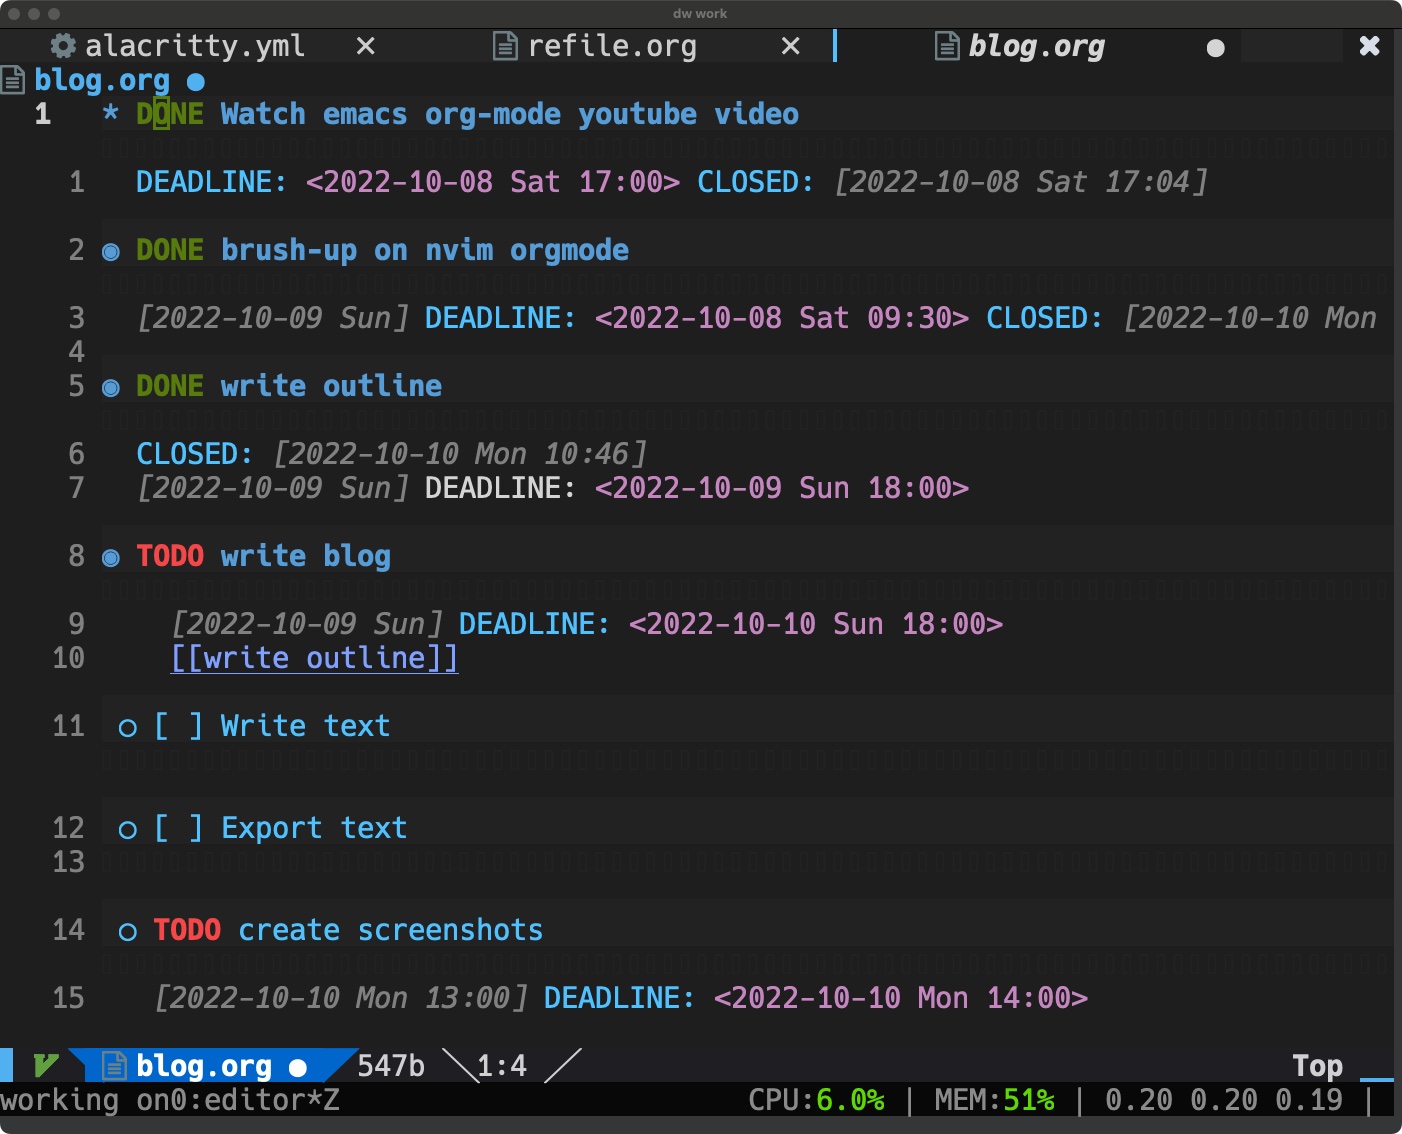
I have already entered the task Create screenshots and added the time 13:00 in the above capture window. The other text in the capture buffer; TODO and the date string [2022-10-10 Mon], were created by the default task template definition. The window above the capture buffer shows a file I had opened before I ran the capture command. In this case, it is an org file named blog.org with some TODO tasks already created.
OK, so we’ve opened up a capture buffer with the command<leader>co chosen a template and quickly entered a new task. Next, we need to save it somewhere.
Saving a captured item
<C-c> control c enables us to save the new task to the default destination file for tasks as defined in our nvim-orgmode configuration. An example configuration is shown below:
-- Load custom tree-sitter grammar for org filetype
require('orgmode').setup_ts_grammar()

local status_ok, orgmode = pcall(require, "orgmode")
if not status_ok then
  return
end


orgmode.setup({
  org_agenda_files = {'~/orgs-example/**/*'},
  org_default_notes_file = '~/orgs-example/refile.org',
  org_capture_templates = {
    T = {
      description = 'Todo',
      template = '* TODO %?\n %u',
      target = '~/orgs-example/todo.org'
    },
    j = {
      description = 'Journal',
      template = '\n*** %<%Y-%m-%d> %<%A>\n**** %U\n\n%?',
      target = '~/orgs-example/journal.org'
    },
    n = {
      description = 'Notes',
      template = '* %?\n %u',
      target = '~/orgs-example/notes.org'
    }
  }
})
The org_default_notes_file is set to ~/orgs-example/refile.org this is the default location for all captured items. Captured items may also be configured individually per template. In my case I have added 3 templates:
- Todo
- shortcut
t - default destination ~/orgs-example/todo.org
- shortcut
- Journal
- shortcut
j - default destination ~/orgs-example/journal.org
- shortcut
- Notes
- shortcut
n - default destination ~/orgs-example/notes.org
- shortcut
The Todo template is just the same as the built-in Task template, so it produces the same output as the above screenshot shows in the capture buffer. If you select this template by entering Twhen prompted and save it using <C-c> the new Todo item it will be saved to the corresponding default location: ~/orgs-example/todo.org. If you selected the default template t as in the example case above the item is saved to ~/orgs-example/refile.org on typing C-c
Saving a captured item to a non-default location
In org mode, moving an item is called refiling.
If you want to save your captured item to a location other than what is configured for the template, the command to do this is <leader>or Where or stands for Orgmode Refile.
After entering his command in a capture buffer, you will be prompted for the location of an existing org file within the configured org_agenda_files path. Once a file is chosen you may then choose a section within the file under which your item will be added. If you do not choose a section, your item will be added to the bottom of the chosen file.
You may also use this command to move any item within org-mode to another file and section. This is useful for moving items from the default capture location to a more long-term location. As the screenshot below shows, where I am refiling an item from refile.org to a section in blog.org

Org Agenda
This is a view of pending TODO tasks. You may access the agenda functionality by doing <leader>oaThis stands for Orgmode Agenda.

Here we see a list of options representing org agenda functions, where each may be accessed by pressing the key displayed. So that the full key sequence to see the Agenda for current week or day for example, is <leader>oaa An example of such an agenda view is shown below.
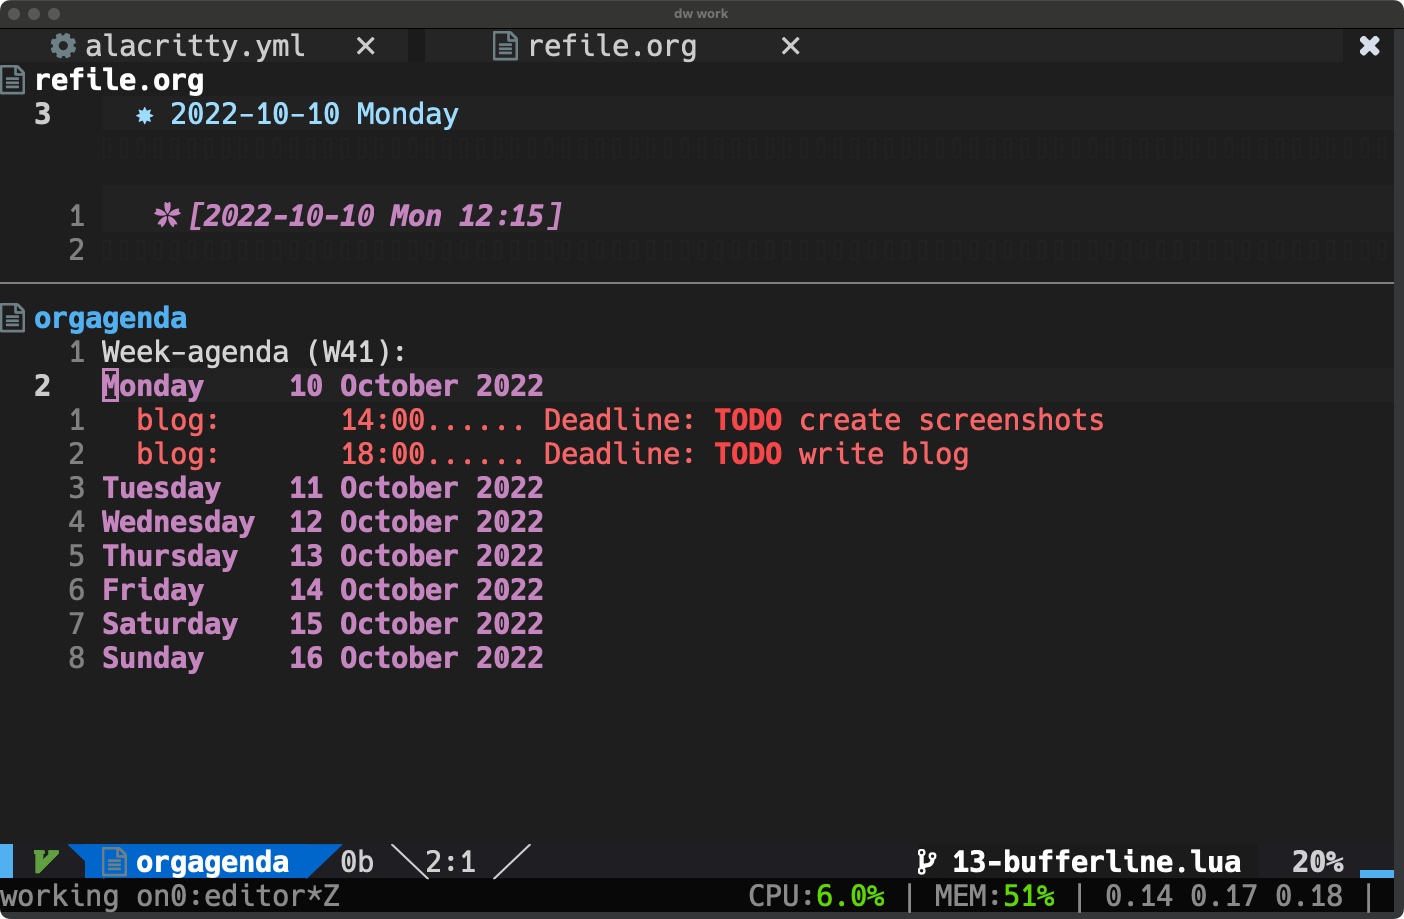
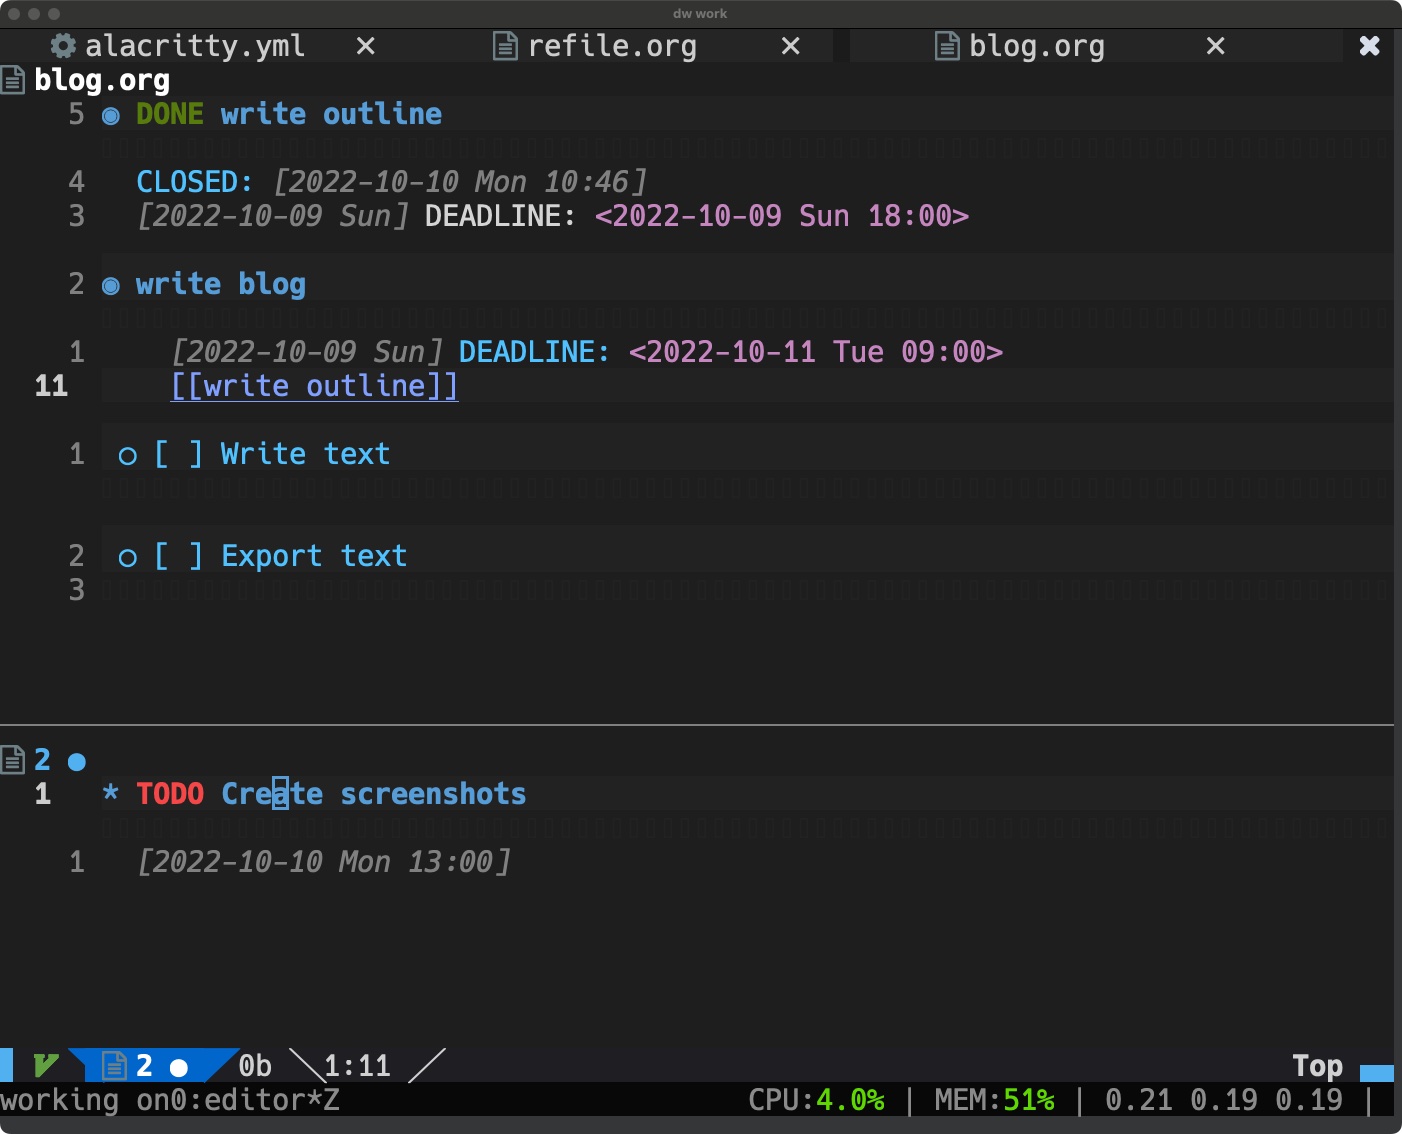
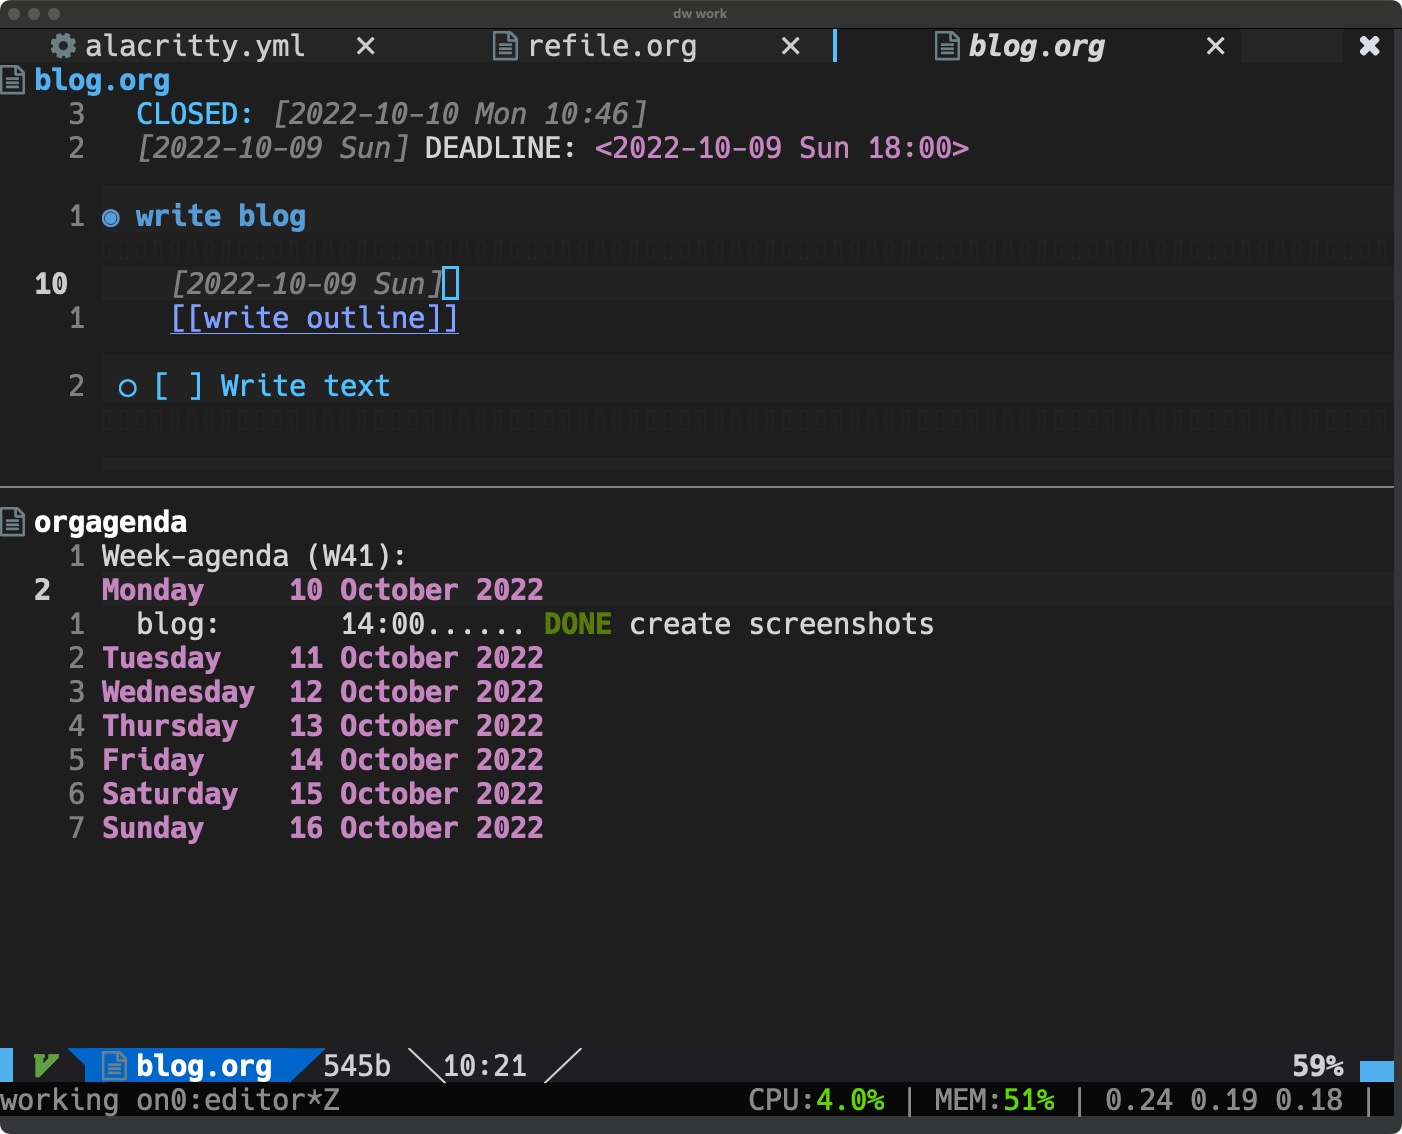
Here we see the TODO items that are due today (today is 2022 October 10). Also, we see that these items are in the blog.org file, and we see the times these items are due. Let’s have another look at blog.org. We may navigate quickly to that file by hitting return when the cursor is on one of the two items. Doing so brings us to the blog.org file within the same window. I have closed the other window in the screenshot below, so that we may see all the contents of blog.org.
In this file, I have a bunch of tasks for this blog. Some have the DONEstatus, some are still TODO . I can change this state by simply changing the text or by doing tfrom the agenda view with the cursor over the task, as shown below, where I have changed the status of the “create screenshots” task.
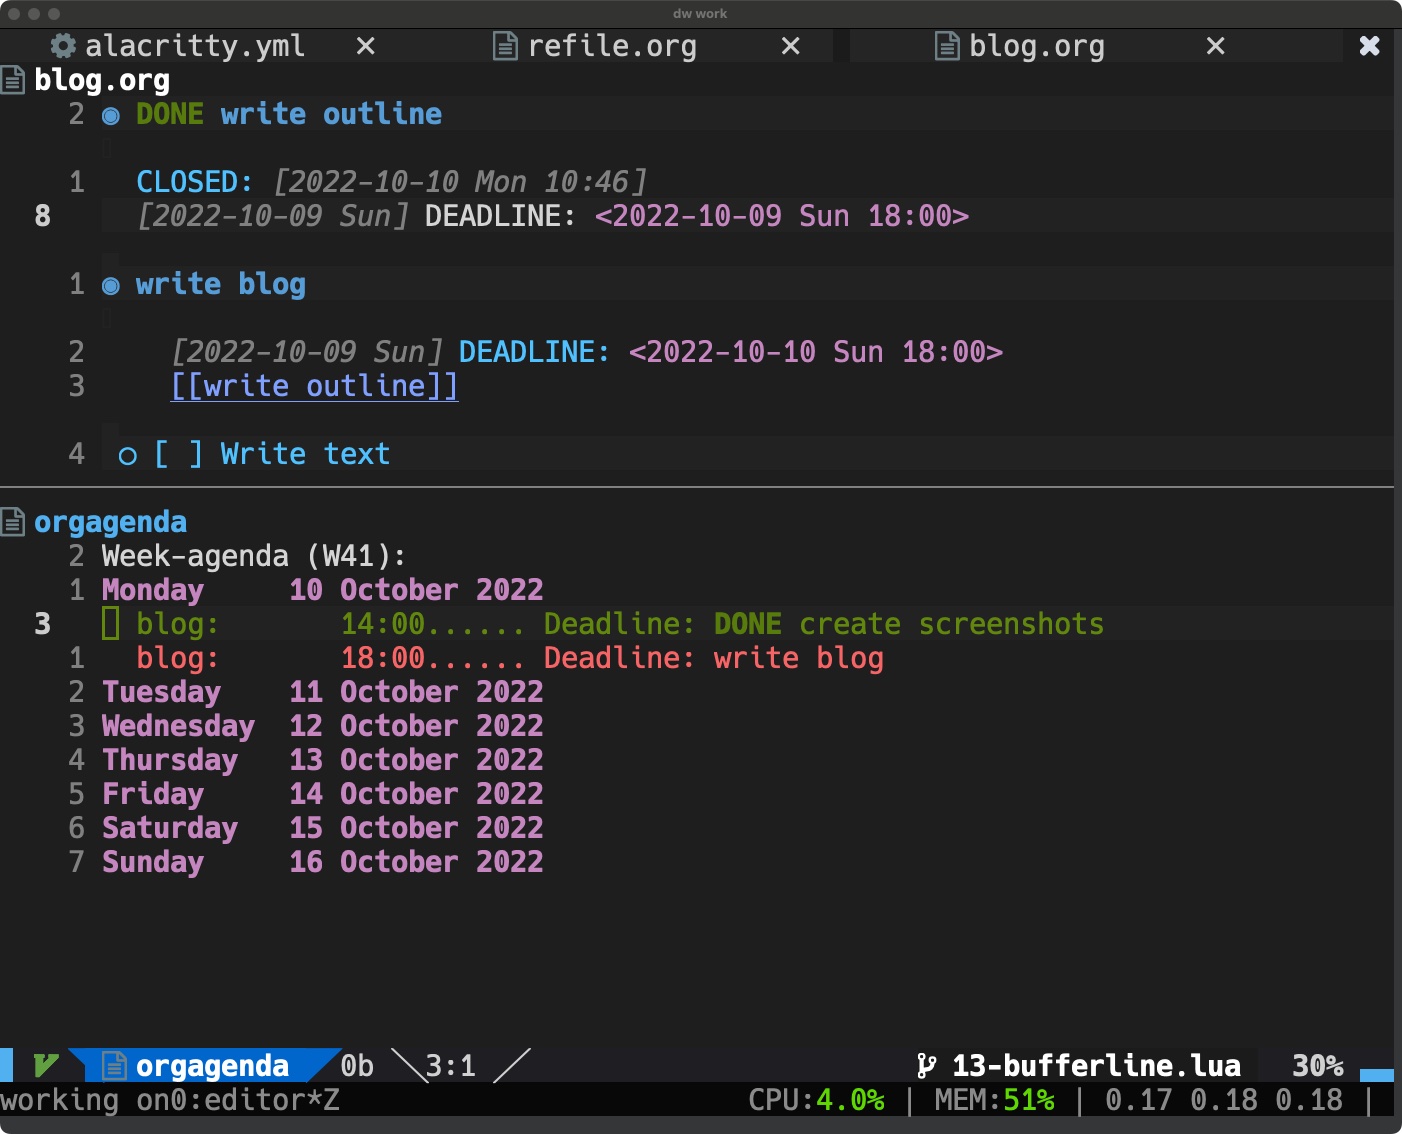
One thing to note here is that items will not be displayed in the agenda view if they do not have a deadline date. If I remove the deadline from an item and hit refresh (r) in the agenda view the item will not be displayed.
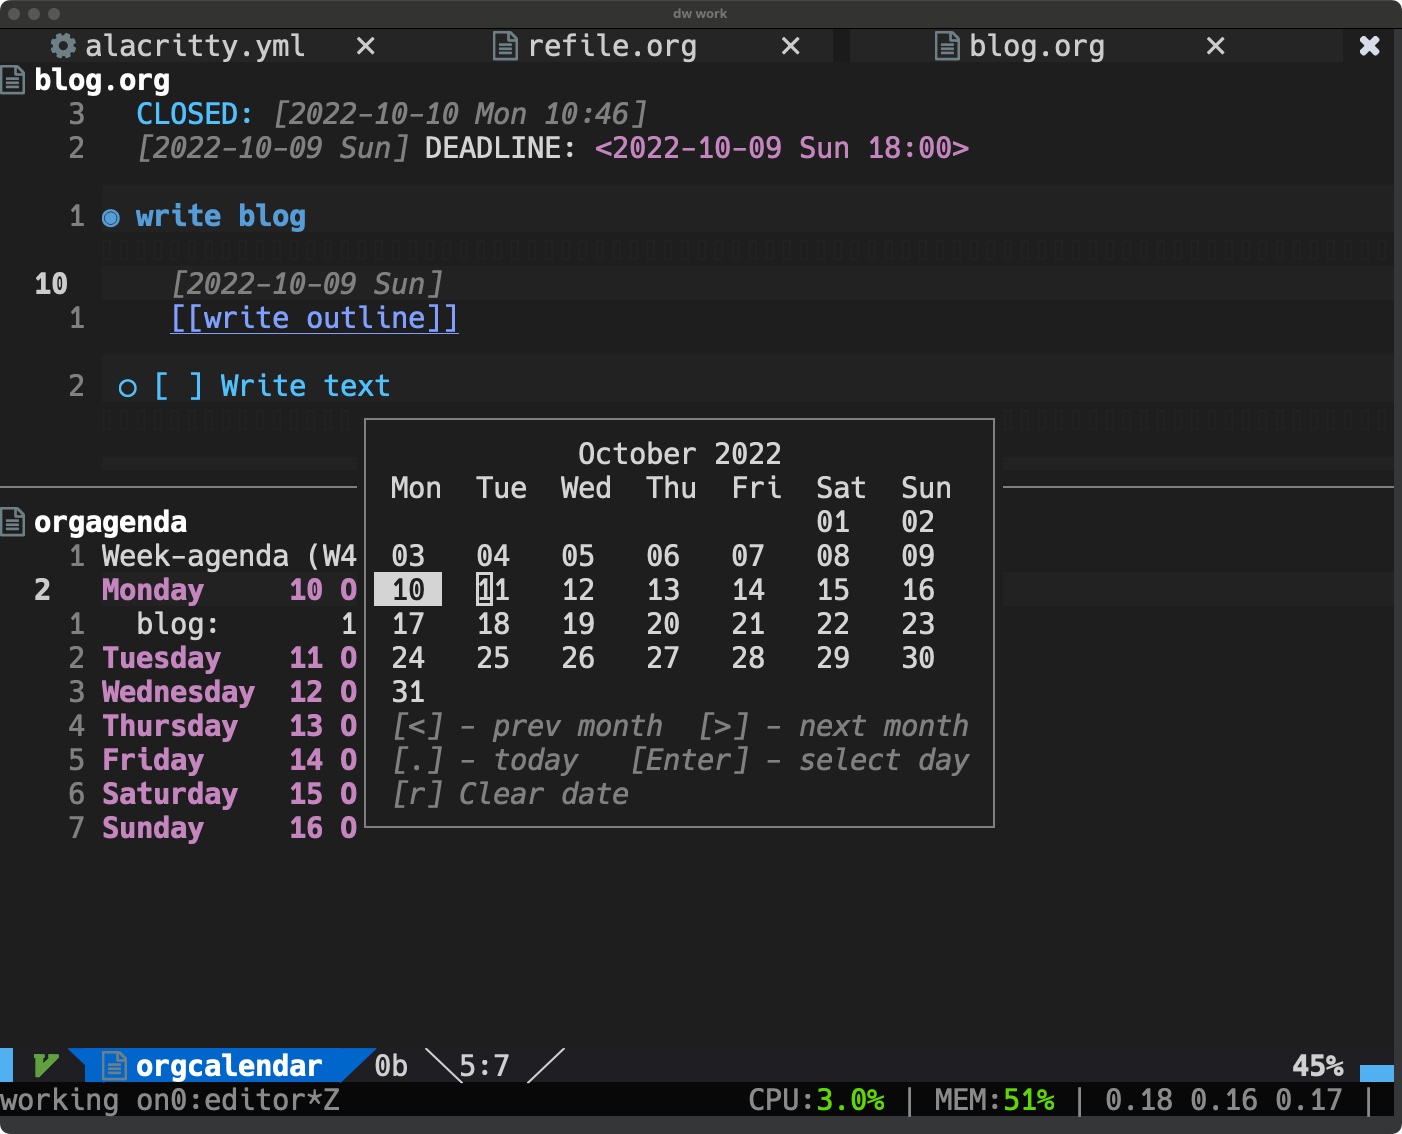
Here we can we can see that after removing the deadline from the “write blog” task, the task is also removed from the agenda view. This is because the agenda view displays items that are due within 14 days from today. This amount is configurable using org_deadline_warning_days I can add a due date when I create a task in the capture buffer or to an existing task with <leader>oid oid stands for Orgmode Insert Deadline. Below we see the resulting deadline selection popup.
Now the task will be shown again in the agenda view.
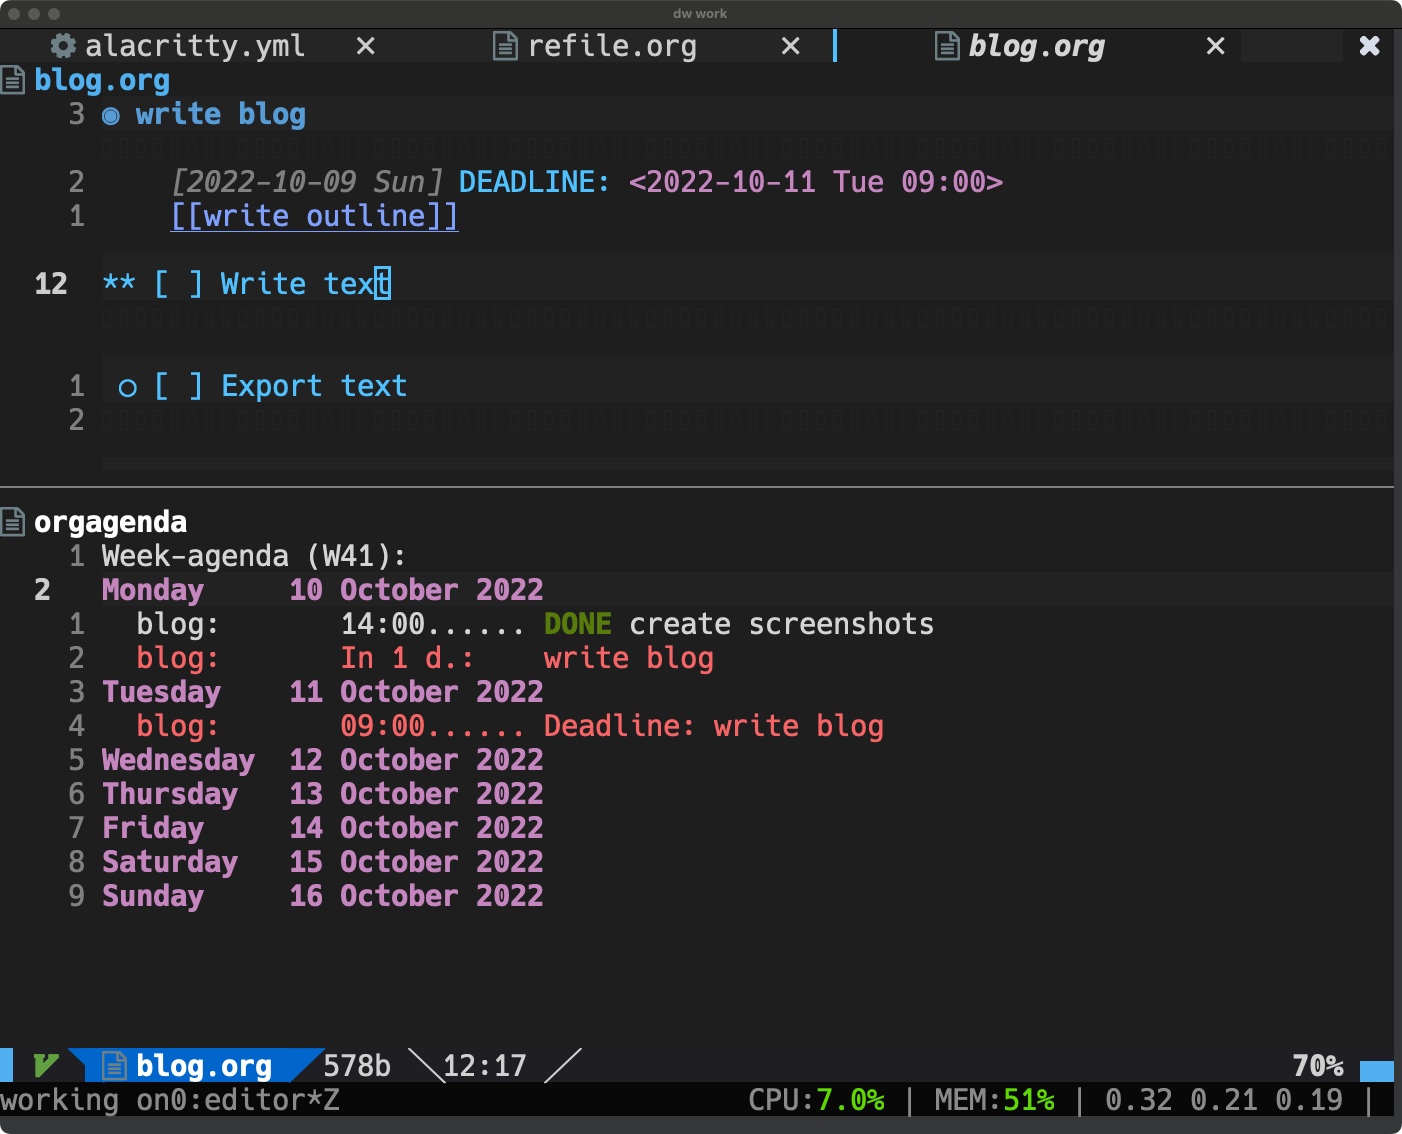
Here we see that the task is shown to be due in one day from Monday (today at the time of writing) and due at 09:00 on Tuesday.
Other useful commands
g? This is the standard Vim help command and nvim-orgmode supports this command in all modes (org, capture, agenda etc).
C-a to increment dates, with the cursor over the target date field
C-x to decrease dates, works the same way as C-a
<leader>oxi Clock in, <leader>oxo Clock out commands. Put your cursor over the task and execute clock-in or clock-out
Useful Supporting Plugins
- org-bullets.nvim – Show org-mode bullets as UTF-8 characters
- See above screenshots of org files for examples of how this plugin displays bullet points
- headlines.nvim – Add few highlight options for code blocks and headlines
- One of the disadvantages of using a terminal for text is that we can’t have different-sized fonts for headings. This plugin attempts to address this shortfall by using different background colors for headings
- sniprun – For code evaluation in blocks
- I haven’t tried this yet but it promises Jupyter-like functionality for man languages embedded in your org files. Emacs org-mode already has this of course. In fact, many Emacs users use Babel org documents to configure their Emacs!
- vim-table-mode – For table support
Problems
Speaking of efficiency, small things have big effects and little problems become big ones, but anytime we try out new editor plugin software we should be expecting problems and this time is no exception.
- When capturing tasks whenever I type
afollowed by another character I get2afollowed by the character. This is probably due to a misconfiguration or clash of plugins in my Neovim configuration since I was not able to find any references to the problem.
Summary
I showed the basic outline of commands required to use nvim-orgmode for note-taking/task-management.
Most of these nvim-orgmode related commands require the minimum of keystrokes to accomplish and the capture/refile/edit workflow is intuitive and easy to understand. There is not much extra decision-making required to take notes and get organized.
I start each work day with a plan of actions to perform, the agenda view will be a usefull tool to ensure that not item is missing from this plan.
I think this is enough to be useful for work tasks and look forward to trying it out more thoroughly next quarter.
References
https://github.com/nvim-orgmode/orgmode
次世代システム研究室では、グループ全体のインテグレーションを支援してくれるアーキテクトを募集しています。インフラ設計、構築経験者の方、次世代システム研究室にご興味を持って頂ける方がいらっしゃいましたら、ぜひ募集職種一覧からご応募をお願いします。
グループ研究開発本部の最新情報をTwitterで配信中です。ぜひフォローください。
Follow @GMO_RD