Kubernetes Flux CD Running on k3d Locally
こんにちは、次世代システム研究室のN.M.です。
Introduction
Flux CD handles continuous delivery for Kubernetes applications. You can configure multiple different different types of sources. Flux takes care of keeping Kubernetes resources up to date with the source. Ofcourse, normally want to set up CD/CI on a remote Kubernetes cluster for staging or production. But sometimes it is useful to test the flux installation locally before deploying to staging or production. This is what is discussed here.Resources to be deployed are defined in manifest files, manifest files can contain references to container images stored in image registries, or references to Helm packages stored in Helm repositories. Helm is the package manager for Kubernetes.
Architecture
Flux is implemented as Kubernetes Custom Resources and Custom Resource Controllers, which is normally how Kubernetes functionality is extended.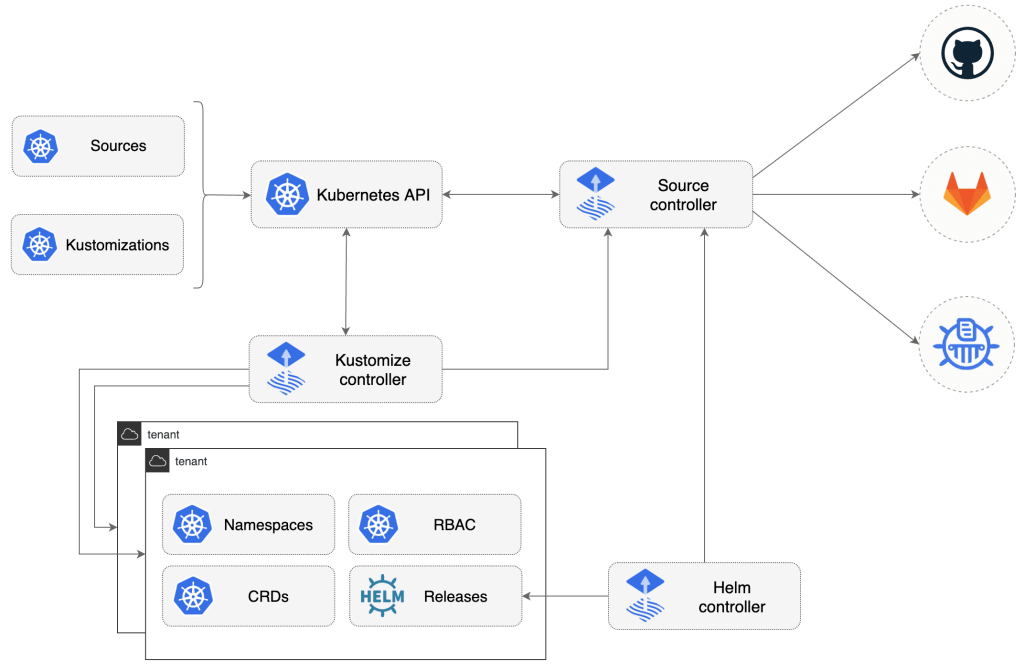
Flux Architecture
Flux needs to know the type and location of the resources it is asked to manage. Flux sources are provided for git, Helm, and cloud storage buckets source types.
Flux then needs to know how to handle the configuration it finds at the source. So it can interpret the source configuration data and ensure the corresponding Kubernetes resources match the configuration, this process is called Reconciliation. Reconciliation configuration types are HelmRelease, Bucket, and
Kustomization.We will concentrate on the
Kustomization reconciliation type and the git Flux source.Setup
Install local Kubernetes distribution – k3d
k3d is a lightweight Kubernetes that runs k3s in Docker, so it’s great for development. It doesn’t support alpha or deprecated functionality, which we will not be using anyway.brew install k3dRun a cluster
❯ k3d cluster create my-cluster --port 9898:80@loadbalancer
INFO[0000] Prep: Network
INFO[0001] Created network 'k3d-my-cluster' (686c33da4f8cea9c2ae314a665c5f449ab1d0647123d2cee7dd556167bed624c)
INFO[0001] Created volume 'k3d-my-cluster-images'
INFO[0002] Creating node 'k3d-my-cluster-server-0'
INFO[0002] Creating LoadBalancer 'k3d-my-cluster-serverlb'
INFO[0002] Starting cluster 'my-cluster'
INFO[0002] Starting servers...
INFO[0002] Starting Node 'k3d-my-cluster-server-0'
INFO[0015] Starting agents...
INFO[0015] Starting helpers...
INFO[0015] Starting Node 'k3d-my-cluster-serverlb'
INFO[0016] (Optional) Trying to get IP of the docker host and inject it into the cluster as 'host.k3d.internal' for easy access
INFO[0019] Successfully added host record to /etc/hosts in 2/2 nodes and to the CoreDNS ConfigMap
INFO[0019] Cluster 'my-cluster' created successfully!
INFO[0019] --kubeconfig-update-default=false --> sets --kubeconfig-switch-context=false
INFO[0019] You can now use it like this:
kubectl config use-context k3d-my-cluster
kubectl cluster-info
This should start a local k8s cluster in less than a minute (it may take longer if you need to download the docker images). It also contains port parameters used for ingress, more on that later.
Point
kubectl to your new local cluster:❯ kubectl config use-context k3d-my-cluster Switched to context "k3d-my-cluster".Check your cluster is running successfully:
❯ kubectl cluster-info
Kubernetes control plane is running at https://0.0.0.0:56237
CoreDNS is running at https://0.0.0.0:56237/api/v1/namespaces/kube-system/services/kube-dns:dns/proxy
Metrics-server is running at https://0.0.0.0:56237/api/v1/namespaces/kube-system/services/https:metrics-server:/proxy

To further debug and diagnose cluster problems, use 'kubectl cluster-info dump'.
We will be following the Flux Getting Started tutorial with a couple of changes, which are explained below.
Commands assume macOS.
Define environment variables for your GitHub credentials:
❯ export GITHUB_USER=YOUR GITHUB USER
❯ export GITHUB_TOKEN=YOUR GITHUB TOKEN
Install Flux:
brew install fluxcd/tap/fluxCheck that your Kubernetes version supports flux:
❯ flux check --pre
► checking prerequisites
✗ flux 0.16.1 <0.17.2 (new version is available, please upgrade)
✔ kubectl 1.22.2 >=1.18.0-0
✔ Kubernetes 1.21.3+k3s1 >=1.16.0-0
✔ prerequisites checks passed
Bootstrap
Sets up the flux Custom Resources and Controller❯ flux bootstrap github \ --owner=$GITHUB_USER \ --repository=fleet-infra \ --branch=main \ --path=./clusters/my-cluster \ --personal ► connecting to github.com ► cloning branch "main" from Git repository "https://github.com/$GITHUB_USER/fleet-infra.git" ✔ cloned repository ► generating component manifests ✔ generated component manifests ✔ component manifests are up to date ► installing toolkit.fluxcd.io CRDs ◎ waiting for CRDs to be reconciled ✔ CRDs reconciled successfully ► installing components in "flux-system" namespace ✔ installed components ✔ reconciled components ► determining if source secret "flux-system/flux-system" exists ► generating source secret ✔ public key: ssh-rsa AAAAB3NzaC1yc2EAAAADAQABAAABAQDJ49zPtK9ySR7N/lc9Lq+9DV3N4mM+auZu5USpXi5KAxGM5pUKCB60OLk+5zmHWZiknsGQWEegtRqAUFumvMTAhqsH6qNmH8SXlk4du7UMfFEJrA6jsCfl0b1EmkBd2vHc9JQoUMh1Y9+MySZUZV4MJZhYm3LS/bcUfGPzKitg16FtqNTDN2G37919nLYSA+hacfYdq8cSr38AYmw8l5yu+LC46awJcebgf08EHli/oUAFjGVFHoq10PqoxnHU0SzkDRXKZ0lnr+mt59k0u1Y6LAdiMMStYTUBuCJCYVKhJxS8ePn7N3SDCE2YNpQgDQI1s5CHtSKCYCDU7h17c3gj ✔ configured deploy key "flux-system-main-flux-system-./clusters/my-cluster" for "https://github.com/$GITHUB_USER/fleet-infra" ► applying source secret "flux-system/flux-system" ✔ reconciled source secret ► generating sync manifests ✔ generated sync manifests ✔ sync manifests are up to date ► applying sync manifests ✔ reconciled sync configuration ◎ waiting for Kustomization "flux-system/flux-system" to be reconciled ✔ Kustomization reconciled successfully ► confirming components are healthy ✔ notification-controller: deployment ready ✔ source-controller: deployment ready ✔ kustomize-controller: deployment ready ✔ helm-controller: deployment ready ✔ all components are healthyAfter this command, the following have been created.
- Flux is set up within our cluster
my-cluster - if not already existing, the flux repository
https://github.com/$GITHUB_USER/fleet-infra.git, will have been created - A deploy key has been created to allow flux to access the flux repository
- A secret for the deploy key has been created
- Any existing kubernetes configuration within the fleet-infra repository will be applied by Flux
my-cluster up to date with the manifests in https://github.com/$GITHUB_USER/fleet-infra.git/clusters/my-clusterFlux knows how to apply configuration manifests from the fleet-infra repository, because during Flux bootstrap a Flux source of type
GitRepository and a Flux reconciliation of type Kustomization were created. These are configured in https://github.com/$GITHUB_USER/fleet-infra/blob/main/clusters/my-cluster/flux-system/gotk-sync.yaml. A sample is shown below:---
apiVersion: source.toolkit.fluxcd.io/v1beta1
kind: GitRepository
metadata:
name: flux-system
namespace: flux-system
spec:
interval: 1m0s
ref:
branch: main
secretRef:
name: flux-system
url: ssh://[email protected]/$GITHUB_USER/fleet-infra
---
apiVersion: kustomize.toolkit.fluxcd.io/v1beta1
kind: Kustomization
metadata:
name: flux-system
namespace: flux-system
spec:
interval: 10m0s
path: ./clusters/my-cluster
prune: true
sourceRef:
kind: GitRepository
name: flux-system
validation: client
Flux bootstrap is idempotent, so you can run it as many times as you like, with no bad effects.
Fork the Getting Started podinfo repository
The Flux Getting Started tutorial simply uses the provided podinfo repository, but if you want more control to edit, and add Github actions, to test deployment, fork the original podinfo repository.Click on the
fork button on the upper right of the https://github.com/stefanprodan/podinfo repository page and fork it.Create and configure Flux Source
The command below creates a Flux source manifest pointing to our new forked repositoryflux create source git podinfo \ --url=https://github.com/$GITHUB_USER/podinfo \ --branch=main \ --interval=30s \ --export > ./clusters/my-cluster/podinfo-source.yamlNote, that we use the main branch as is the new GitHub convention. The main branch will need to be created in the podinfo repository for this to work.
We can look at the contents of the exported source manifest in clusters/my-cluster/podinfo-source.yaml
apiVersion: source.toolkit.fluxcd.io/v1beta1
kind: GitRepository
metadata:
  name: podinfo
  namespace: flux-system
spec:
  interval: 30s
  ref:
    branch: main
  url: https://github.com/$GITHUB_USER/podinfo
We see that the contents of this file reflect the parameters of the source creation command.When this file is pushed to our fleet-infra repository, Flux will create a Flux source resource that checks https://github.com/$GITHUB_USER/podinfo every 30 seconds for updates.
Let’s check the Flux sources we have now:
❯ flux get sources git
NAME       	READY	MESSAGE                                                          	REVISION                                       	SUSPENDED
flux-system	True 	Fetched revision: main/84ddb3b7834bce5a71e0a779b14f459c959bbffc  	main/84ddb3b7834bce5a71e0a779b14f459c959bbffc  	False
podinfo    	True 	Fetched revision: master/5398c1a5b732faf153c199a64902d7384e5be068	master/5398c1a5b732faf153c199a64902d7384e5be068	False
We have two sources:
flux-system, the source for the flux configuration in ourfleet-infrarepositorypodinfo, the source for thepodinfoapplication, in our fork of thepodinforepository
Tell Flux how to use the Source
Flux still hasn’t deployed the podinfo application because it doesn’t know what type of reconciliation to use, Helm Release, Bucket, or Kustomization.Let’s tell Flux how to use the podinfo Source, using the command below:
flux create kustomization podinfo \
  --source=podinfo \
  --path="./kustomize" \
  --prune=true \
  --validation=client \
  --interval=5m \
  --export > ./clusters/my-cluster/podinfo-kustomization.yaml
We create a Flux reconciliation resource of type Kustomization and tell flux this comes from the podinfo source defined previously.
You can check the contents of the exported manifest file:
---
apiVersion: kustomize.toolkit.fluxcd.io/v1beta1
kind: Kustomization
metadata:
  name: podinfo
  namespace: flux-system
spec:
  interval: 5m0s
  path: ./kustomize
  prune: true
  sourceRef:
    kind: GitRepository
    name: podinfo
  validation: client
and again we see the file simply reflects the parameters passed to the create kustomization command.When this file is pushed to GitHub, Flux will try to deploy our forked copy of the
podinfo application using the manifests it finds under https://github.com/$GITHUB_USER/podinfo/tree/master/kustomizeNow, whenever the manifests under the
kustomize directory are updated, Flux will try to reconcile those manifests with the corresponding resources in my-cluster. Now we get and idea how deployments will happen.Let’s have a look at the contents of the podinfo/kustomize directory: https://github.com/$GITHUB_USER/podinfo/blob/master/kustomize/
We see four files:
deployment.yaml– configures a Deployment and Pod for the podinfo applicationservice.yaml– configures a Servicehpa.yaml– configures a HorizontalPodAutoscaler resource for horizontal Pod scalingkustomization.yaml– contains configuration how to customize the above three files. This kustomization.yaml simply combines the above three files into one.
spec:
  containers:
  - name: podinfod
    image: ghcr.io/stefanprodan/podinfo:6.0.0
    imagePullPolicy: IfNotPresent
    ports:
    - name: http
      containerPort: 9898
      protocol: TCP
    - name: http-metrics
      containerPort: 9797
      protocol: TCP
    - name: grpc
      containerPort: 9999
      protocol: TCP
    command:
    - ./podinfo
    - --port=9898
    - --port-metrics=9797
    - --grpc-port=9999
    - --grpc-service-name=podinfo
    - --level=info
    - --random-delay=false
Here we see that the image, ghcr.io/stefanprodan/podinfo:6.0.0, is utilized for our Pod. Also, we see that the podinfo command is used to start the container. Our application logic is usally inside such an image. Therefore to deploy our application, we need to rebuild the image, pushing the new image with a new tag to a container repository, and update the image tag in deployment.yaml.Deployments with GitHub actions
We can use a github a workflow script for rebuilding the container image, pushing the new image and updating the container image tag to a GitHub action in our podinfo repository:name: Deploy PodInfo
on:
push:
branches: [main]
pull_request:
branches: [main]
jobs:
build:
runs-on: ubuntu-latest
steps:
- uses: actions/checkout@v2
- name: Setup QEMU
uses: docker/setup-qemu-action@v1
with:
platforms: all
- name: Setup Docker Buildx
id: buildx
uses: docker/setup-buildx-action@v1
with:
buildkitd-flags: "--debug"
- name: Login to GitHub Container Registry
uses: docker/login-action@v1
with:
registry: ghcr.io
username: ${{ github.actor }}
password: ${{ secrets.GITHUB_TOKEN }}
# - name: Login to Docker Hub
# uses: docker/login-action@v1
# with:
# username: ${{ secrets.DOCKER_USERNAME }}
# password: ${{ secrets.DOCKER_PASSWORD }}
- name: Prepare
id: prep
run: |
VERSION=sha-${GITHUB_SHA::8}
if [[ $GITHUB_REF == refs/tags/* ]]; then
VERSION=${GITHUB_REF/refs\/tags\//}
fi
echo ::set-output name=BUILD_DATE::$(date -u +'%Y-%m-%dT%H:%M:%SZ')
echo ::set-output name=VERSION::${VERSION}
- name: Publish multi-arch image
uses: docker/build-push-action@v2
with:
push: true
builder: ${{ steps.buildx.outputs.name }}
context: .
file: ./Dockerfile
platforms: linux/amd64,linux/arm/v7,linux/arm64
tags: |
ghcr.io/${{ github.actor }}/podinfo:${{ steps.prep.outputs.VERSION }}
labels: |
org.opencontainers.image.title=${{ github.event.repository.name }}
org.opencontainers.image.description=${{ github.event.repository.description }}
org.opencontainers.image.source=${{ github.event.repository.html_url }}
org.opencontainers.image.url=${{ github.event.repository.html_url }}
org.opencontainers.image.revision=${{ github.sha }}
org.opencontainers.image.version=${{ steps.prep.outputs.VERSION }}
org.opencontainers.image.created=${{ steps.prep.outputs.BUILD_DATE }}
- name: Set image tag in kustomization
run: |
cd kustomize
kustomize edit set image ghcr.io/${{ github.actor }}/podinfo:${{ steps.prep.outputs.VERSION }}
cat kustomization.yaml
- name: Commit kustomization
run: |
git config --local user.email "[email protected]"
git config --local user.name "GitHub Action"
git commit -a -m "ghcr.io/${{ github.actor }}/podinfo:${{ steps.prep.outputs.VERSION }}"
- name: Push changes to main
uses: ad-m/github-push-action@master
with:
github_token: ${{ secrets.GITHUB_TOKEN }}
branch: main
This github action is not tested, it is only shown to give an idea of what is involved in building a new docker image, tagging it, pushing it to a container registry (ghcr.io), and lastly changing the original image tag in deployment.yaml using kustomize.kustomization.yaml can be used to update the manifest files in the kustomization directory. Specifically, we would like to update the image tag in deployment.yaml to the newly built tag. To do this we will add to the kustomization.yaml the below text:
images:
- name: ghcr.io/stefanprodan/podinfo:6.0.0
  newTag: sha-aa7d15af
This customizes the image tag, replacing the old tag,
6.0.0, with the new tag, sha-aa7d15af. The git hash of the commit used to build the image, is used for the new tag. This way we can easily see what commit was used to build any of our images.When the github workflow pushes the new kustomization.yaml to the podinfo repository, the Flux git Source and Kustomization will see the change in git and install the new image.
Accessing our application
Generally speaking to access a Kubernetes application from the outside, you need a Kubernetes Ingress or a NodePort service.K3d comes with an inbuilt Ingress Controller called
traefik that listens on the internal port 80.We will be using the Ingress method.
Startup command:
Remember we have already mapped the internal port 80 to the external (host) port 9898 when we started k3d❯ k3d cluster create my-cluster --port 9898:80@loadbalancerThis means we now have port 9898 on our localhost which is connected to port 80 inside Kubernetes, which is a reserved port for ingress.
If we now access http://localhost:9898 we get
404 page not foundThis is because Kubernetes does not yet know where to forward requests to port 80.
Ingress
We need to tell Kubernetes what service the internal port 80 should be connected with, for this we use the following Ingress configuration:apiVersion: networking.k8s.io/v1beta1
kind: Ingress
metadata:
name: podinfo-ingress
annotations:
ingress.kubernetes.io/ssl-redirect: "false"
spec:
rules:
- http:
paths:
- path: /
backend:
serviceName: podinfo
servicePort: 9898
See here for more information on exposing services in k3d: https://k3d.io/usage/guides/exposing_services/If we push this manifest to either of our flux sources,
https://github.com/$GITHUB_USER/fleet-infra/tree/main/clusters/my-cluster, or https://github.com/$GITHUB_USER/podinfo/tree/main/kustomize, Flux will create the Ingress resource for us. Let’s save the file as ingress.yaml and push it to the podinfo source. You will also need to add the resource to the kustomization.yaml file in the kustomize directory:apiVersion: kustomize.config.k8s.io/v1beta1 kind: Kustomization resources: - hpa.yaml - ingress.yaml - deployment.yaml - service.yamlAfter pushing to github we see the new resource.
❯ kubectl get ingresses
NAME              CLASS    HOSTS   ADDRESS       PORTS   AGE
podinfo-ingress   <none>   *       192.168.0.2   80      18s
So now when we access http://localhost:9898, the request is routed to Kubernetes internal Ingress port 80, which is then routed to our podinfo service (port 9898) which is then routed to our podinfo Pod (port 9898).
After Here is a screen shot of the podinfo app served from our host at http://localhost:9898
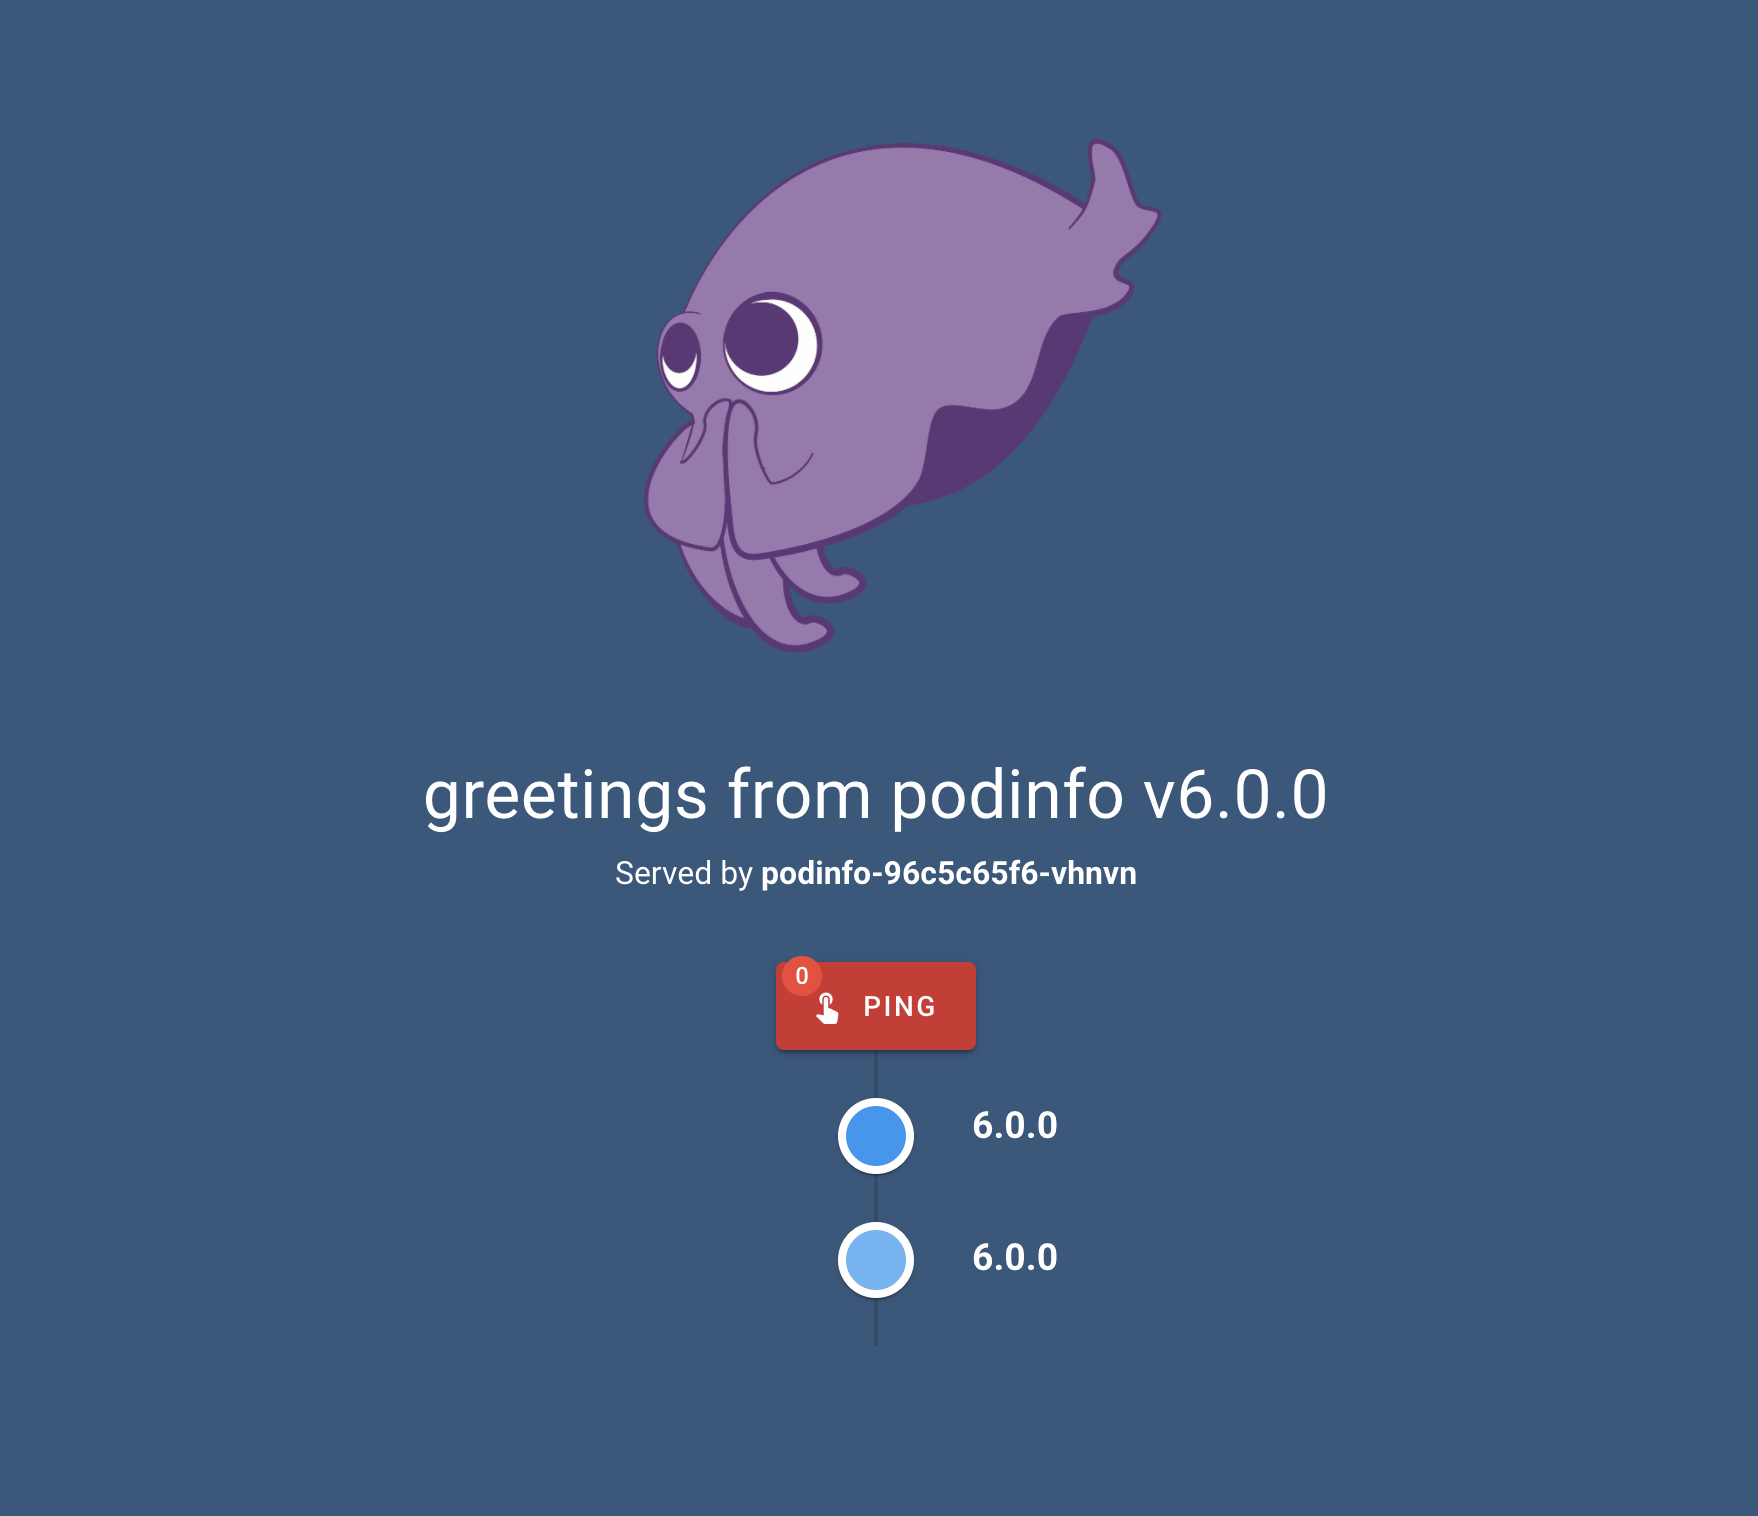
The above application was installed by flux based on the sources and reconciliations we configured.
Summary
We have seen how Flux can be installed and configured with sources and reconciliation configurations.We used the lightweight k3d to test Flux locally.
We saw how to use GitHub workflows to build a new container, create an image tag, and trigger flux deploys by updating the new image tag for the deployment manifest.
次世代システム研究室では、グループ全体のインテグレーションを支援してくれるアーキテクトを募集しています。インフラ設計、構築経験者の方、次世代システム研究室にご興味を持って頂ける方がいらっしゃいましたら、ぜひ募集職種一覧からご応募をお願いします。