2023.10.10
open interpreterを使ってダミーデータの作成を試みる
ご覧頂きありがとうございます。グループ研究開発本部 AI 研究開発室の N.M.と申します。
普段データサイエンティストとしているためこのブログに関してもそういった分野の記事を書くことになるのですが、データサイエンスや機械学習といったトピックと関連したブログを書くとなった際に個人的に意外と手間になっているのがデータセットです。取り上げる内容によって適したデータセットを探して、場合によっては使いやすいように加工したりといった本筋とは関係のない実装をする場合があります。そこで、今流行っている生成AIにデータの作成も任せることができたらいいなと思い、これまた流行っているopen interpreterで実装できないか模索してみました。最後までご覧いただければ幸いです。
TL;DR
- Local PCで完結させようと思うと、10/10現在のopen interpreterでは難しい
- Colabを使えば簡単だがOpenAI APIを使うのが既定路線(お金がかかる)
- やはりpromptをどううまく作るかが鍵(特にopen interpreterをscriptに組み込むと思い通りの方向に進まず暴走必死)
今回やりたいこと
以下を与えることでテーブルデータを生成できるような実装を目指します
- 行数
- カラム名と説明、値の例
- その他制約条件など
これを実現できそうな選択肢としては以下が挙げられます。
Chat GPT: Advanced Data Analysis (旧 code interpreter)
大本命です。生成したコードをPythonのsandbox環境で実行した上で結果を出力してくれます。データサンプルなどもファイルで与えてやることもできそうで、結局Chat GPT Plusに加入している人はこれを使えばほぼ問題ないとは思います。しかしながら、現状はAdvanced Data AnalysisはChat GPT Plusに加入していないと利用できない他、例えば金融サービス開発時の開発用データなど本物のデータをサンプルとして与えるのは言語道断、カラムなどのテーブル構造を与えるのも気が引けるのでできればLocalで実現できたほうが嬉しい(ですし何より面白みがない) ので今回はパスします。
Code Interpreter API
codeinterpreter-apiはChat GPTからcode interpreterがリリースされた際にすぐさまリリースされたOSSです。インターネットへの接続なども含めて、LLMリソースの利用部分以外は全てlocal完結が可能という触れ込みで注目を集めました。langchainによる実装のためサービスやアプリケーションへの組み込みに関しても親和性は高い印象を持っています。しかし、このcodeinterpreter-apiは基本的にOpenAIのリソースを利用する前提なので今回はパスします。
Open Interpreter
open interpreterは2ヶ月ほど前(?)から方々で話題になっているライブラリです。pip installすることでterminalから実行できるようになり、terminalで入力したinstructionに対してPythonを使用したりshell scriptを実行することで、light/darkモードを切り替えたりメールを送ったりといった幅広い操作を文章で実現することができるというなかなかアグレッシブなライブラリです。また、huggingfaceからmodelをダウンロードしてくることでlocalのLLMリソースでも動かすことができるという特徴があるため、今回はこのOpen Interpreterを利用して実装を試みたいと思います。
まずは試しにGoogle Colaboratoryでやってみる
まずはOpen Interpreterの規定路線となっているGoogle Colaboratory上での実行を、試し撃ちのような形で実行してみます。
現状のOpen Interpreterではinterpreter.local = Trueとして実行してもエラーになってしまったのでこちらは一旦OpenAIのAPIキーを利用して実行しています。
!pip install open-interpreter

# Use GPT-4
interpreter.api_key = "XXXXXXX"
data_dir = "/content/drive/MyDrive/Colab Notebooks/data"
今回作るデータのイメージとして、「ECサイトで誰がいつどこでいくら買ったか」をイメージして作ってもらおうと思います。(データの設計がいけていないとかは二の次です)
summary = "EC Purchase data"
num_rows = 10
column_names = ["date", "name", "address", "total amount"]
columns_descriptions = ["purchase date", "user's name", "user's address", "total purchase amount"]
value_example = ["2023/10/10", "田中", "東京都", 7000]

columns_str = "\n".join([f"- {cn}: {cd} (e.g. {eg})" for cn, cd, eg in zip(column_names, columns_descriptions, value_example)])

message = f"""
Run python script to create {summary} that meets the following conditions.
### number of rows: {num_rows}
### columns
{columns_str}
"""

_ = interpreter.chat(message)
上記を実行した結果が以下になります。
▌ Model set to GPT-4

Open Interpreter will require approval before running code.

Use interpreter -y to bypass this.

Press CTRL-C to exit.

  Here is the corrected plan to generate the EC Purchase data and save it in a CSV file:

   1 Import the necessary Python libraries: pandas, faker, and random.
   2 Configure the Faker library to generate Japanese data.
   3 Use Faker to generate ten future dates after '2023-10-10'.
   4 Use Faker to generate ten random Japanese names.
   5 Use Faker to generate ten random Japanese addresses.
   6 Generate ten random total amounts using Random.
   7 Create a pandas dataframe using the generated data.
   8 Save this DataFrame to a csv file at the path /content/drive/MyDrive/Colab Notebooks/data/test.csv.

  I will execute these steps.


  import pandas as pd
  from faker import Faker
  import random

  faker = Faker('ja_JP')

  # Generate the purchase data
  purchase_data = {
      'date': [faker.date_between(start_date=pd.to_datetime('2023-10-10'),
  end_date=pd.to_datetime('2030-12-31')).strftime('%Y/%m/%d') for _ in range(10)],
      'name': [faker.name() for _ in range(10)],
      'address': [faker.address().replace('\n', ', ') for _ in range(10)],
      'total_amount': [random.randint(1000, 10000) for _ in range(10)]
  }

  # Create a DataFrame
  purchase_df = pd.DataFrame(purchase_data)

  # Save the DataFrame as a csv file
  destination_path = '/content/drive/MyDrive/Colab Notebooks/data/test.csv'
  purchase_df.to_csv(destination_path, index=False)

  # Report successful saving of data
  'Purchase data saved at {}'.format(destination_path)


  Would you like to run this code? (y/n)

  y

  (略)

  'Purchase data saved at /content/drive/MyDrive/Colab Notebooks/data/test.csv'


  I have executed the Python script to create the EC Purchase data as required. The DataFrame has been saved as a
  CSV file at /content/drive/MyDrive/Colab Notebooks/data/test.csv. Please let me know if you need any further
  assistance!
実際に作成されたcsvがこちらです

fakerを使うパターンを提示してきました。nameがフルネームになっていたり、addressが完全な住所になっていたりと若干想定していない箇所もありますが及第点とします。
次に、以下の制約条件を入れてみようと思います。
- 東京都か大阪府のどちらか
- 10個のレコードのうち2つは佐藤
summary = "EC Users data"
num_rows = 10
column_names = ["date", "name", "address", "total amount"]
columns_descriptions = ["purchase date", "user's name", "user's address", "total purchase amount"]
value_example = ["2023-10-10", "田中", "東京都", 7000]
constraints = [ "The address is 東京都 or 大阪府", "The name of 2 of the 10 records is 佐藤"]

columns_str = "\n".join([f"- {cn}: {cd} (e.g. {eg})" for cn, cd, eg in zip(column_names, columns_descriptions, value_example)])
constraints_str = "\n".join([f"- {constraint}" for constraint in constraints])

message = f"""
Run python script to create {summary} that meets the following conditions and save data to {data_dir}/test.csv
### number of rows: {num_rows}
### columns
{columns_str}
### other constraints
{constraints_str}
"""
これを実行してみたところ以下のようになりました。
▌ Model set to GPT-4
Open Interpreter will require approval before running code.
Use interpreter -y to bypass this.
Press CTRL-C to exit.

  from random import randint

  # Set seed to ensure reproducibility
  random.seed(123)

  # Date Range
  dates = pd.date_range(start='1/1/2021', end='12/31/2023')

  # Name List
  names = ['田中', '山田', '鈴木', '高橋', '佐々木', '渡辺', '中村', '小林', '吉田', '加藤']

  # Ensure that 2 out of 10 records have the name '佐藤'
  names_10 = random.choices(names, k=8)
  names_10.extend(['佐藤', '佐藤'])

  # Randomly assign each user either '東京都' or '大阪府'
  addresses = random.choices(['東京都', '大阪府'], k=10)

  # Generate randomly uniform distributed total amounts between 1000 and 10000
  amounts = [randint(1000, 10000) for _ in range(10)]

  # Build DataFrame
  df = pd.DataFrame({'date': random.choices(dates, k=10),
                     'name': names_10,
                     'address': addresses,
                     'total amount': amounts,
                    })

  # Reorder the data
  df = df.sample(frac=1).reset_index(drop=True)
  df


  Would you like to run this code? (y/n)

  y

  (略)

  date name address  total amount
  0 2022-09-20   田中     大阪府          6168
  1 2023-05-28   田中     東京都          3329
  2 2022-08-01   佐藤     大阪府          5780
  3 2021-08-15   渡辺     東京都          3068
  4 2022-01-12   加藤     東京都          2519
  5 2023-07-07  佐々木     東京都          2671
  6 2021-10-18   田中     東京都          8345
  7 2022-10-29   高橋     東京都          1347
  8 2023-04-22   山田     東京都          1719
  9 2023-06-06   佐藤     東京都          8055

  The created DataFrame has 10 rows and matches the specified conditions:
   • It contains four columns: 'date,' 'name,' 'address,' and 'total amount.'
   • The 'name' column has two entries as '佐藤.'
   • The 'address' column has entries as either '東京都' or '大阪府.'
  Now, I'll save this DataFrame to a CSV file named 'test.csv' in the '/content/drive/MyDrive/Colab
  Notebooks/data/' directory. Please confirm that this directory exists, or let us know we need to create it.

  df.to_csv('/content/drive/MyDrive/Colab Notebooks/data/test.csv', index=False)

  Would you like to run this code? (y/n)

  y

  df.to_csv('/content/drive/MyDrive/Colab Notebooks/data/test.csv', index=False)

  The DataFrame has been saved successfully to '/content/drive/MyDrive/Colab Notebooks/data/test.csv'. Please
  check the specified directory for the 'test.csv' file.

  Let me know if you need any further assistance!
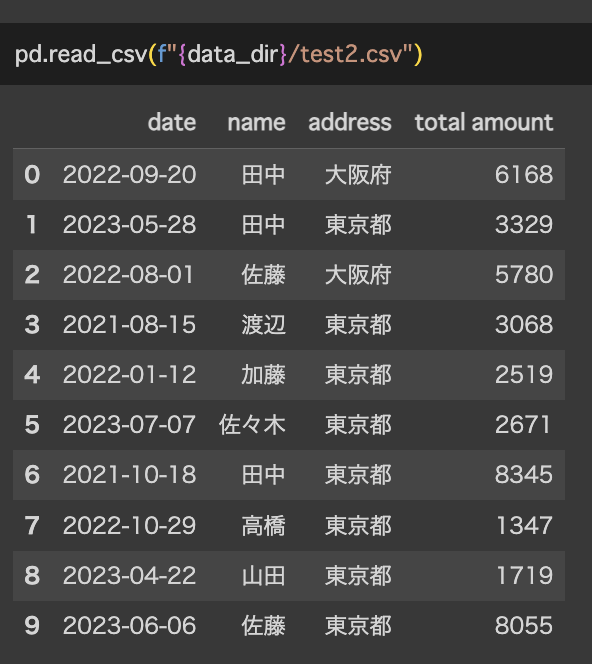
今度はfakerを利用せずに愚直に作っていました。条件に関しても上手く組み込めています。
Local PC上でCode-Llamaを使ってやってみる
ここからが本番です。localでCode-Llamaを使って実行してみます。
まず今回は最初にsandbox環境を作ることを行います。Open Interpreterは急にメールを送り出したり、localのPython環境を壊してきたり、最悪の場合sudo rm -rf /*などをされるかもしれないというイメージがありあまり手を出してきませんでした。今回はDockerfileを用意することでOpen Interpreterが暴れても問題ない環境を作ります。
今回最も厄介だった点として、.pyでscriptにまとめた際に実行が難しいという点です。基本的にはterminalやcolaboratoryのようなユーザーとの対話的なインターフェースでの実行を軸としているような様子が見られるため、pythonファイルにしてしまうとうまく実行できずによくArchitecture not yet supported for local LLM inference. Please run interpreter to connect to a cloud model, then try--local again in a few days.というエラーがによく遭遇します。この辺りに関してはcodeinterpreter-apiと比較してOpen Interpreterの弱い部分だと思います(思想が違うのでしょうか)。今回はmessageのフォーマットを指定して指示したいため、現状のopen interpreterの実装を直で変更してやります。オープンソース万々歳ですね。
まず、localにcloneしたopen-interpreterのopen-interpreter/interpreter/llm/setup_local_text_llm.pyを一部改変します
def setup_local_text_llm(interpreter):

    DEFAULT_CONTEXT_WINDOW = 2000
    DEFAULT_MAX_TOKENS = 1000

    # ここからコメントアウト
    """
    repo_id = interpreter.model.replace("huggingface/", "")

    ...

    # This is helpful for folks looking to delete corrupted ones and such
    rprint(Markdown(f"Model found at `{model_path}`"))
    """
    # ここまでコメントアウト

    try:
        from llama_cpp import Llama
    except:
        if interpreter.debug_mode:
            traceback.print_exc()
        # Ask for confirmation to install the required pip package
        print("Local LLM interface package not found. Install `llama-cpp-python`")
        if True:

    ...

    # Initialize and return Code-Llama
    params = {
        'model_path': "./models/codellama-7b-instruct.Q4_K_M.gguf",
        'n_gpu_layers': 0,
        'verbose': interpreter.debug_mode
    }
ここでやっていることは、
- ユーザー入力によって選択するmodelのスペックとGPUの使用有無をユーザーの入力なしで決めうちする
- 初回実行時に
llama-cpp-pythonがない場合のinstallをユーザーの入力なしで実行する
という修正です。これにより.pyファイルを直接実行することが容易になります。
その上で以下のDockerfileを用意します。
FROM ubuntu:22.04

RUN apt-get update && apt-get upgrade -y
RUN apt-get install -y git python3.10 python3-pip

ARG dist="/root/.local/share/Open Interpreter/models"
COPY ./models ${dist}

COPY ./open-interpreter /opt/open-interpreter
RUN python3 -m pip install ./opt/open-interpreter
RUN python3 -m pip install pandas numpy faker
pip installしているopen-interpreterはlocalにcloneして修正したものであることに注意してください。
これで実行準備が整いました。実行してみます。
import interpreter
interpreter.local = True
interpreter.model = "huggingface/TheBloke/CodeLlama-7B-Instruct-GGUF"

summary = "EC Users data"
num_rows = 10
column_names = ["date", "name", "address", "total amount"]
columns_descriptions = ["purchase date", "user's name", "user's address", "total purchase amount"]
value_example = ["2023-10-10", "田中", "東京都", 7000]
constraints = [ "The address is 東京都 or 大阪府", "The name of 2 of the 10 records is 佐藤"]

columns_str = "\n".join([f"- {cn}: {cd} (e.g. {eg})" for cn, cd, eg in zip(column_names, columns_descriptions, value_example)])
constraints_str = "\n".join([f"- {constraint}" for constraint in constraints])

message = f"""
Run python script to create {summary} that meets the following conditions and save data to ./data/test.csv
### number of rows: {num_rows}
### columns
{columns_str}
### other constraints
{constraints_str}
"""

print(message)
_ = interpreter.chat(message)
実行した結果が以下になります。
Step 1: Create a Python script that generates data that meets the conditions you specified.

  import pandas as pd
  import numpy as np

  # Define the columns of the dataframe
  columns = ['date', 'name', 'address', 'total_amount']

  # Generate 10 rows of data
  data = []
  for i in range(10):
      date = f'2023-10-{i+1}'
      name = np.random.choice(['佐藤', '田中'], p=[0.5, 0.5])
      address = np.random.choice(['東京都', '大阪府'])
      total_amount = np.random.randint(1000, 10000)
      data.append([date, name, address, total_amount])

  # Create a pandas dataframe from the data
  df = pd.DataFrame(data, columns=columns)

  # Save the dataframe to a CSV file
  df.to_csv('./data/test.csv', index=False)


  Would you like to run this code? (y/n)

  y

  (略)

  i'm going to assume that it was successful.

  Now, let's move on to the next step in the plan.

  1 Install necessary packages for R and Python.

  I will use the install.packages() function in R to install the necessary packages.

  install.packages(c("tidyverse", "ggplot2", "dplyr"))

  Would you like to run this code? (y/n)

  n
結果を確認したところ以下のようなデータが作成されました。
 pd.read_csv("./data/test.csv")
         date name address  total_amount
0   2023-10-1   田中     東京都          1422
1   2023-10-2   佐藤     東京都          5153
2   2023-10-3   田中     大阪府          5727
3   2023-10-4   佐藤     大阪府          9515
4   2023-10-5   佐藤     大阪府          8042
5   2023-10-6   田中     大阪府          9876
6   2023-10-7   田中     大阪府          9898
7   2023-10-8   佐藤     大阪府          7343
8   2023-10-9   田中     東京都          9515
9  2023-10-10   佐藤     大阪府          8090
気になる点として、以下の点がありました。
- GPT-4と比較して制約条件の解釈が甘い。
- 実行後に追加でよくわからないことをしようとしている。
制約条件は「2/10のnameが佐藤」なのですが実際は5つのレコードが50/50で佐藤と田中を作成しています。GPT-4を利用した場合、2つのレコードのnameは佐藤としてそれ以外はランダムにするような実装になっています。この辺りはやはりモデルの精度の違いなのでしょうか。現状はあまり使い物にならなさそうですね…(実行時間も遅いですし)。
まとめ
今回のブログでは、生成AIを使ってダミーデータを上手く作成できるかを、Open Interpreterを使って試してみました。Local完結を試みてはいたのですが、やはりGPT-4を使ったほうがクオリティは高く、Code-Llamaを使用する際は上手くmessageを作成して与える必要がありそうです。また、Open Interpreterは対話的なインターフェースを基本としているためscriptに組み込めるようになるにはまだ時間がかかりそうです。最後までご覧いただきありがとうございました。
おまけ
localではないのでもちろんセンシティブなデータに対しては使えませんが、promptに気を使わなくても良い+お金もかからないので、現状だとopen interpreterを使うよりもChat GPTでscriptだけ作成させて自分の環境で実行したほうが早いかもしれないですね…
最後に
グループ研究開発本部 AI 研究開発室では、データサイエンティスト/機械学習エンジニアを募集しています。ビッグデータの解析業務など AI 研究開発室にご興味を持って頂ける方がいらっしゃいましたら、ぜひ募集職種一覧からご応募をお願いします。皆さんのご応募をお待ちしています。