2023.10.10
Iframeを使いこなそう。~ EC決済のセキュリティ対策に関連して ~
導入
こんにちは。グループ研究開発本部 次世代システム研究室のH.Oです。今回はEC決済におけるフロントエンド開発に、iframe要素を活用してセキュリティ対策・実装を行う事例について考えていきたいと思います。
結論ファースト
- 昨今のEC決済のフロントエンド実装においては、ベストプラクティスの一つとして、個人情報を入力するformをiframeで埋め込むという方法が取られている。
- 実際の実装については、テナントのサイト・複数のiframe間でdataの送受信を行うため複数のiframe要素を作成する必要がある。
- server sideのAPIを叩くとき、formから取得したデータを変数・Objectに詰めて引数に設定するのではなく、iframe elementそのものを引数に設定することで、テナントが顧客の情報を取り扱ってしまう危険性がなくなる。
EC決済とセキュリティ
背景
詳しい実装の内容に入る前に、EC決済とセキュリティに関する背景を振り返ります。
EC決済の実装方式としては、大きくリダイレクト型とJavaScript型(トークン決済)があります。どちらもEC加盟店がクレジットカード情報を非保持化することが目的となっています。前者はECサイト本体と、決済画面が異なる仕様のページとなるため、ユーザーの離脱を招く可能性が高いことから、ECサイト本体にJavaScriptを埋め込んで使うことのできるトークン決済が現在の主流となっています。ユーザーから入力情報を取得し、トークンを発行するJavaScriptでの処理を加盟店へ提供する決済事業者は、カード情報を保持することになるため、PCIDSSへ準拠することが求められます。PCIDSSでは、カード番号など個人を特定できる情報を加盟店で持ってはいけないという考えから、カード情報を入力するフォームを、一つのウェブページから別のウェブページにコンテンツを埋め込む安全な方法であるiframeで提供し、加盟店のECサイトに埋め込む事が推奨されています。
iframeがセキュリティの観点から推奨される根拠として、下記のことが指摘されています。(出典: Very Good Security)
- iframe要素にはsandbox属性が存在し、埋め込まれたフレームのコンテンツを誰からもアクセスされないように分離し、悪意のある者によって操作されることがないよう設定ができる。
- ECの世界では、iframeを使用することで、加盟店が自分のウェブサイトに決済代行事業者が提供するiframeを埋め込むことができます。加盟店のチェックアウトのプロセス中に、決済代行事業者は顧客のカード保有者データのすべてを受け取り、加盟店はそれを見ることもアクセスすることもできない。
- iframeは、すべての現代のウェブブラウザによって強制されるSame-Origin Policyを活用することでセキュリティを向上させている。Same-Origin Policyは、1つのoriginによってロードされた文書やスクリプトが、プロトコル、ポート、ホストの同じ「タプル」を持つURLである別のoriginのリソースとどのように相互作用できるかを制限している。したがって、異なるoriginの文書やスクリプトは、明示的にそのように認証されない限り、相互作用することはできない。Same-Origin Policyは、加盟店のウェブサイト上の(悪意のある可能性のある)スクリプトが、iframe内の決済代行事業者の提供する支払いフォームのようなサードパーティのコンテンツや通信と相互作用するのを防ぐ。これにより攻撃者が、カード保有者のデータを読み取ったり盗んだりするのが難しくなる。
動作の概要
iframeのプロセスの動作は下記の通りになります。
- 加盟店はウェブページに提供されたiframeを埋め込む。
- 顧客はiframeを介して決済代行事業者の支払いフォームをリクエストする。
- 決済代行事業者はiFrameを通じて顧客に直接支払いフォームを送信する。
- 顧客は決済代行事業者のフォームに支払い詳細を入力する。
- 決済代行事業者は顧客から直接支払いの詳細を受け取る。
- 決済代行事業者は加盟店と顧客の代わりに支払い認証をリクエストする。
処理の流れの詳細については後ほどのdemoであらためて説明します。
加盟店にとってのメリット
加盟店への影響: iframeをベースにした設計は、加盟店に多くの利点をもたらすことが指摘されています。(出典 Very Good Security)
- 支払いカードデータは収集、保存、処理、または転送されない。
- 適用されるPCI DSSの要件が少なくなる。
- セキュリティコントロールが必要なシステムが少なくなる。
- 情報セキュリティの脅威が少なくなる。
- システムの侵害のリスクが低下。
iframeはまた、リダイレクト支払い方法と異なり、支払いページが既存のウェブサイトのデザインに一致するため、顧客はショッピング体験中に加盟店のウェブサイトに留まるため、ユーザー体験の向上につながります。
以上、iframe要素を埋め込む実装について意義やメリットを概観しました。それでは具体的にどのように実装すれば良いのでしょうか。以下では具体的な実装を検討していきます。
iframe要素と親ページでdataをやり取りしてみる。
まずは最小構成で考えたいと思います。iframeを用いたdataのやり取りは主にmessage eventを利用して行います。
以下では、一枚のHTML(parentとする)に一つのiframe要素を埋め込む構成を考えます。iframe要素、親ページにそれぞれinputを用意し、iframe要素のinputに入力した値が親ページに送信・表示され、親ページのinputに入力した値がiframe要素内に送信・表示されるようにしています。
- 構成(各URLは架空のものです。)
- https://example-site.example/form.html にiframeを埋め込むページをhostingする
- https://sample-iframe.example/sample-iframe.htmlに読み込むiframe要素をhostingする
https://sample-iframe.example.com/sample-iframe.html
<!DOCTYPE html>
<html lang="ja">
<head>
    <meta charset="UTF-8">
    <meta name="viewport" content="width=device-width, initial-scale=1.0">
    <title>iframe</title>
    <style>
        .container {
            border: 1px solid black;
            padding: 20px;
        }
    </style>
</head>
<body>
    <div class="container">
        <h2>iframe要素</h2>
        <div>
            <label for="input-form">input</label>
            <input id="input-form" type="text">
        </div>
        <div>
            <p>親ページから受信したdata</h2>
            <p id="data"></p>
        </div>
    </div>
    <script>

        // iframe要素のinputに入力された値を親ページにpostMessageで送信
        const inputElement = document.getElementById('input-form');
        inputElement.addEventListener('input', function() {
                         // 第二引数でoriginを指定する。この場合、https://example-site.exampleから送信されるデータしか処理を受け付けない。
            window.parent.postMessage(inputElement.value, 'https://example-site.example');
        });

        // 親ページから受信
        window.addEventListener("message", (event) => {
            document.getElementById("data").innerHTML = event.data;
        }, false);
    </script>
</body>
</html>
https://example-site.example/form.html
<!DOCTYPE html>
<html lang="ja">
<head>
    <meta charset="UTF-8">
    <meta name="viewport" content="width=device-width, initial-scale=1.0">
    <title>Simple Web Page</title>
</head>
<body>
    <h1>親ページ</h1>
    <iframe src="https://sample-iframe.example/sample-iframe.html" frameborder="0" style="width: 100%; height: 280px"></iframe>
    <div>
        <label for="input-to-iframe">input</label>
        <input id="input-to-iframe" type="text">
    </div>
    <div>
        <p>iframeに入力したdata</p>
        <p id="data"></p>
    <script>
        const IFRAME_ORIGIN = "https://sample-iframe.example";
        const IFRAME_URL = `${IFRAME_ORIGIN}/sample-iframe.html`;

        // 親ページのinputに入力したデータをiframe要素へ送信し、表示する
        const inputElement = document.getElementById('input-to-iframe');
        inputElement.addEventListener('input', function() {
            const message = inputElement.value;
            const iframeElement = document.querySelector('iframe');
                         // 第二引数でoriginを指定する。この場合、https://sample-iframe.exampleから送信されるデータしか処理を受け付けない。
            iframeElement.contentWindow.postMessage(message, IFRAME_URL);
        });

        // 埋め込んだiframeに入力したデータを親ページへ送信・表示する
        window.addEventListener('message', function(event) {
            if(event.origin !== IFRAME_ORIGIN) return;
            const message = event.data;
            document.getElementById("data").innerHTML = message;
        });
    </script>
</body>
</html>
このように[送信先のframe].postMessage(data)で、dataを送信し、送信先のframeがmessageEventをlistenしておくことで、送信されたdataをmessageEventとして受け取ることができます。
実装
それでは上記を踏まえて、フォームがiframeで提供されることによって、入力された個人情報は実際にどのように処理されるのでしょうか。
あるWebサイトで、個人情報の入力を受け取り、Objectに詰めてサーバーのエンドポイントに送信する、というケースを考えます。
今までは、下記のように直接フォームを実装して入力を受け取っていました。
before
<!DOCTYPE html>
<html>
<head>
    // Libというglobal変数が使えるようになる、Libraryとする。
    <script src="https://sample-library.example"></script>
    <script>
        function handleSendData() {
            const content1 = document.getElementById('content1').value;
            const content2 = document.getElementById('content2').value;
            const content3 = document.getElementById('content3').value;

            Lib.sendData({content1, content2, content3}, (response) => {
                const resultElement = document.getElementById('result');
                resultElement.innerHTML = JSON.stringify(response);
            });
        }
    </script>
</head>
<body>
    <form action="サーバー側の処理を指定" method="post">
        <label for="content1">content1:</label>
        <input type="text" id="content1" name="content1" required><br><br>

        <label for="content2">content2:</label>
        <input type="text" id="content2" name="content2" required><br><br>

        <label for="content3">content3:</label>
        <input type="text" id="content3" name="content3" required><br><br>

        <input type="button" onClick="handleSendData()">
    </form>
    <div id="result"></div>
</body>
</html>
しかし、これらのフォームをiframeで提供することによってよりセキュアに個人情報を送信することができるようになります。フォームの実装は下記のようなコードに変更するようにします。
<!DOCTYPE html>
<html lang="ja">
  <head>
    <meta charset="UTF-8">
    <meta name="viewport" content="width=device-width, initial-scale=1.0">
    <title>Iframe Demo</title>
     // JavaScriptのコードを読み込んでいる。Libというglobal変数が使えるようにしている。
    <script src="./dist/index.js"></script>
  </head>
  <body>
    <form>
      <div>
        <label>content1</label>
        <div id="content1-wrapper"></div>
      </div>
      <div>
        <label>content2</label>
        <div id="content2-wrapper"> </div>
      </div>
      <div>
        <label>content3</label>
        <div id="content3-wrapper"></div>
      </div>
      <input type="button" onClick="handleSendData()">
    </form>
    <div>
      <p id="result"></p>
    </div>
    <script>
      const elements = Lib.createElements();
      const form1Element = elements.create('form1');
      const form2Element = elements.create('form2');
      const form3Element = elements.create('form3');
      const form1Wrapper = document.getElementById('#content1-wrapper');
      const form2Wrapper = document.getElementById('#content2-wrapper');
      const form3Wrapper = document.getElementById('#content3-wrapper');
      const result = document.getElementById('result'); // iframeで作成したformを加盟店が作成したwrapper要素内にmountする
      form1Element.mount(form1Wrapper);
      form2Element.mount(form2Wrapper);
      form3Element.mount(form3Wrapper); // APIを叩いて、formの入力値をbackendへ送信する
      function handleSendData(){
        Lib.sendData(form1Element).then((response) => { result.innerHTML = JSON.stringify(response); });
      }
    </script>
  </body>
</html>
Webサイトの実装者は、これまでのようにユーザーがフォームに入力した値を触ることなく、実装が完結するようになっています。それでは、ユーザーの入力は実際にどのように処理されているのでしょうか。
ポイントとなるのは、役割ごとに別々のiframeを用意しデータの送受信のフローを設計している点です。
加盟店に提供するformだけではなく、APIを叩く処理を行うiframe、さらに親ページとなる加盟店のサイトとの間でデータの送受信を行うcontrollerの役割を持つiframe要素を作成します。こうすることで、データの送信元・送信先を明確に制御しながらdataの受け渡しを行うことができるようになります。
- 構成(URLは架空です)
- 加盟店サイトpage https://sample-shop.example
- Library, form iframe, controller iframe https://sample-library.example
- api connect element iframe https://sample-library.example/api.html
- backend API https://sample-server-side/sample-endpoint.example
Dataの遷移を以下の図のように設計しました。(画像をclickの上、拡大してご覧ください。)
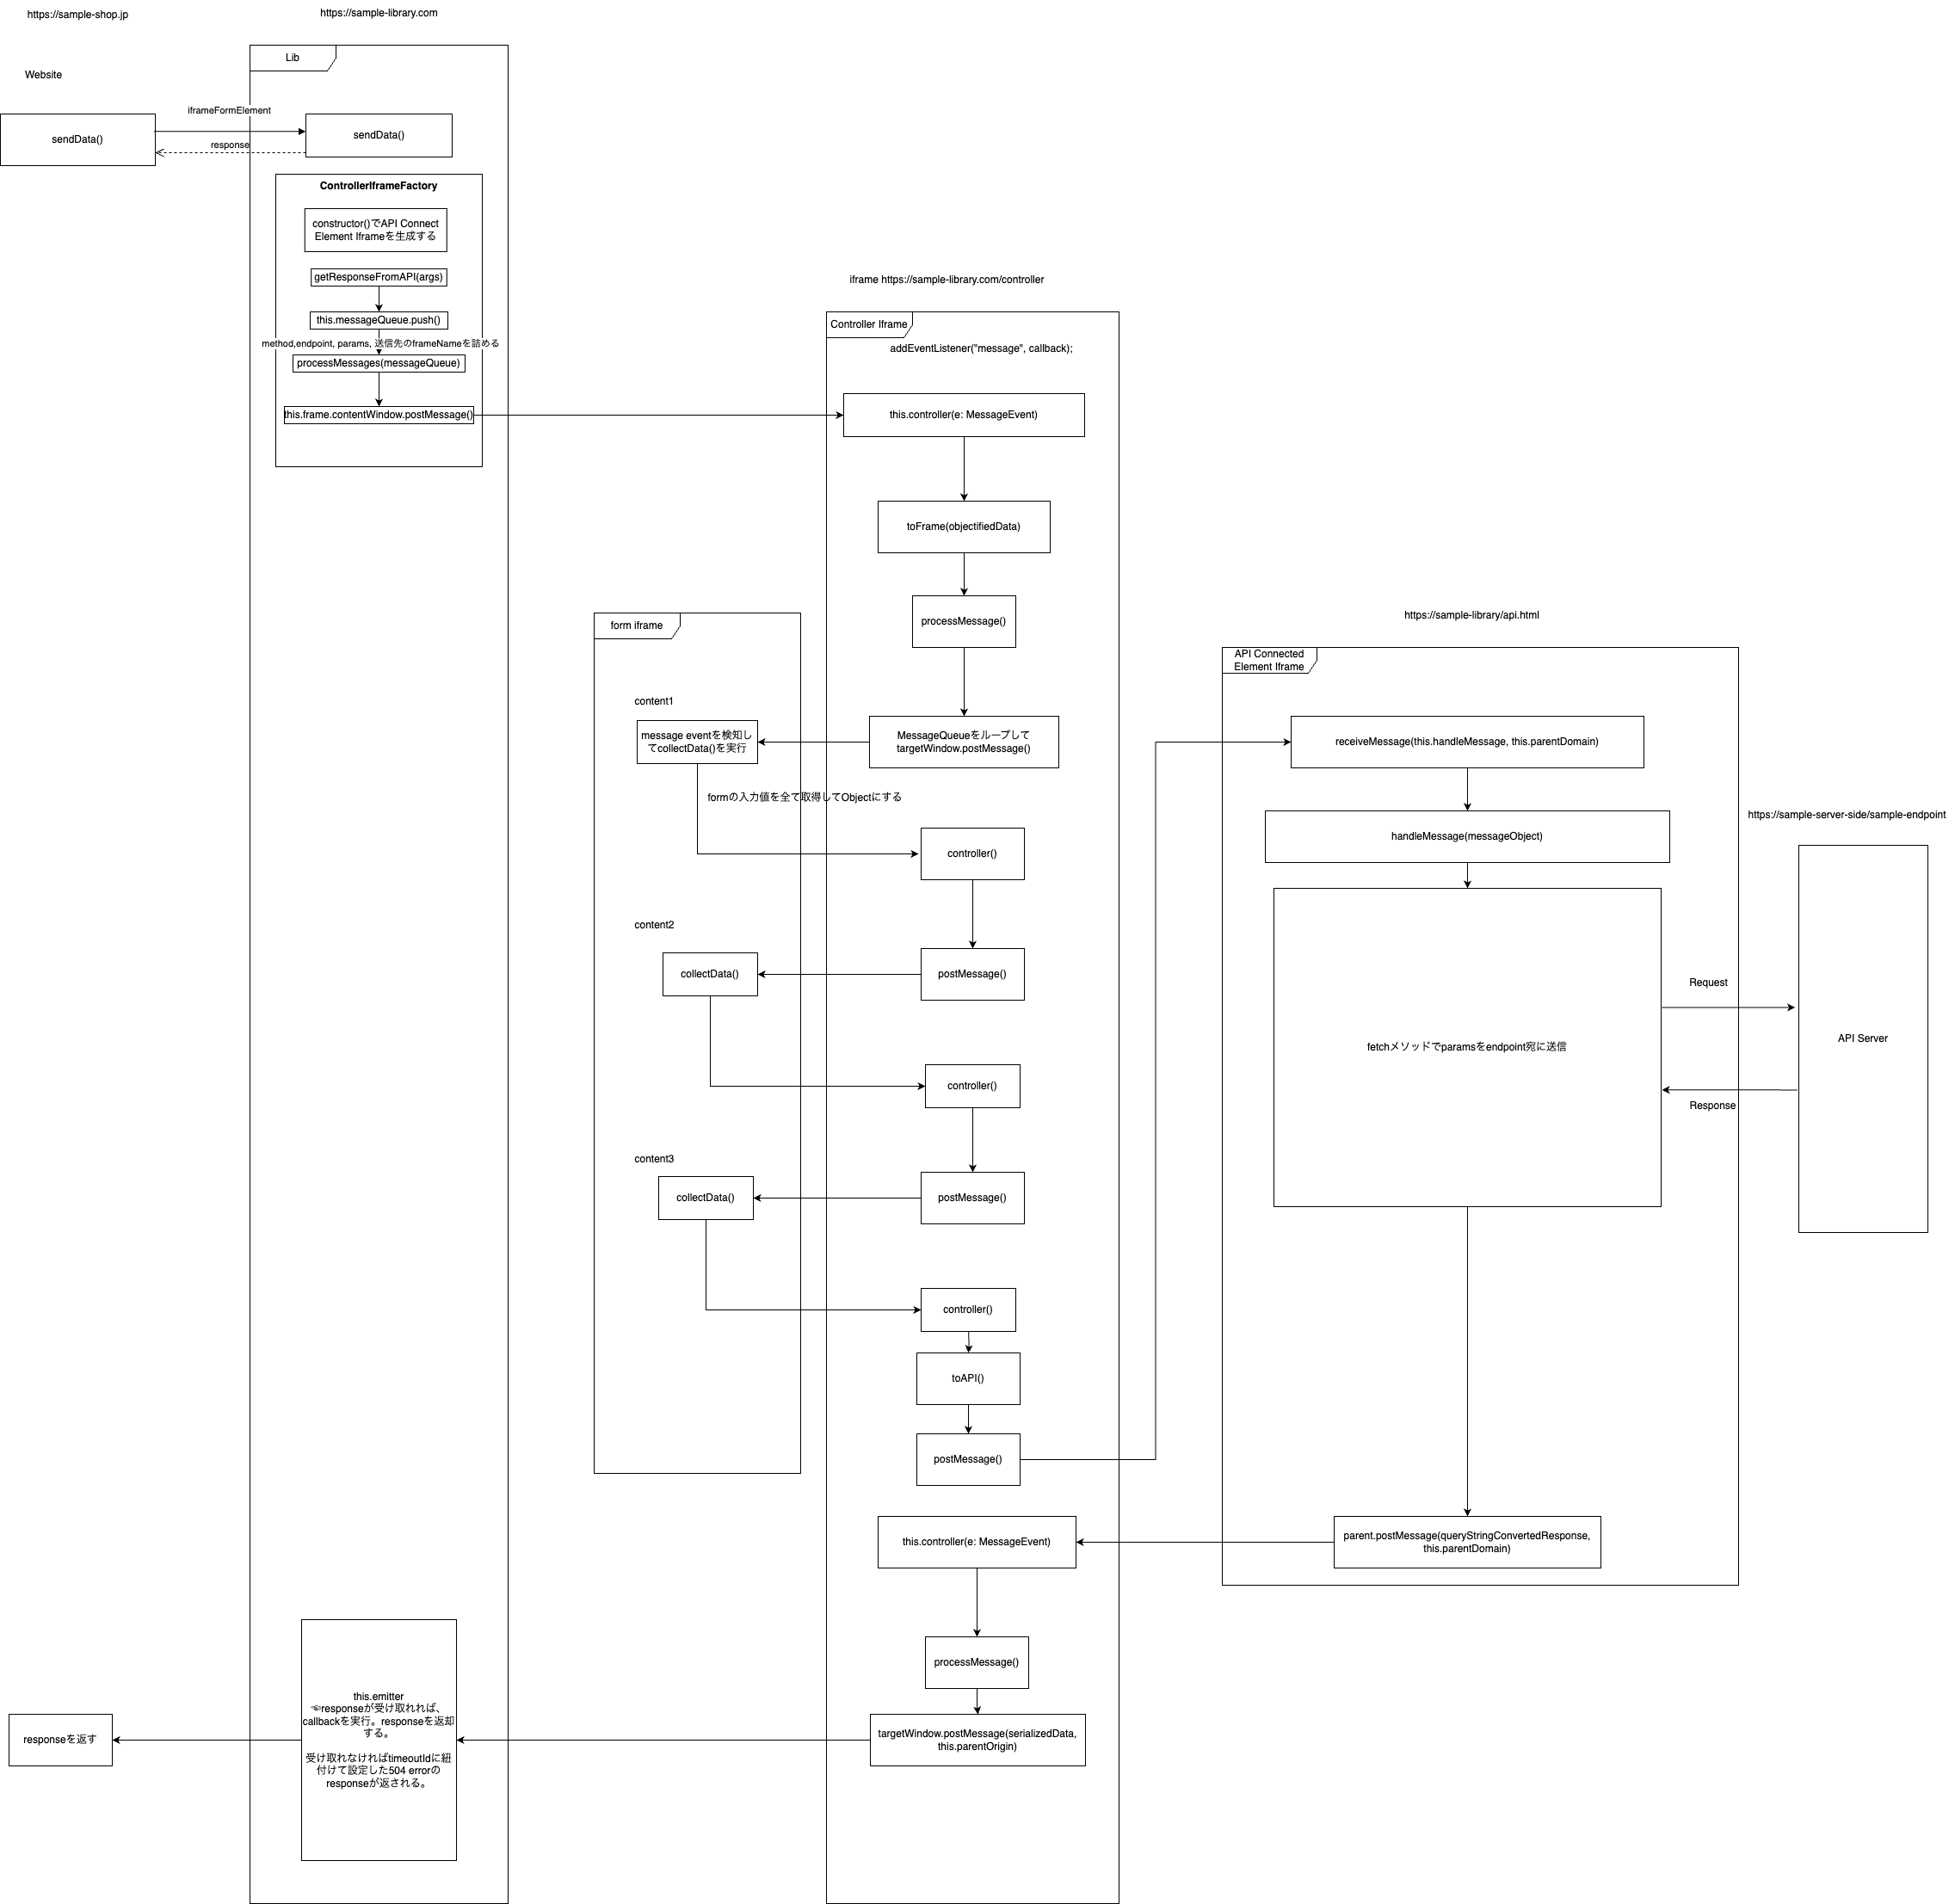
注: importしている各methodは下記のような処理です。
- trimSlash: 末尾の’/’を削除する
- convertToQueryString: key-value objectをURLのquery stringに変換
- convertToObject: queryStringをkey-value objectに変換
ライブラリ
import { setFrameName, convertToQueryString, convertToObject, trimSlash } from "./util";

export class Lib {
  controllerFactory: ControllerIframeFactory;
  END_POINT = "https://sample-server-side/sample-endpoint.example";
  constructor() {
    this.controllerFactory = new ControllerIframeFactory();
  }

  // ElementFactory classのinstanceを返す。加盟店はこのインスタンスに定義されたpublic methodを実行することで、iframe製のformをmountするなどの操作ができるようになる。
  public createElements = () => {
    return new ElementFactory(this.controllerFactory);
  };
  public async sendData = (formElement: FormElement) => {
    // formの入力の初期値はnullにする
    this.ControllerIframeFactory.getResponseFromAPI("POST", END_POINT, {
      params: {
        form1: null,
        form2: null,
        form3: null,
      }
    });
  }
}

// 加盟店が、iframe formを埋め込んだり取得したりするためのclass
class ElementFactory {
  private elements: FormElement[] = [];
  private controllerFactory: ControllerIframeFactory;
  private id: number = 0;

  constructor(controller: ControllerIframeFactory) {
    this.controllerFactory = controller;
  }

  public create(name: string): FormElement {
    const iframeElement = new FormElement(
      this.id,
      name,
      this.controllerFactory
    );
    this.elements.push(iframeElement);
    return iframeElement;
  }

  public getElement(type: string): FormElement | undefined {
    return this.elements.find((element) => element.type === type);
  }
}

// dataの送受信を制御するcontroller iframeを生成し、埋め込む
class ControllerIframeFactory {
  constructor() {
    this.controllerId = `Controller${this.counter++}`;
    this.name = setFrameName(this.controllerId);
    this.setFrame();
        // 親要素宛に別frameからmessage eventを検知したら、実行する処理
    window.addEventListener("message", (event) => {
      return this.emitter(event);
    });
  }

  private setFrame = () => {
    // controller iframeの作成とbodyへの追加を行う
  };

  public getResponseFromAPI = (
    endpoint: string,
    method: string,
    params: any
  ) => {
    // responseが返ってきた時に、どのcallbackを実行すれば良いかを指定するidを作成する。このcallbackの実行処理はthis.emitter(event)の中で行なっている。
    const id = `${this.controllerId}_${this.counter++}`;
    return new Promise((resolve) => {
      this.messageQueue.push({
        message: { id, method, endpoint },
        callback: resolve,
      });
      // このprocessMessages内でthis.controllerIframe!contentWindow!postMessage(convertToQueryString(messageObj), this.domain)を実行し、controller iframeに dataを送信する。また、API Connect Element Iframeからresponseが帰ってきた場合、それを返すcallbackを実行する。
      this.processMessages();
    });
  };
}


class FormElement {
  constructor(id: number, name: string, controller: ControllerIframeFactory) {
    this.id = `Elements${id}`;
    this.name = name;
    this.controllerFactory = controller;
    this.frame = this.createFrame(this.id, name);
  }

  // formのiframe要素を生成する
  private createFrame(id: string, type: string): HTMLIFrameElement

  public mount = (wrapperElement: HTMLElement) => {
    if (wrapperElement === null) {
      throw new Error("Invalid Element");
    }
    if (!this.isDestroyed && !this.isMounted()) {
      this.mountTo(wrapperElement);
    }
  };
  private postMessage = (data: any) => {
    this.frame.contentWindow!.postMessage(convertToQueryString(data), this.domain);
  };
}

window.Lib = new Lib();

declare global {
  interface Window {
    Lib: Lib;
  }
}
Controller Iframe
import {trimSlash, convertToQueryString, convertToObject } from './util.ts';

export class Controller {
  url: string = "https://sample-library.example";
  apiConnectElementIframe: HTMLIFrameElement | null = null;
  parentOrigin: string = "https://sample-library.example";
  controllerURL: string | null;
  messageQueue: {
    origin: string | null;
    data: any;
    targetWindow: Window | null;
  }[] = [];


  constructor() {
    const attributes = {
      src: `${this.url}/api/index.html#${encodeURIComponent(
        window.location.href
      )}`,
      name: "ApiConnectElementIframe",
      scrolling: "no",
    };
    if (this.apiConnectElementIframe === null) {
      this.apiConnectElementIframe = document.createElement("iframe");
      for (const [key, value] of Object.entries(attributes)) {
        this.apiConnectElementIframe.setAttribute(key, value);
      }
      document.body.appendChild(this.apiConnectElementIframe);
    }
    this.apiConnectElementIframe.addEventListener('load', () => {
        this.processMessage();
    });
    document.body.appendChild(this.apiConnectElementIframe);


    const objectifiedHash = convertToObject(window.location.hash.substring(1));
    this.parentOrigin = objectifiedHash.origin;
    this.controllerURL = trimSlash(window.location.origin);
    window.addEventListener('message', this.controller);
  }


  private controller = (e: MessageEvent) => {
    const {origin, data, source} = e;
    const trimmedOrigin = trimSlash(origin);
    if(
        (this.parentOrigin === trimmedOrigin) && source === window.parent
    ){
        const objectifiedData = convertToObject(data);
        const {to} = objectifiedData;
        return to === window.name ? this.toApi(objectifiedData): this.toFrame(objectifiedData);
    }


    if(trimmedOrigin === this.controllerURL){
        const objectifiedData = convertToObject(data);
        const {to, from} = objectifiedData;
        if(!to && !from && source === this.apiConnectElementIframe!.contentWindow){
            this.messageQueue.push({
                data, targetWindow: window.parent, origin: this.parentOrigin,
            });
            return this.processMessage();
        }
        try {
            if(window.parent.frames[null === objectifiedData ? undefined : from] !== e.source){
                return;
            }
        } catch (e) {
            return;
        }
        return (objectifiedData === null ? undefined : to) === window.name ? this.toApi(objectifiedData) : this.toFrame(objectifiedData);
    }
  };


  private processMessage = () => {
    for(const message of this.messageQueue){
        const { data, targetWindow, origin} = message;
        if(!targetWindow || !origin) continue;
        targetWindow.postMessage(data, origin);
    }
    this.messageQueue = [];
  };


  private toApi = (data: any) => {
    data.from = window.name;
    this.messageQueue.push({
        data: convertToQueryString(data),
        targetWindow: this.apiConnectElementIframe!.contentWindow,
        origin: this.url,
    });
    this.processMessage();
  };


  private toFrame = (data: any) => {
    try {
        data.from = window.name;
        const { to } = data;
        this.messageQueue.push({
            data: convertToQueryString(data),
            targetWindow: window.parent.frames[to],
            origin: this.controllerURL,
        });
        this.processMessage();
        } catch (deseralizedData) {
            return;
        }
  };
}
Form Iframe
一番最初はAPIに送信するobjectの初期値が全てnullの状態でcontroller iframeからデータが送信されます。
iframe要素のformに入力された全ての値を格納していきます。必須のparameterでnullのものがあれば、そのデータを入力しているframeを送信先として更新し、controller iframeのpostMessageを実行します。全ての必須parameterが取得できたら、送信先をcontrollerにします。controllerはこれを判定して、送信先をAPI Connect Element Iframeにします。また、必須ではないparameterについては、correctDataの処理の中で、frameの存在判定を挟むことで実装可能です。今回はDataの受け渡しを見ることが目的なので、関係する処理のみ紹介します。
class FormElementIframe {
  constructor(){
    // urlのhashにつけたquery parameterをobjectに成形し、属性をそれぞれ設定。

    window.addEventListener("message", function (messageObject) {
          // controller iframeからのpostMessageの場合、fromの値をtoに更新してcorrectDataを実行する。
    }),
  }


  private correctData = (message) => {
    const { name, inputs, controllerName } = this;
    const { form1, form2, form3 } = message.params;

    // 各フォームに対応する値をつめる
    // 送信先を更新
    // controller iframeに対してpostMessage
    window.parent.frames[controllerName].postMessage(
        convertToQueryString(message),
        window.location.origin
    );
  }
}
API Connect Element Iframe
import { convertToQueryString, convertToObject } from "../util";

export class ApiConnectElementIframe {
  parentURL: string;
  parentDomain: string;

  constructor() {
    this.parentURL = decodeURIComponent(
      window.location.hash.replace(/^#/, "")
    ).replace(/#.*$/, "");
    this.parentDomain = this.parentURL.replace(/([^:]+:\/\/[^\\/]+).*/, "$1");
    this.receiveMessage(this.handleMessage, this.parentDomain);
  }

  private handleMessage = async (messageObject: any) => {
    const { id, params, endpoint, method } = messageObject as {
        id: string;
        params: any;
        endpoint: string,
        method: string,
    };
    const response = await fetch(endpoint, {
        method,
        headers: {
            'Content-Type': 'application.json',
        },
        body: JSON.stringify(params),
    });
    const queryStringConvertedResponse = convertToQueryString({id, response});
    parent.postMessage(queryStringConvertedResponse, this.parentDomain);
  };

  private receiveMessage = (handleMessageFn: (data: any) => void, parentDomain: string) => {
    if(typeof window !== 'undefined'){
        const attachedCallback = function(args: any){
            if(args.origin.toLowerCase() !== parentDomain.toLowerCase()) return false;
            handleMessageFn(convertToObject(args.data));
        };
        window.addEventListener('message', attachedCallback, false);
    }
  };
}
まとめ
ここまで、EC決済のフロントエンド実装のベストプラクティスとして、個人情報を入力するinputをiframeで提供し、加盟店に埋め込んでもらう実装について紹介しました。ユーザー体験を損なうことなく、かつ安全にお客様の情報を守りながら処理を行うために欠くことのできない知識となっていると思います。一方で、当然ですが、iframeでフォームを埋め込むば安心、という訳ではなく、不正なbrowserへのアクセスを検知したり、データを暗号化したりするなど、様々な対策と掛け合わせることが重要です。iframeを駆使した実装は普段から数多く見かけるものではないと思いますので、何らかのヒントとして役に立つことができれば幸いです。
参考資料
https://www.verygoodsecurity.com/blog/posts/iframes-for-e-commerce-security
https://listings.pcisecuritystandards.org/documents/Understanding_SAQs_PCI_DSS_v3.pdf
最後に
グループ研究開発本部 次世代システム研究室では、最新のテクノロジーを調査・検証しながらインターネット上の高度なアプリケーション開発を行うエンジニア・アーキテクトを募集しています。募集職種一覧 からご応募をお待ちしています。
グループ研究開発本部の最新情報をTwitterで配信中です。ぜひフォローください。
Follow @GMO_RD