2021.01.12
A First Look at Google’s AI Platform
こんにちは、次世代システム研究室のN.M.です。
The Plan
I wanted to use deep learning to implement an exercise application. Having used some exercise vides I found on youtube I thought it would be nice to have something interactive that could recognize what the user was doing and respond accordingly.
For example if the user was doing press-ups slowly the app could tell the user to speed up.
However this level of real-time interactivity was beyond me. In the end I lowered my expectation to being able to count how many press-ups (or any other type of exercise) the user had completed by analyzing a video of the user exercising. This meant it wouldn’t be real-time interactive, since the video would be analyzed after it was made, but it is a nice start.
Not knowing much about deep learning I knew this was probably going to be hard to implement within the available time, but I wanted to learn so I gave it a go.
I planned to have the heavy lifting done on Google Cloud somehow and call that service from my smart phone.
This blog will be about finding my way around Google Cloud Platform offerings while trying to develop the above mentioned application.
RepNet
Official Documentation: https://sites.google.com/view/repnet
There is a Colab notebook here: https://colab.research.google.com/github/google-research/google-research/blob/master/repnet/repnet_colab.ipynb
The RepNet algorithm uses deep learning to analyze a video containing repetitions. The repetitions can be of anything but as some of the samples show it is ideally suited for counting repetitions of exercising. One of the notable strengths of RepNet is the flexibility of being able to process any video containing repetitions and count them correctly. Also, it can handle repetitions of varying durations, so could count repetitions of a user doing an exercise starting of fast and slowing as they become tired. See the bouncing ball example in the RepNet introduction link above.
This type of technology that could really help my application. I thought about using the Colab notebook directly, but couldn’t imagine a way to have a user’s client app connect with the notebook, so decided to try and convert the RepNet algorithm in the notebook to something more like a service that could be called over HTTP.
RepNet is quite compute intensive and on the notebook page it is stated that it requires a GPU for processing, this would make things more challenging as you will see.
To show that RepNet actually works, below is a video produced using the RepNet notebook of my cat graciously cooperating for an exercise video, and RepNet counting the repetitions.
Version 1: The Cloud Function
My first idea was to simply convert RepNet to a Cloud Function and call that via HTTP from a smart phone via HTTP after the exercise App had uploaded a video of the user exercising to Cloud Storage. The Cloud Function would then run RepNet on the video.
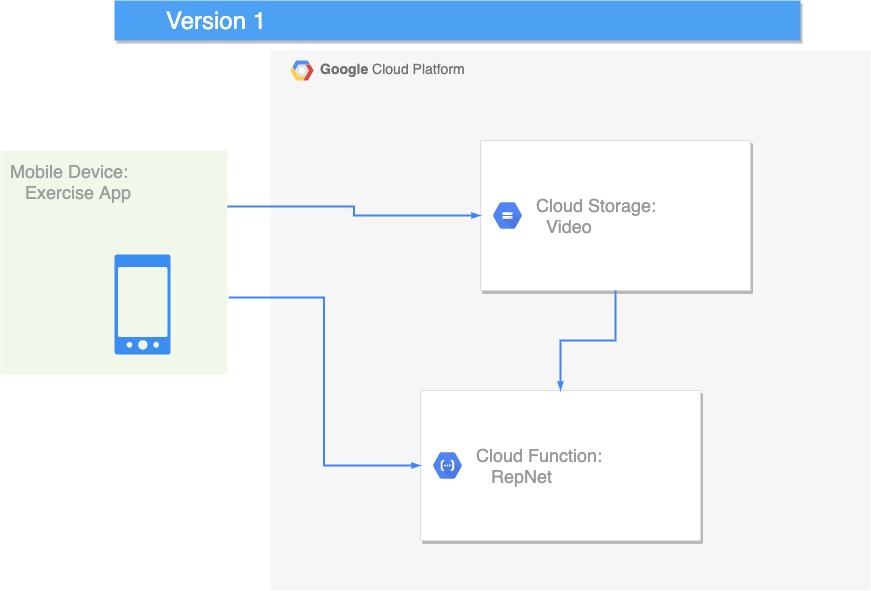
Unfortunately I overlooked the fact that the RepNet inference requires a GPU and didn’t check if Cloud Functions support GPUs – they don’t. Anyway below are some of the things I learnt along the way.
I had never written a Cloud Function in Python but Python has the most support for deep learning applications, so decided on Python for this project.
I used the gcloud command line tool to do my work from a local terminal, you could also use the online terminal which comes already setup or just use the GUI from the Google Console. You can activate the online terminal by selecting the icon at the top right of the Dashboard.
If you use gcloud locally these are useful to know to get started or when you work with multiple projects and switch between them often.
❯ gcloud config set project <PROJECT_NAME>
Updated property [core/project].
❯ gcloud auth login <YOUR EMAIL HERE>
Cloud Functions in Python are quite simple to write. You will need to create a file called requirements.txt which contains your library dependencies. Mine is as follows:
Pillow==6.0.0
opencv-python
numpy==1.18.5
tensorflow==2.3.0
tensorflow-probability
google-cloud-storage==1.33.0
The you write your program in a file called main.py.
You can deploy your code with a command similar to the one below:
❯ gcloud functions deploy repnet-1 --runtime python37 --trigger-http --entry-point repnet
Or if you need more memory (as I did) specify that option as shown below:
❯ gcloud functions deploy repnet-1 --runtime python38 --trigger-http --entry-point repnet --memory 2048
I specify the entry-point which is the name of the Python method that is the entry point into my program. I specify Python 3.7. Although you can use later versions of Python for Cloud Functions, GCP has some requirements for Python 3.7 which I noticed when I started using the AI Platform later, so better to stick with 3.7 for AI work with GCP.
def repnet(request):
    """Bare bones implementation attempt at RepNet HTTP Cloud Function.
    Args:
        request (flask.Request): The request object. Contains the name of the video in Cloud Storage.
        <https://flask.palletsprojects.com/en/1.1.x/api/#incoming-request-data>
    Returns:
        The response text, contains the count of repetitions in the video.
        <https://flask.palletsprojects.com/en/1.1.x/api/#flask.make_response>.
    """
    from flask import abort

    request_json = request.get_json(silent=True)
    request_args = request.args

    if request_json and 'name' in request_json:
      name = request_json['name']
    elif request_args and 'name' in request_args:
      name = request_args['name']
    else:
        return abort(403)

    video_file = '/tmp/{}'.format(escape(name))
    download_blob(MOVIE_STORAGE, name, video_file)
    imgs, vid_fps = read_video(video_file)

    # print('Running RepNet...')
    # (pred_period, pred_score, within_period, per_frame_counts, chosen_stride) = get_counts(
    #     model,
    #     imgs,
    #     strides=[1,2,3,4],
    #     batch_size=20,
    #     threshold=THRESHOLD,
    #     within_period_threshold=WITHIN_PERIOD_THRESHOLD,
    #     constant_speed=CONSTANT_SPEED,
    #     median_filter=MEDIAN_FILTER,
    #     fully_periodic=FULLY_PERIODIC)
    # print('Visualizing results...')

    return 'Counts {}!'.format(getTotal(pre_frame_counts))
Here we see the bare bones of my Cloud Function. Google Cloud Functions for Python use the Flask Framework. You can see that I use the flask abort method if I don’t get the expected input, which is the name of the video file for input to RepNet.
I had planned to retrieve the video of the user doing an exercise and return a count of how many times the user had performed that exercise. The get_counts method is where the magic of RepNet actually does the counting. RepNet counts per frame of the video, the per_frame_counts variable, which is an array of doubles. The RepNet Colab notebook creates a video with the count displayed per frame, but I just wanted to add these to get the total count and return the total count to the user.
For Version 1 I converted the RepNet notebook to a Cloud Function. For this I referred to this document: https://cloud.google.com/blog/products/ai-machine-learning/how-to-serve-deep-learning-models-using-tensorflow-2-0-with-cloud-functions
One of the most important recommendations in that document is to not load your model every time the Cloud Function is called, instead use a global variable for your model. In this way the model gets loaded once the first time the Cloud Function is called and is reused thereafter. I implemented this as below:
PATH_TO_CKPT = '/tmp/repnet_ckpt/'
os.system('mkdir {}'.format(PATH_TO_CKPT))
os.system('wget -nc -P {} https://storage.googleapis.com/repnet_ckpt/checkpoint'.format(PATH_TO_CKPT))
os.system('wget -nc -P {} https://storage.googleapis.com/repnet_ckpt/ckpt-88.data-00000-of-00002'.format(PATH_TO_CKPT))
os.system('wget -nc -P {} https://storage.googleapis.com/repnet_ckpt/ckpt-88.data-00001-of-00002'.format(PATH_TO_CKPT))
os.system('wget -nc -P {} https://storage.googleapis.com/repnet_ckpt/ckpt-88.index'.format(PATH_TO_CKPT))

model = get_repnet_model(PATH_TO_CKPT)
I have a model global variable that stores the model downloaded from the original repnet_ckpt bucket in Google Storage used by the Colab notebook.
OK, ready to roll! Or so I thought.
It turns out that Cloud Functions do not support GPUs so I would need to find another solution for serving the RepNet model.
The Cloud Function can’t run my model but I still want a Cloud Function to act as an API interface to the model, so the next step would be basically just finding a way to separate the model part out from my Cloud Function…
While I’m on the subject of GPUs I did bother to check what machines Google offers with GPU capability: https://cloud.google.com/ai-platform/prediction/docs/machine-types-online-prediction#gpus
According to the document, GPUs are available on n1-standard-2 upwards but you can’t use auto-scaling with GPUs currently. Which is unfortunate because for cheap development I would like to auto-scale to zero machines when I’m not using the service. From the Google docs:
Specify GPUs when you create a model version. AI Platform Prediction allocates the number and type of GPU that you specify for each prediction node. You must manually scale prediction nodes for your version when you use GPUS. You can later change how many nodes are running, but you cannot currently use automatic scaling with GPUs.
Version 2: AI Platform Prediction
https://cloud.google.com/ai-platform/prediction/docs/online-predict
AI Platform Predictions enable you to make predictions on the Cloud. You need to upload your model to Google Storage and create a Model Resource and create a Model Version.
AI Platform Prediction deploy documents: https://cloud.google.com/ai-platform/prediction/docs/deploying-models
First I thought I may be able to simply deploy a new Model and Version and it would work.
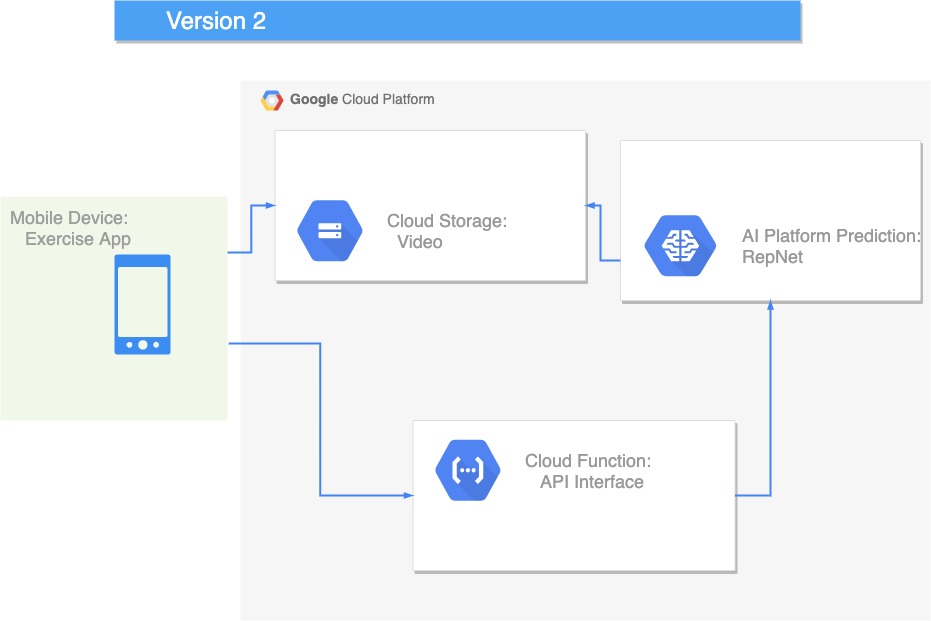
This was not possible for this RepNet because the RepNet algorithm requires data processing of the video input data and the model output data.
The good news is that from this stage I learnt about saving the trained model in a format suitable for the AI Platform.
We can save a model just by calling the save method:
PATH_TO_CKPT = '/tmp/repnet_ckpt/'
PATH_TO_SAVED_MODEL = '/tmp/repnet_model/'

model = get_repnet_model(PATH_TO_CKPT)
model.save(PATH_TO_SAVED_MODEL)
You can also specify a location in Google Storage to save the model and you can also specify a different format such as H5. The default format is called SavedModel. AI Platform typically serves models in either the default tensorflow format or H5, but it will not serve models just saved as checkpoint data, since this format does not preserve the model architecture.
Below is an analysis of my saved model that shows the architecture.
❯ python summarize_model.py
2021-01-08 14:26:53.379293: I tensorflow/core/platform/cpu_feature_guard.cc:142] This TensorFlow binary is optimized with oneAPI Deep Neural Network Library (oneDNN)to use the following CPU instructions in performance-critical operations:  AVX2 FMA
To enable them in other operations, rebuild TensorFlow with the appropriate compiler flags.
2021-01-08 14:26:53.397226: I tensorflow/compiler/xla/service/service.cc:168] XLA service 0x7fc1d9eb90a0 initialized for platform Host (this does not guarantee that XLA will be used). Devices:
2021-01-08 14:26:53.397246: I tensorflow/compiler/xla/service/service.cc:176]   StreamExecutor device (0): Host, Default Version
Model: "resnet_period_estimator"
_________________________________________________________________
Layer (type)                 Output Shape              Param #
=================================================================
functional_1 (Functional)    (None, None, None, 1024)  5209600
_________________________________________________________________
conv3d (Conv3D)              multiple                  14156288
_________________________________________________________________
batch_normalization (BatchNo multiple                  2048
_________________________________________________________________
conv2d (Conv2D)              multiple                  320
_________________________________________________________________
dense (Dense)                multiple                  1049088
_________________________________________________________________
dense_1 (Dense)              multiple                  1049088
_________________________________________________________________
transformer_layer (Transform multiple                  1577984
_________________________________________________________________
transformer_layer_1 (Transfo multiple                  1577984
_________________________________________________________________
dropout_4 (Dropout)          multiple                  0
_________________________________________________________________
dense_14 (Dense)             multiple                  262656
_________________________________________________________________
dense_15 (Dense)             multiple                  262656
_________________________________________________________________
dense_16 (Dense)             multiple                  16416
_________________________________________________________________
dense_17 (Dense)             multiple                  262656
_________________________________________________________________
dense_18 (Dense)             multiple                  262656
_________________________________________________________________
dense_19 (Dense)             multiple                  513
=================================================================
Total params: 25,690,081
Trainable params: 25,673,313
Non-trainable params: 16,768
_________________________________________________________________
From the above we can see the architecture of the saved RepNet model. Below is the Python code that creates these layers in the model:
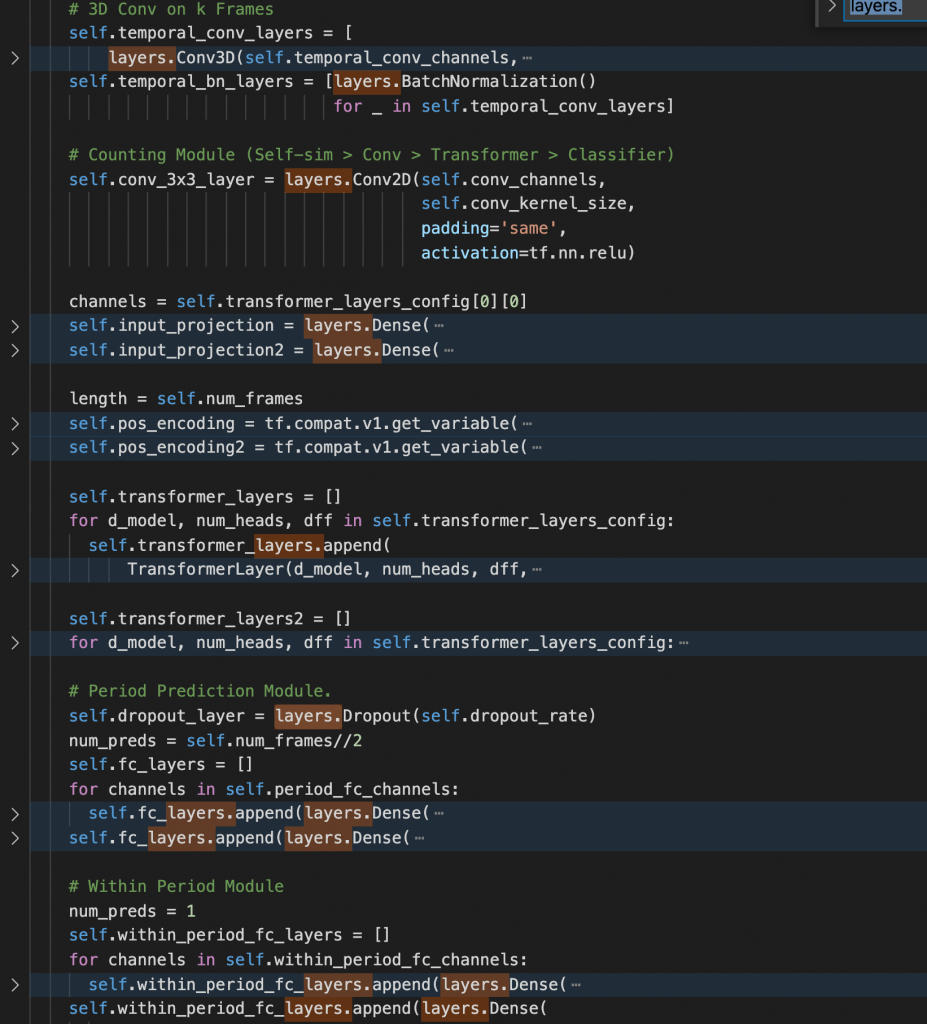
The code to retrieve the above network layer information is quite simple:
import tensorflow as tf

PATH_TO_SAVED_MODEL = '/tmp/repnet_model/'
model = tf.keras.models.load_model(PATH_TO_SAVED_MODEL, compile=False)
model.summary()
Version 3: Custom Prediction Routine
According to this document if I want to add data processing to the input or output data I should go with a Custom Prediction Routine, according to the documentation:
To create a custom prediction routine, you must provide two parts to AI Platform Prediction when you create your model version:
- A model directory in Cloud Storage, which contains any artifacts that need to be used for prediction.
- A
.tar.gzPython source distribution package in Cloud Storage containing your implementation of the Predictor interface and any other custom code you want AI Platform Prediction to use at prediction time.
I decided it was better to first try out a Custom Prediction Routine using a simpler model than RepNet, so I implemented the Iris Predictor based on the official custom prediction routine tutorial: Creating a custom prediction routine with Keras.
❯ gcloud beta ai-platform versions create $VERSION_NAME \
  --model $MODEL_NAME \
  --runtime-version 2.3 \
  --python-version 3.7 \
  --origin gs://$BUCKET_NAME/custom_prediction_routine_tutorial/model/ \
  --package-uris gs://$BUCKET_NAME/custom_prediction_routine_tutorial/my_custom_code-0.1.tar.gz \
  --prediction-class predictor.MyPredictor
Please specify a region:
 [1] global
 [2] asia-east1
 [3] asia-northeast1
 [4] asia-southeast1
 [5] australia-southeast1
 [6] europe-west1
 [7] europe-west2
 [8] europe-west3
 [9] europe-west4
 [10] northamerica-northeast1
 [11] us-central1
 [12] us-east1
 [13] us-east4
 [14] us-west1
 [15] cancel
Please enter your numeric choice:  11

To make this the default region, run `gcloud config set ai_platform/region us-central1`.

Using endpoint [https://us-central1-ml.googleapis.com/]
ERROR: (gcloud.beta.ai-platform.versions.create) FAILED_PRECONDITION: Field: framework Error: Machine type n1-standard-2 does not support CUSTOM_CLASS.
- '@type': type.googleapis.com/google.rpc.BadRequest
  fieldViolations:
  - description: Machine type n1-standard-2 does not support CUSTOM_CLASS.
    field: framework
As can be seen from the above output I wasn’t able to create a Custom Prediction Routine on the default machine (n1-standard-2). This is because Custom Prediction Routines are only supported on the legacy type machines as shown here: https://cloud.google.com/ai-platform/prediction/docs/machine-types-online-prediction#available_machine_types
If you do the same tutorial you must remember to specify a legacy machine type when creating the version:
gcloud beta ai-platform versions create $VERSION_NAME \
 --model $MODEL_NAME \
 --runtime-version 2.3 \
 --python-version 3.7 \
 --origin gs://$BUCKET_NAME/custom_prediction_routine_tutorial/model/ \
 --package-uris gs://$BUCKET_NAME/custom_prediction_routine_tutorial/my_custom_code-0.1.tar.gz \
 --prediction-class predictor.MyPredictor \
 --machine-type=mls1-c1-m2
Version 4: Using an AI Platform Custom Docker Container
This is where I ran out time, but seems the most promising solution. According to the documentation Custom Containers support GPUs and give you the freedom to run any type of model with any type of data processing which are my two main requirements.
Summary: The Devil is in the details
The two main requirements, RepNet requires a GPU, and the data needs pre-processing and post-processing, caused some headaches.
Cloud Functions were rule out because they don’t support the GPU requirement.
I couldn’t just use the standard type of AI Platform inference model because this doesn’t allow data processing before or after inference. After realizing the standard AI Platform inference model was not going to work I decided to try Custom Prediction Routines.
Then I realized Custom Prediction Routines are only available on the legacy machine types. And legacy machine types do not support GPUs.
So my current plan is to implement a Custom Container to run my model and perform the extra data processing steps required.
次世代システム研究室では、グループ全体のインテグレーションを支援してくれるアーキテクトを募集しています。インフラ設計、構築経験者の方、次世代システム研究室にご興味を持って頂ける方がいらっしゃいましたら、ぜひ募集職種一覧からご応募をお願いします。
皆さんのご応募をお待ちしています。
グループ研究開発本部の最新情報をTwitterで配信中です。ぜひフォローください。
Follow @GMO_RD